
Hang a friendly spirit by your doorway with the Crochet Halloween Ghost Free Pattern, a cute decoration for parties and October evenings.
On a chilly autumn evening, as the leaves begin to fall and the whispers of Halloween fill the air, there's something special about adding a handmade touch to your seasonal decor. A charming little ghost that brings a cozy and whimsical spirit to any room. This delightful figure isn’t just any decoration—it’s brought to life through a Crochet Halloween Ghost Pattern, expertly shared by Rajutan Aulia on YouTube. Full credit goes to the creator for this clear and easy-to-follow tutorial and the unique design.
Quick Crochet Halloween Ghost Free Pattern To Try This October
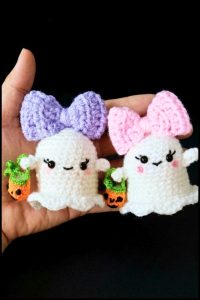
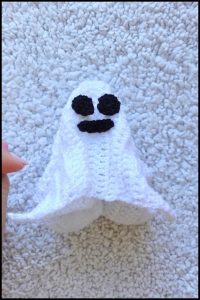
This Crochet Halloween Ghost is a soft, stuffed figure made with milk cotton yarn, showcasing a smooth yet textured feel that invites you to hold it close. Its rounded, slightly bulbous head tapers gently into a flowing ghostly body, accented by little arms and a tiny crocheted hat that adds character and charm. The pattern cleverly plays with stitches to create depth and dimension, giving the ghost a playful, slightly puffed texture that truly stands out as a spirited decoration.
Perfect as a handmade gift for friends and family who adore Halloween, this ghost can easily become a cherished keepsake. Its small size and soft texture make it a great ornament for shelves, desks, or mantels, bringing a warm festive charm to homes, offices, or even classrooms. Beyond decoration, the crochet ghost’s appearance—the friendly round eyes and the tiny hat—gives it a delightful personality, making it suitable for both children’s rooms and seasonal displays.
Whether used to brighten up your own space or given as a thoughtful seasonal present, this ghost combines style and heart in one simple yet beautiful design. It’s a lovely way to celebrate Halloween with warmth and creativity, bringing a touch of joyful spirit wherever it goes.
Spooky Crochet Halloween Ghost Free Pattern
This Halloween ghost plush adds a cheerful touch to seasonal decorating or gifting. With its structured base, ruffled skirt, detachable hat, and small arms, the plush offers a playful design that’s both tactile and visually appealing. By working in a series of precise rounds, increases, and decorative stitch combinations, you can achieve an endearing ghost form. Each section—from the body to the skirt and mini hat—is mapped out step by step, ensuring clarity and reliability throughout. The assembly process brings all elements together, resulting in a soft, finished piece that is suitable for hanging or display.
Quick Overview Of Pattern
- Begin with a magic ring and shape the ghost’s body using single crochet rounds.
- Increase and decrease strategically for shaping and structure.
- Work ruffles by attaching yarn to unused loops and combining various stitches.
- Crochet the arms separately and affix them with glue.
- Construct the mini hat with its own increase rounds and attach it to the ghost.
- Final steps include adding a chain strap for hanging or as a keychain.
Notes
- Always use a stitch marker to ensure the start of each round is clear and consistent.
- The body is firmly stuffed after the shaping rounds, prior to final closing.
- For the ruffle skirt, attention to front and back loop placement is essential.
- Rounds with slip stitches and chaining provide transitions for hat shaping.
- Arm and hat parts are attached using craft glue, simplifying assembly.
- Tails and ends are woven or trimmed carefully for a neat result.

Skill Level
Beginner to Advanced Beginner:
Core knowledge in magic ring, single crochet, increases, decreases, slip stitch, half double crochet, and double crochet recommended.
Materials
- Milk cotton yarn in three colors (main, accent, hat)
- No. 5 Tulip crochet hook
- Stitch marker
- Tapestry needle
- Dacron/polyfill stuffing
Measurements / Sizing
- Ghost body: Approx. 6–8 cm tall depending on tension and yarn.
- Ruffle skirt: 1–1.5 cm extension.
- Mini hat: 2–2.5 cm in diameter.
- Arms: Each about 1.5 cm long.
- Strap/loop: 28 chains long for hanging or keychain attachment.
Gauge (and Stitch Pattern)
Gauge is not critical; tight crochet is preferred to prevent stuffing from showing.
A typical gauge swatch:
- 6 sc x 6 rows = 2 cm square (with milk cotton and 5 Tulip hook).
Stitch Abbreviations
| Abbreviation | Meaning |
|---|---|
| MR | Magic Ring |
| sc | Single Crochet |
| inc | Increase (2 sc in one stitch) |
| dec | Decrease (sc2tog) |
| hdc | Half Double Crochet |
| dc | Double Crochet |
| sl st | Slip Stitch |
| ch | Chain |
Special Stitches
- Magic Ring (MR): Begin round work with an adjustable loop, anchoring all stitches.
- Increase (inc): Work 2 sc in one stitch to expand round count.
- Decrease (dec): Combine two stitches into one for shaping.
- Half Double Crochet (hdc), Double Crochet (dc): Used in ruffle sequence for texture.
- Back Loop Only (BLO): Insert hook into back loop for some shaping rounds; leaves front loops for ruffle attachment.
The Crochet Pattern
Main Body
- Round 1: Start with a magic ring and work 6 sc (6 sts). Place stitch marker at beginning of round.
- Round 2: Work 2 sc in each stitch around (increase). Finish with 12 sts.
- Round 3: Repeat (1 sc, 1 inc) sequence around. Finish with 18 sts.
- Round 4: Repeat (2 sc, 1 inc) sequence around. Finish with 24 sts.
- Rounds 5–9: Work 1 sc in each stitch around. Maintain 24 sts.

- Round 10: Work 1 sc in each stitch around, increasing total to 30 sts.
- Round 11: Working in the back loops only (BLO): Repeat (3 sc, 1 inc) sequence around. Finish with 24 sts.
- Round 12: Through both loops: Repeat (2 sc, 1 inc) sequence around. Finish with 18 sts.
- Round 13: Repeat (1 sc, 1 inc) sequence around. Finish with 12 sts.
- Stuffing: Stuff firmly with dacron/polyfill before closing.
- Round 14: Work 6 decreases (sc2tog) consecutively so 6 sts remain.
Finish with a slip stitch, cut yarn, and use a tapestry needle to weave in tail.

Ruffle Skirt Base
- Round 15: Attach yarn to unused front loops from Round 11. Repeat (4 sc, 1 inc) sequence around. Finish with 36 sts.
- Round 16: Repeat (5 sc, 1 inc) sequence around. Finish with 42 sts.
- Round 17 (Ruffle Edge): Work the following sequence in each repeat: 1 sc, 1 hdc, 1 dc, 1 hdc, 1 sc, 1 sl st—continue this sequence into subsequent stitches until end of round. Fasten off.

Arms (Make Two)
- Round 1: Make a magic ring and work 5 sc (5 sts).
- Round 2: Repeat (1 sc, 1 inc) twice; in last remaining stitch, work 1 sc. Total 7 sts.
- Round 3: Work 1 sc in each stitch around (7 sts). Finish with a slip stitch, cut yarn, and leave a clean end for gluing.
Mini Hat
- Round 1: Make a magic ring and work 6 sc.
- Rounds 2–4: Each round: sl st, ch 1, then 1 sc in each stitch around (maintain 6 sts).
- Round 5: Repeat (2 sc, 1 inc) sequence around.
- Round 6: sl st, ch 1, then repeat (1 sc, 1 inc) around (12 sts).
- Round 7: Repeat (2 sc, 1 inc) sequence around (16 sts).
- Round 8: Repeat (3 sc, 1 inc) sequence around (20 sts). Finish with sl st and cut yarn.

Assembly & Strap
- Attach arms and secure mini hat with craft glue to the stuffed body.
- Sew facial embroidery eyes.

- Add blush using pink yarn
- For the strap or keychain loop, chain 28 stitches and fasten ends as desired, attaching securely.

Conclusion and Ending Words
This Halloween ghost plush is built with a clear sequence of sculptural rounds, decorative ruffles, and precise increases. The separate mini hat and arms bring playful personality, while the soft stuffing and neat seam finishing provide structure and warmth. Strategic use of front and back loops creates an appealing skirt effect, distinct from the rounded body. All elements are straightforward to assemble, and the final strap allows the plush to be shown as a festive charm. With tight stitches and thoughtful construction, this project highlights both technique and a delightful seasonal motif. The completed plush works well as a gift, display, or keychain, adding cheerful flair to autumn settings.

Leave a Reply