
Keep your cup space clean with this free crochet pumpkin car coaster pattern that lets you create a soft and colorful coaster perfect for daily drives.
Fall in Love with This Free Crochet Pumpkin Car Coaster Pattern
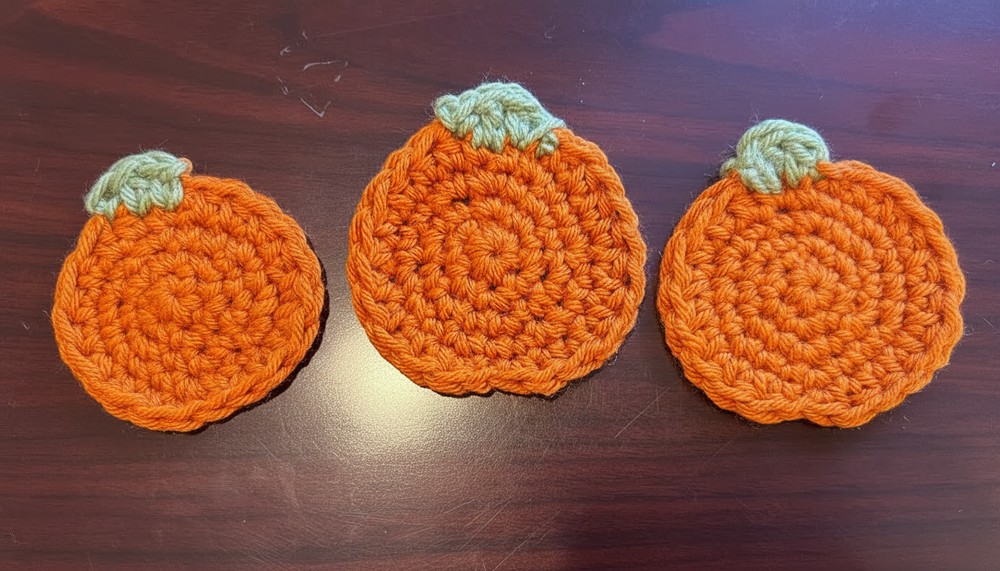
Turn your car into a magical autumn haven with this bright orange pumpkin mat that fits perfectly inside your cup holder. This adorable coaster looks just like a tiny pumpkin plucked straight from the farm, featuring a round, flat shape with a delightful green stem on top.
With the Free Crochet Pumpkin Car Coaster Pattern, you can create this festive and cheerful accessory with ease—even if you’re new to crocheting. The soft yarn and charming design add cozy fall vibes to your car while keeping it clean and stylish at the same time. This sturdy coaster is perfect for catching drips from your cold drinks and small enough to fit in any car—or even on your work desk. Use it as a lucky charm for your travels or as a thoughtful handmade gift for someone who loves the fall season.
Cute Crochet Pumpkin Car Coaster Pattern
Materials Needed
Ensure you have the following tools and supplies before beginning the project:
- Yarn:
- Yarn Bee Soft and Sleek in Pumpkin Spice (orange color)
- Sage green yarn (or a similar shade for the pumpkin stem)
- Crochet Hook: 5mm crochet hook
- Other Tools:
- Scissors
- Tapestry needle
- Stitch marker
Special Technique: Magic Circle
Instructions:
- Creating the Magic Circle:
- Lay the yarn over your palm to form an "X."
- Insert the hook under the first strand of yarn and grab the second strand.
- Pull the yarn through to form a loop and twist the hook to secure the loop.
- Pull the working yarn through to make the magic circle.
(If needed, refer to a dedicated video or resource for practicing the magic circle.)
Pattern Instructions
Base of the Coaster (Pumpkin)
- Row 1:
- Create a magic circle.
- Single crochet (SC) 6 times into the circle.

- Pull the tail to tighten the circle and close the gap.
- Slip stitch (SL ST) into the first SC to complete the row.

- Row 2 – Increases:
- Work 2 SC into each stitch around (this is called an "increase").
- At the end of this row, you will have 12 stitches.
- Row 3 Single and Increases:
- SC in the first stitch, then increase in the next stitch (SC 1, 2 SC in the next).

- Repeat this pattern (SC, increase) around the row.
- By the end of this row, you should have 18 stitches in total.
- SC in the first stitch, then increase in the next stitch (SC 1, 2 SC in the next).
- Row 4 Two Singles and Increases:
- SC in the first stitch, SC in the second stitch, and increase in the third (SC 1, SC 1, 2 SC in the next).

- Repeat this pattern (2 SC, 1 increase) around.
- At the end of this row, you will have 24 stitches.

- SC in the first stitch, SC in the second stitch, and increase in the third (SC 1, SC 1, 2 SC in the next).
- Forming the Pumpkin Ribs Half Double Crochets:
- Work 10 half double crochets (HDC), one in each of the next 10 stitches.
- SL ST into the next stitch to secure the section.
- Repeat HDC Section:
- Work another 10 half double crochets (HDC) in the next 10 stitches.
- Again, SL ST into the next stitch to complete the ribbed sections.

Stem and Color Change
- Switch to Green Yarn:
- To join the green yarn for the stem, go into the next stitch with the hook, pull in the green yarn, and SL ST to secure it.
- Tighten the orange yarn to ensure a clean color change.

- Creating the Stem:
- Work 2 double crochets (DC) into the first green stitch.
- Repeat for a second DC in the next stitch.
- SL ST into the following stitch to close the stem.
- Cutting and Securing:
- Pull the yarn through the final loop and cut it.
- Tie a knot to prevent unraveling.

Finishing the Coaster
Cleaning the Stem Edges:
- Use the tapestry needle to tidy up loose ends, especially at the color transition point (orange to green).
- Insert the needle under the green stitches and adjust as needed to blend the color changes.
- Use a cross stitching motion to secure both colors and create a neat appearance.
- Weave the loose ends securely into the back of the work to maintain durability.
Final Words and Tips for Maintaining the Pattern
- Blocking: Lightly block the coasters to ensure they maintain a flat, even shape.
- Care Instructions: Use gentle hand washing or a delicate cycle in a mesh bag for easy cleaning. Avoid heavy agitation to preserve the texture.
- Yarn Choice: For a brighter or more muted coaster, experiment with variations in yarn color and texture. Ensure the yarn weight and hook size match.
- Additional Options: You can increase or decrease rounds to customize the coaster size to better fit your specific needs.
Conclusion
Congratulations on completing the pumpkin car coaster. This adorable and functional decor piece is ideal for adding a festive touch to your car or gifting to loved ones during the fall season. With proper care, your handcrafted coaster will be a favorite for years to come.


Leave a Reply