
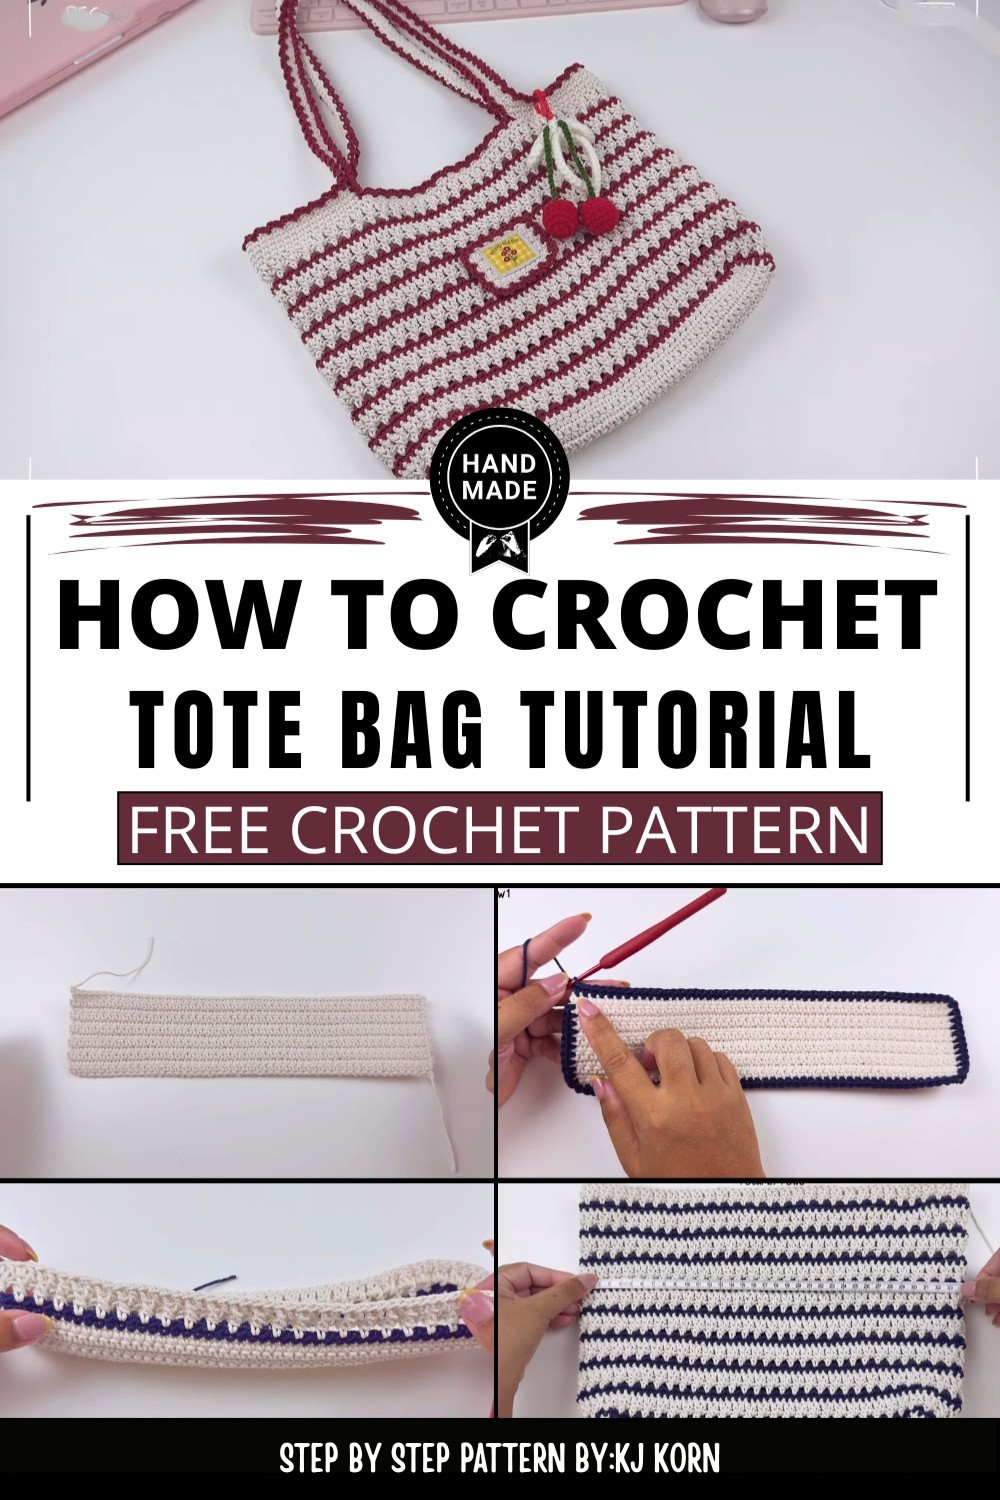
Eco-Friendly and Stylish Crochet Tote Bag For Daily Use
Carry style and sustainability effortlessly with the Crochet Tote Bag Pattern, perfect for everyday use and eco-friendly fashion lovers.
In bustling markets and quiet seaside strolls, a reliable tote can become a cherished companion. This versatile accessory balances practicality and style, making everyday errands feel a little more special. Its spacious interior effortlessly accommodates everything from fresh produce to books, while sturdy handles ensure comfort during long carries. The open, airy stitches offer both durability and a lightness that’s perfect for warmer days, allowing the bag to hold its shape without weighing you down.
Modern Crochet Tote Bag with a Touch of Classic Charm
With subtle textures and a timeless silhouette, this tote adapts seamlessly to various outfits and occasions—whether paired with casual jeans or a breezy summer dress. The breathable construction promotes ease of use, while the handmade touch brings a warmth that machine-made bags often lack. Beyond mere function, it also encourages a sustainable lifestyle by reducing dependence on single-use bags.
Whether for a weekend getaway or daily use, this tote bag is an ideal companion, blending utility with understated beauty. Its simple elegance and dependable structure make it a practical choice for those who appreciate both style and conscience in their accessories. This is more than just a bag—it’s a thoughtful addition to everyday life, ready to accompany you wherever you go.
Materials Needed
- Yarn: 2 mm cotton rope (300 grams). The main color will use slightly more yarn.
- Crochet Hook: Size 5/0 or 3 mm.
- Tools: Scissors, yarn needle, and stitch markers.
- Optional: A "handmade" tag to elevate the tote’s look.


Step-by-Step Details
1. Special Features of the Tote Bag
- Dimensions: Width: 33 cm; Height: 26 cm.
- Design: The bag combines patterns of single crochet and decorative criss-cross stitches.
- Straps: Long and adjustable straps are added for convenience.
- Customizable: The size and colors can be easily modified.
- Finishing Touch: Includes an option to add aesthetic touches like a handmade tag for personalization.
3. Step-by-Step Process
A. Crafting the Base of the Bag
- Start with a slip knot and crochet 50 chains (or any even number for a larger/smaller base). This creates a base of approximately 26 cm.
- Work on Row 1 by making a single crochet in the second chain from the hook and continue to the end of the row.
- Row 2: Chain 1, turn, and repeat single crochets across the row.

- Continue for 12 total rows, ending with a base of 28 cm by 6.5 cm.

B. Starting the Body of the Bag
- Change to the second yarn color to begin the body. Create a seamless join using a slip knot.
- Row 1: Single crochet around the entire border of the base (10 on short sides, 50 on long sides). Adjust any uneven stitches with a needle.

- Pattern Design:
- Row 2: Use a half-double crochet (hdc) and chain-1 combination in alternating spaces around.
- Row 3: Create a criss-cross pattern using double crochet stitches by skipping and working into previous spaces.
- Repeat Rows 2–3 for decorative texture. Create 3-row pattern sets and alternate yarn colors for dynamic visuals.
- Continue to crochet and repeat pattern sets until the body reaches the desired height (27 rows or approximately 23 cm tall).

C. Adding the Final Rounds
- Row 28: Single crochet into each stitch for a clean edge. This prepares the bag for the straps.
- Adjust the size—add or reduce rows per your preferred height.
D. Crocheting the Straps and Their Edges
- Find the center of the bag and mark the placement for the straps using stitch markers.
- Strap Width: Count 17 stitches for each strap. The straps are connected symmetrically on opposite sides of the bag.
- Strap Length: Chain 100 chains (or adjust for personal preference) to create long straps.
- Reinforce straps by crocheting into the back bumps for strength.

E. Adding Edging to the Straps
- For a neat finish, edge the straps with a decorative chain-2, skip 1 stitch, slip stitch pattern. Perform this edging on both the outer and inner edges of the strap.
- Secure all loose yarn tails using a needle to weave them into the work.

4. Tutor’s Suggestions
- Beginner-Friendly: The pattern works perfectly for beginners. Use stitch markers to keep track of rows and stitches.
- Customizations: Increase the bag size by adding more base chains or rows. Alternating yarn colors creates exciting designs.
- Alternative Joining: Choose the weaving method to close seams if cutting and weaving yarn after every row isn’t preferred.
5. Uses of the Bag
- Daily Use: A stylish and sturdy tote for grocery shopping, carrying books, and daily errands.
- Gift Idea: A beautiful handmade gift with customizable colors and patterns.
- Decorative: Add aesthetic tags or accessories like tassels to make it unique.
Difficulty Level
The project is beginner to intermediate level. While basic stitches like single crochet are used, the criss-cross double crochet stitch and edging require some attention to detail.
Conclusion
This crochet tote bag project is a rewarding project that allows you to create a personalized and functional item. It is a step-by-step process that accommodates beginners and can be customized to your preferences. By the end of the pattern, you will have a durable and stylish tote bag. Don’t forget to add your creative flair with new colors and additional embellishments!
Tip for Success
Take your time with the stitch joins and weaving. A neat finish will greatly enhance the final look and professionalism of your project. Additionally, always weave in yarn ends securely to ensure the durability of your bag.