
Free Crochet Arm Warmer Sweater Pattern To Keep You Warm
Wrap yourself in style and warmth with a cozy arm warmer sweater that’s for chilly days, both fashionable and functional with an easy crochet guide.
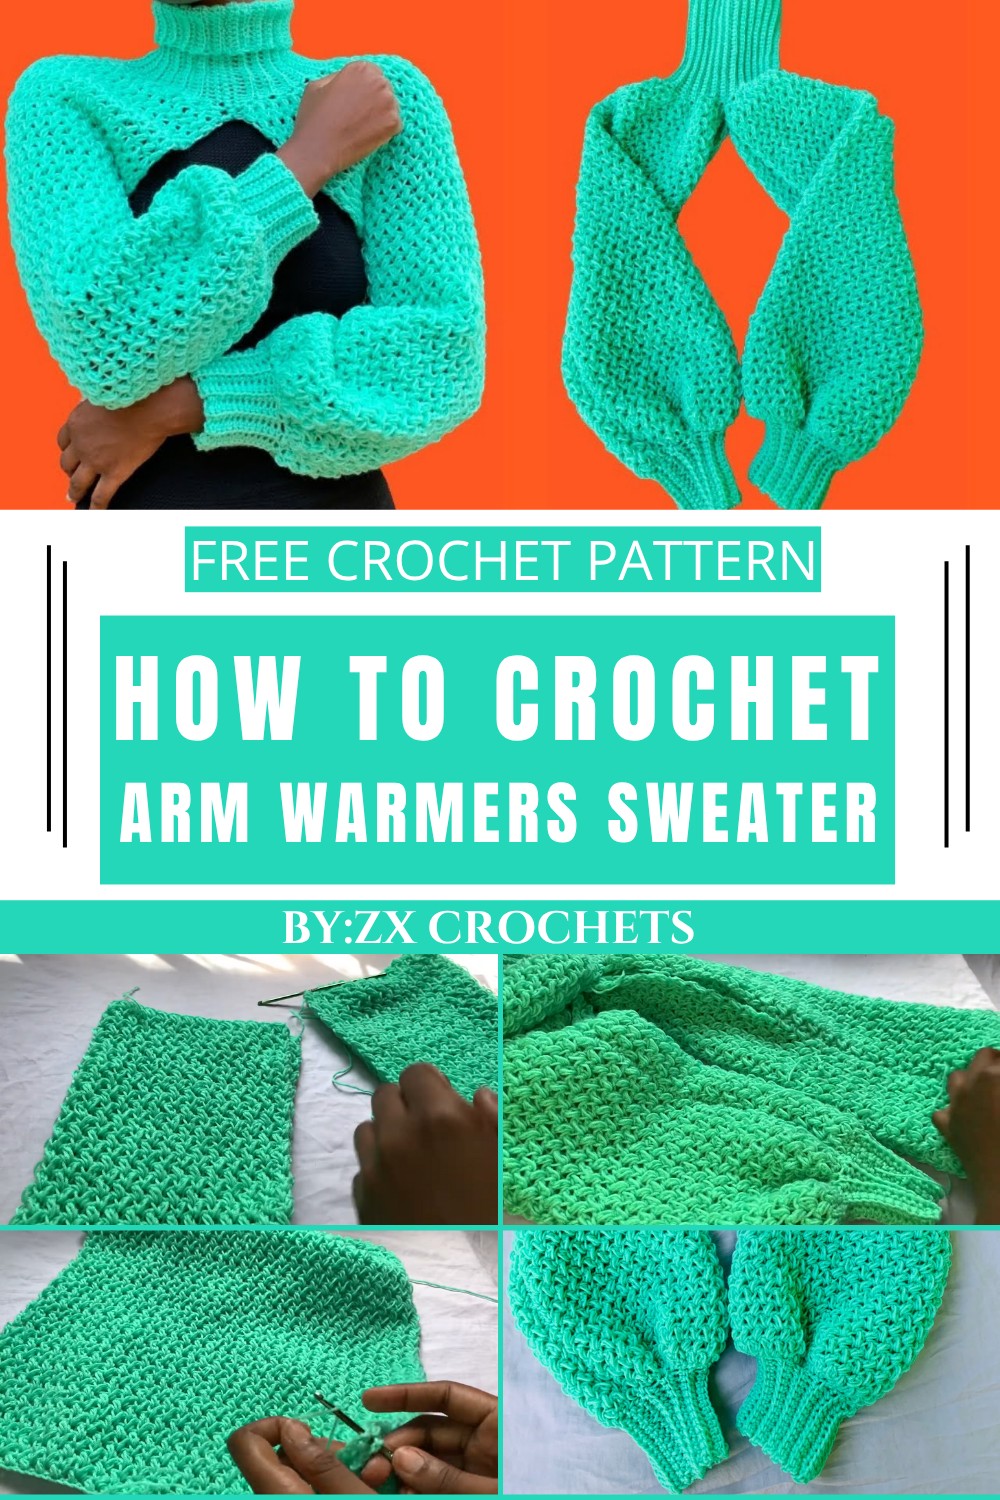
Free Crochet Arm Warmer Sweater Pattern for Your Winter Project
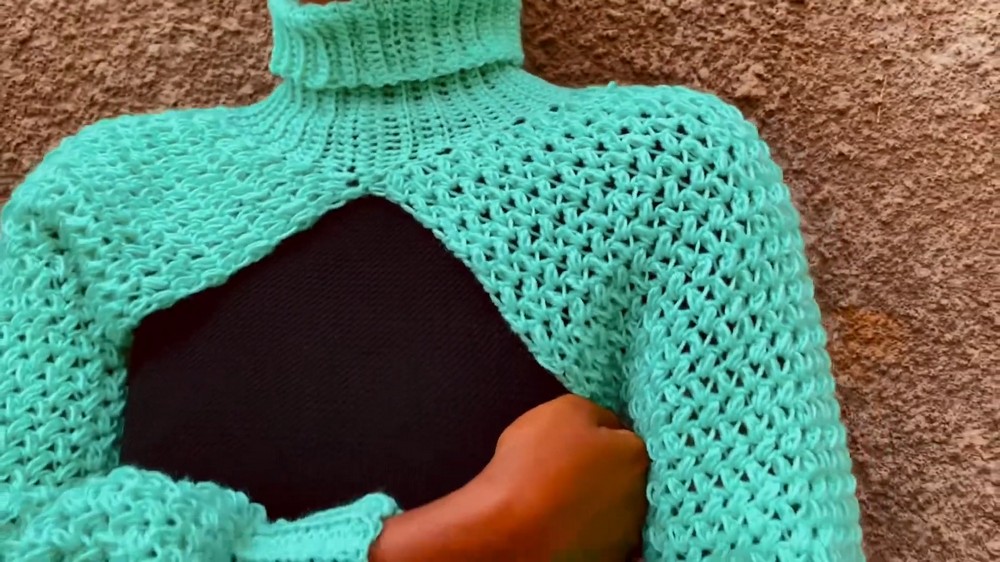
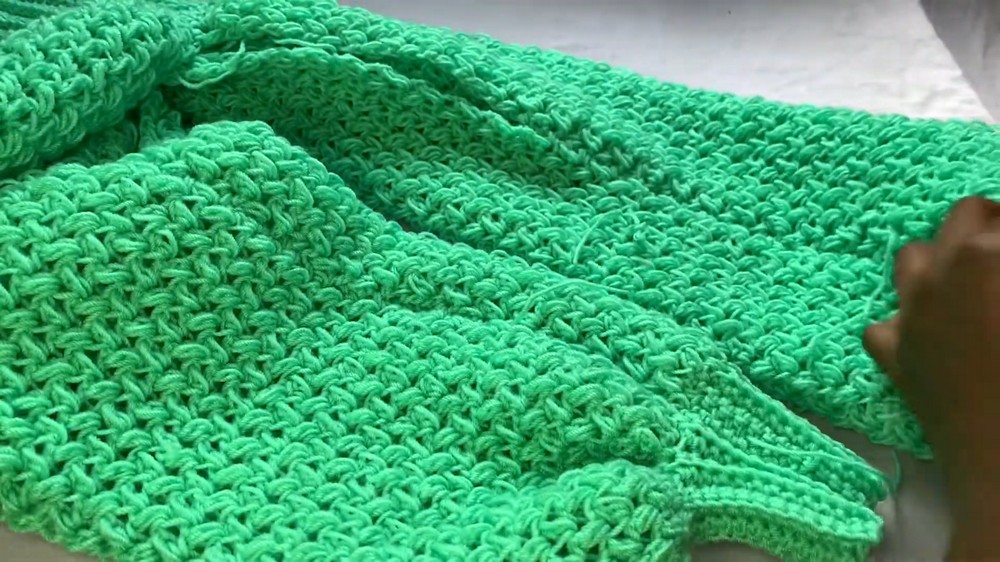
There’s nothing more versatile and cozy than a unique accessory that blends warmth and style perfectly. An arm warmer sweater brings a touch of elegance to chilly days, wrapping your arms snugly while letting your style shine. With a free crochet arm warmer sweater pattern, you can create a piece that stands out with its delicate texture and modern flair. From running errands to relaxing at home, it’s the ultimate companion for layering over your favorite outfits. The beauty lies in its simplicity—soft yarn, intricate stitches, and a design that feels both lightweight yet warm. Its appearance is sleek and fashionable, making it ideal for casual looks or even dressier occasions. Whether enjoying a crisp fall morning or needing extra comfort in winter, this piece combines function and fashion perfectly. It’s easy to crochet and even easier to love, offering both charm and practicality in one wearable masterpiece.
Materials Required
Yarn:
- 4-ply acrylic yarn for a lightweight but warm sweater.
- Example: Winter Kingdom, 100% acrylic.
- Approximate quantity: 400–500g, depending on size.
Crochet Hook:
- 4.5 mm hook: For the body of the sweater.
- 4 mm hook: For ribbing and finishing details.
Other Tools:
- Scissors: For trimming excess yarn.
- Tape Measure: To measure lengths for custom sizing.
- Stitch Markers: Optional, to mark the beginning of rounds or rows.
Special Techniques & Stitches
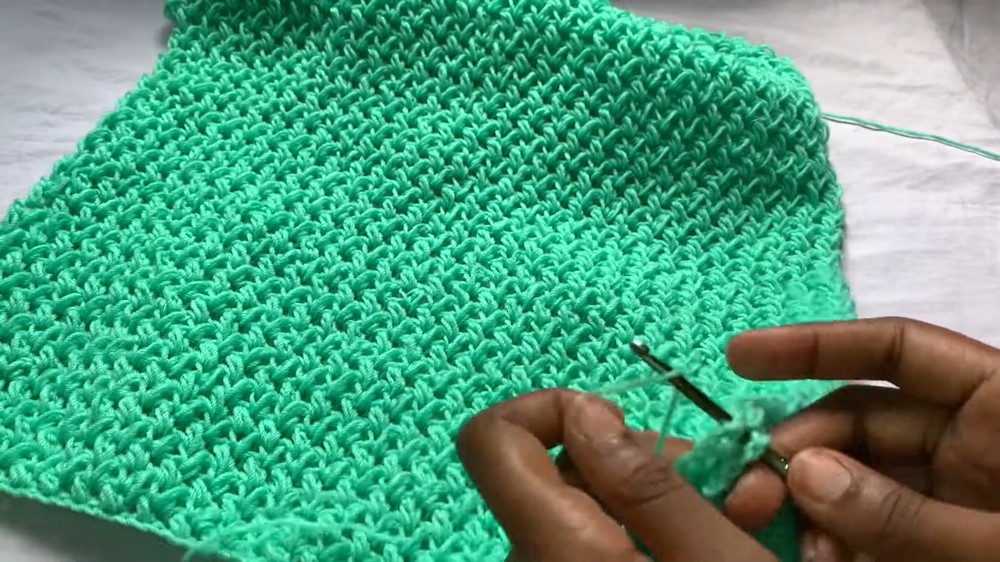
Bean Stitch (Puff Stitch):
- Insert your hook into the indicated stitch.
- Pull up a loop (2 loops on hook).
- Yarn over (YO) and insert the hook into the same stitch again.
Pull up another loop (4 loops on hook). - YO and pull through all 4 loops.
- Chain 1 to close the stitch.
Note: For this pattern, work the Bean Stitch into the space immediately after the previous Bean Stitch, not into chain spaces.
Single Crochet in Back Loop Only (Ribbing):
- Insert your hook into the back loop of the stitch (loop furthest from you).
- Yarn over, pull up a loop. Yarn over again, pull through both loops on the hook.
- Creates flexible ribbing, ideal for cuffs and edges.
Gauge
- Gauge for the Bean Stitch: 12 stitches x 10 rows = 4 inches (10 cm).
- Adjust hook size to meet the gauge if necessary.
Finished Size
- The finished sweater size is customizable based on your measurements.
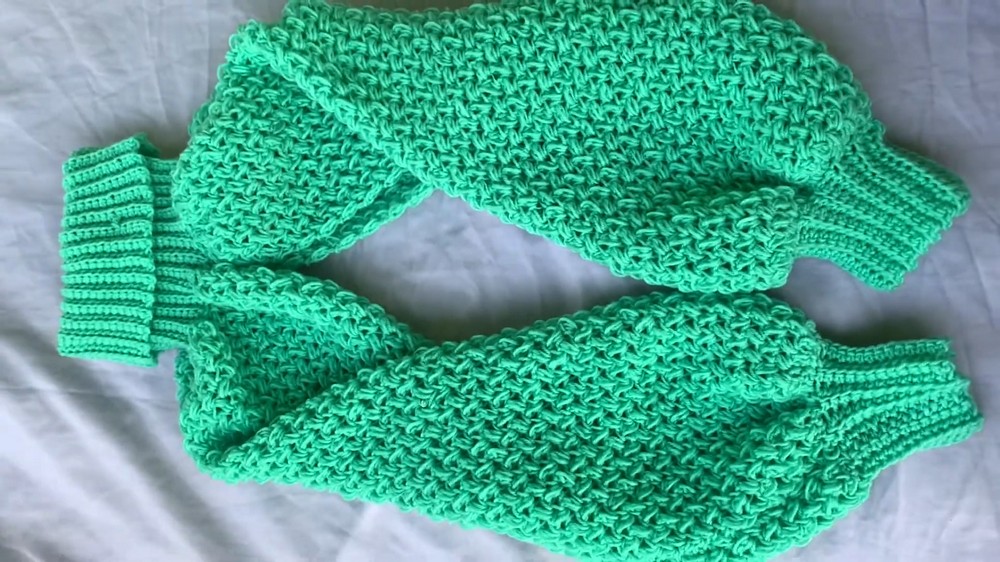
- For the demo, the sweater was 15 inches wide (unstretched) and stretches up to 28 inches in circumference.
Step-by-Step Pattern
Part 1: The Body
- Foundation Chain:
- Start with a slip knot and chain in multiples of 2 until your chain measures the desired width of your sweater.
- Example: Chain 60 stitches for a 15-inch width.
- Ensure a slightly loose tension for flexibility.
- Start with a slip knot and chain in multiples of 2 until your chain measures the desired width of your sweater.
- Row 1 (Bean Stitch Row):
- Skip the first chain (closest to the hook) and insert into the second chain to begin the Bean Stitch.
- [Work a Bean Stitch as described above, chain 1, skip the next chain, and repeat].
- Continue across the row. At the end of the row, turn your work.
- Rows 2 – Desired Length:
- Turn your work. Do not work into the chain-1 spaces. Instead, insert into the space immediately after the previous Bean Stitch.
- Repeat the Bean Stitch pattern to build your rows until the sweater body has reached your desired length.
- Example Length: 26 inches (up to 28 inches when stretched).
- Example Length: 26 inches (up to 28 inches when stretched).
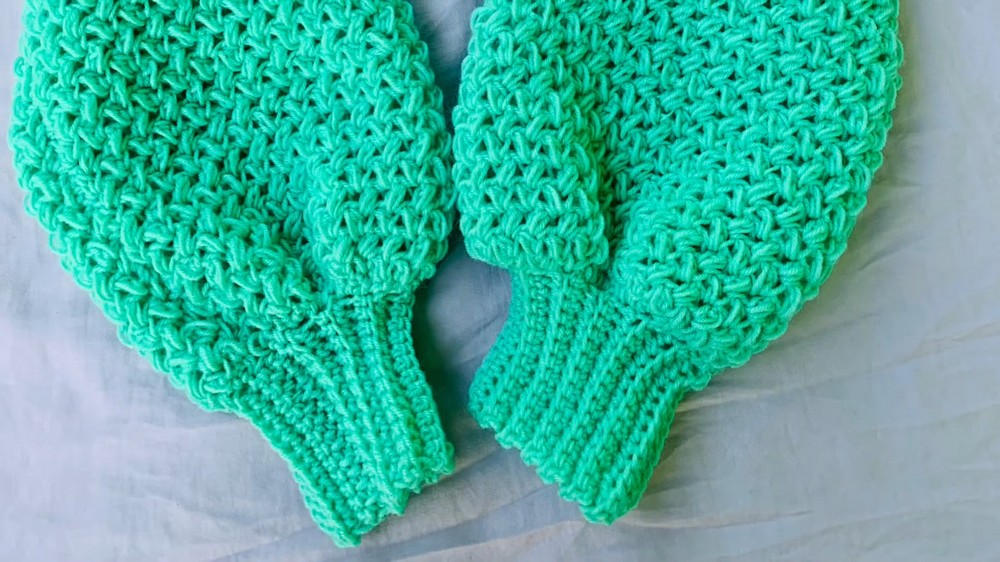
Part 2: The Ribbed Edging (Sleeves)
- Foundation Chain:
- Make a slip knot and chain 14 stitches (approximately 3 inches wide for the ribbed edging).
- Row 1:
- Starting in the second chain from the hook, work 1 single crochet (sc) in each chain. Turn your work.
- Row 2 onward:
- Work 1 sc in the back loop only across all stitches.
- Repeat this row until the ribbing reaches 9 inches (24 rows) or fits the desired circumference of your arm opening.
- Attachment:
- Attach the ribbing to the arm opening of the body using a single crochet seam method, working stitches in a 1:3 ratio:
- Attach 1 ribbing stitch to every 3 stitches from the sleeve opening for an even gathering effect.
- Attach 1 ribbing stitch to every 3 stitches from the sleeve opening for an even gathering effect.
- Attach the ribbing to the arm opening of the body using a single crochet seam method, working stitches in a 1:3 ratio:
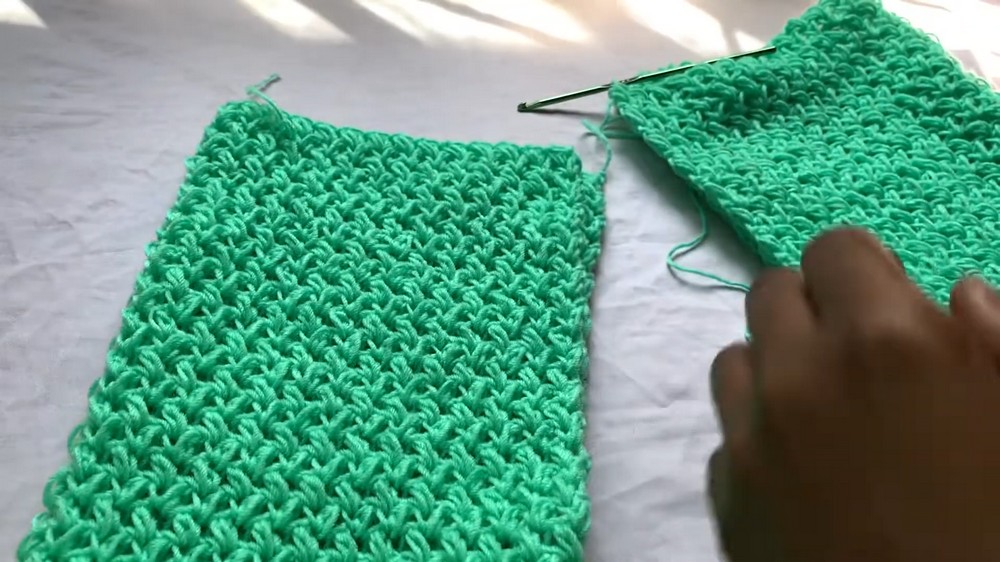
Part 3: Attaching the Sleeves to the Body
- Seaming the Sleeves:
- After attaching the ribbing, fold the sleeve in half (lengthwise) and seam it together using the single crochet seam or a yarn needle.
- Leave a 16-inch unstitched gap for the armhole if following the exact tutorial measurements.
- Repeat:
- Create and attach a second sleeve using the same method.
Part 4: Creating the Turtle Neck Collar
- Foundation Chain:
- Using a 4 mm hook, attach yarn at the neckline and chain 34 stitches (approximately 10 inches long).
- Row 1:
- Single crochet (sc) in the second chain from the hook, and sc across the row into each chain. Turn your work.
- Row 2 onward:
- Work 1 sc in the back loop only (BLO) across the row to create the ribbed effect.
- Once you complete the row, turn your work and repeat until a circular collar is formed around the neckline.
- Attachment:
- Use slip stitches or single crochet to attach the ribbing to the neckline.
- Seaming:
- Seam the ends of the collar together with a single crochet seam or slip stitch.
- Seam the ends of the collar together with a single crochet seam or slip stitch.
Part 5: Final Assembly
- Finished Seams:
- Complete all seams on the wrong side for a neat appearance.
- Flip the piece inside out once everything is stitched together.
- Weave in Loose Ends:
- Use your darning needle to weave in any loose yarn ends to prevent unraveling.
Tips to Maintain the Pattern
- Consistency in Stitch Tension:
Maintain a consistent tension while working the Bean Stitch to avoid uneven rows. - Customizing Size:
- Adjust the foundation chain length for a wider or narrower sweater.
- Work fewer or additional rows to adjust the sleeve length, body width, or collar height.
- Joining Ribbing:
The 1:3 or 1:4 stitch ratio ensures ribbing properly conforms to the arm or body openings without pulling or puckering.
Final Words & Customization Tips
Congratulations on completing your beautiful Bean Stitch Crochet Pullover! This sweater combines a beginner-friendly stitch technique with elegant ribbed details. Its versatility allows you to customize to any size and even create variations, such as sleeveless versions or cropped cuts.
Enhancements & Ideas:
- Experiment with color changes to make stripes or gradients in the sweater.
- Add additional ribbing at the waist for an extra-snug fit.
- Try metallic or wool-blend yarns for a luxurious winter sweater.
Care Instructions:
- Hand-wash or machine-wash on a gentle cycle using cold water. Dry flat to maintain the sweater’s shape.