
Choose a fall accessory with this Crochet Halloween Pumpkin Badge Free Pattern and stitch a cute badge for bags and cozy sweaters.
There’s something truly special about creating small personal accessories that can brighten up a day or add a unique touch to any outfit. Imagine making a charming decoration that celebrates the spirit of autumn in a fun and cozy way. This is exactly what you get with the delightful Crochet Halloween Pumpkin Badge Pattern, shared by AnDesign_Craft on YouTube, whose tutorial and design deserve full credit for this wonderful project. This badge is a small yet eye-catching accessory perfect for Halloween lovers or anyone who enjoys seasonal decorations.
Mini Crochet Halloween Pumpkin Badge Free Pattern As A Party Favor
The Crochet Halloween Pumpkin Badge Pattern offers a fantastic opportunity to add a festive highlight to your clothes, bags, or hats. It’s not just an item for personal use; its cute and vibrant design makes it an ideal handmade gift for friends, family, or colleagues around the Halloween season. This little pumpkin badge carries warm autumn vibes and can also brighten your home when pinned to curtains, pillows, or even used as a small ornament.
Visually, the pumpkin badge stands out with a round pumpkin shape that is instantly recognizable and charming. The texture feels soft yet sturdy, thanks to the yarn used, giving it a pleasant tactile experience. The style balances simplicity with detail—the carefully stitched curves, ridges, and little green leaf at the top create a realistic yet inviting character. This combination of shape, texture, and joyful color makes it truly eye-catching and perfect for anyone who loves to celebrate Halloween in a unique, handcrafted way.
Whether you pin it on your coat, backpack, or gift it to someone special, this pumpkin badge becomes a lovely symbol of warmth and festivity, bringing smiles and seasonal cheer wherever it’s placed.
Mini Crochet Halloween Pumpkin Badge Free Pattern
This project presents a stepwise method for producing a decorative Halloween pumpkin featuring a whimsical witch hat. The instructions guide through rounds forming the pumpkin base, stem, and hat, with additional sections for embroidered face details and optional double-sided assembly. The process uses a straightforward combination of stitches, resulting in a compact and well-shaped motif. Each step highlights technique and stitch placement to achieve crisp edges and defined form, ensuring the finished item stands out as a festive accessory. The motif is ideal for applications such as decorations, garment embellishments, or thematic accessories. Careful color changes and optional stuffing allow for flexible use according to preference and occasion.
Quick Overview Of Pattern
- Easy-to-follow rounds construct the pumpkin base with textured increases
- Stem and witch hat created as separate elements and attached to the pumpkin
- Face embellishments achieved with basic embroidery for expressive effect
- Optional: Double-sided assembly for a clean, concealed finish
- Suitable for use as a decoration, applique, or costume addition
Notes
- Proper tension ensures the motif maintains its shape
- Use recommended hook size for more defined stitches
- Embroidery is optional, but adds festive character
- Yarn tails should be woven securely to avoid unraveling
- Double-sided assembly can enhance thickness and durability

Skill Level
Beginner to Intermediate
Basic knowledge of working in rounds, increases, and color changes required. Some embroidery and sewing skills helpful for the finishing touches.
Materials
- 4-ply cotton yarn in orange (main), green (stem), black (face/hat), yellow (hat band, optional)
- 2.5 mm crochet hook
- Polyester fiberfill (optional; for stuffed or double-sided version)
- Scissors
- Yarn needle for sewing and embroidery
Measurements / Sizing
- Width: Approx. 5 cm
- Height: Approx. 7 cm (with hat)
- Depth: Varies based on stuffing or doubling; typically less than 1 cm for flat motif
Gauge & Stitch Pattern
- Gauge is not crucial for this small motif; work tightly for a neat finish
- Main stitches: magic ring, chain (ch), single crochet (sc), half double crochet (hdc), double crochet (dc), slip stitch (sl st), increases and basic embroidery
Stitch Abbreviations
| Abbreviation | Stitch Name |
|---|---|
| ch | Chain |
| sc | Single crochet |
| hdc | Half double crochet |
| dc | Double crochet |
| sl st | Slip stitch |
| inc | Increase (2 stitches in same space) |
Special Stitches
- Magic ring: Formed by looping yarn, inserting hook, and anchoring with first stitches
- Increase (inc): Work two of the indicated stitches into the same space
- Embroidery: Used to create face features with yarn and needle
The Crochet Pattern
Pumpkin Base
Round 1:
- Begin with a magic ring, leaving a yarn tail.
- Insert hook, form a slipknot, and ch 1.
- Begin the first dc by working a sc and then another sc over it (substitute for true starting dc).
- Next, work dc stitches into the ring until you have 12 in total.
- Pull yarn tail tight to close the center.
- Sl st into the first stitch to join and complete the round.
Round 2:
- Ch 1 to start.
- In the first stitch: work sc, then hdc.
- In the next stitch: hdc, then dc.
- In the next two stitches: perform dc inc (2 dc in each).
- Next stitch: dc, hdc.
- Next stitches: hdc, then sc.
- Now halfway through the round: sc, hdc.
- Next stitch: hdc, dc.
- Next two stitches: repeat dc inc (2 dc in each).
- Next stitch: dc, hdc.
- Last stitches: hdc, sc.
- Sl st into the first stitch to complete Round 2.
Round 3:
- Ch 1.
- First stitch: sc.
- Next: hdc.
- Following stitch: hdc inc (2 hdc).
- Next: hdc, then another hdc inc (2 hdc).
- Next two stitches: hdc each.
- Next two stitches: 2 hdc in each (total of 4 hdc).
- Sc in next.
- Sl st, then sc in next four stitches.

- Sl st, then sc in following stitch.
- Next two stitches: hdc inc (2 hdc in each).
- Next: hdc, then hdc inc (2 hdc).
- Next: hdc, then hdc inc (2 hdc).
- Following: hdc, sc as final stitches.
- Fasten off without a sl st; hide tail inside pumpkin.
Stem
- Insert hook into a recessed stitch on top of the pumpkin.

- Ch 1.
- Sc in same spot.
- Ch 4.
- Turn; beginning from the second ch, sc back over the next three chains.
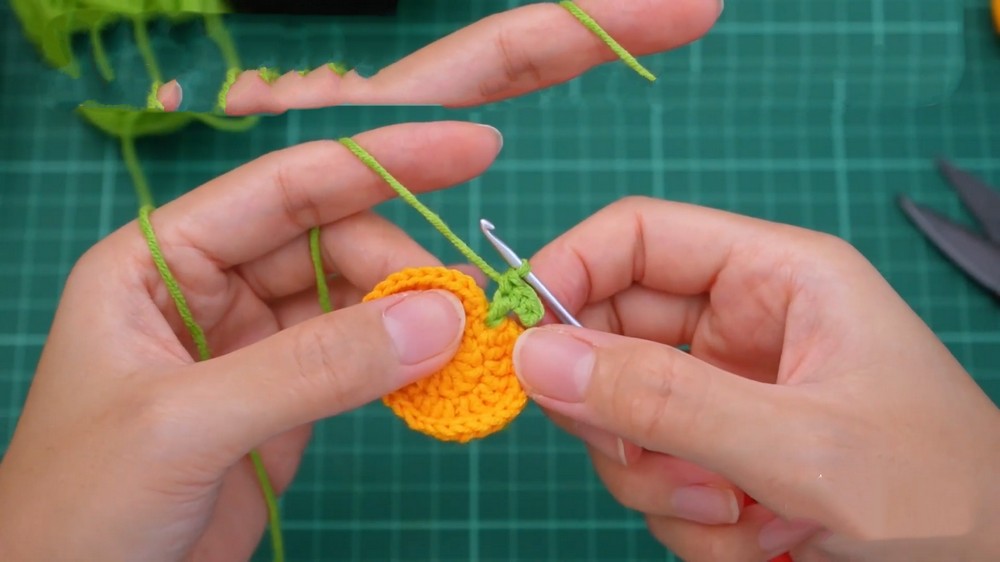
- Sl st into the first stitch to secure.
- Cut yarn and fasten off neatly.
Witch Hat
Hat Base
- Begin with ch 8.
- Turn, skip the first ch, and sl st in the second chain.
- Next: sc.
- Follow with three hdc in next stitches.
- Then sc in the following stitch, and finish with a sl st.
- Cut excess yarn.
Hat Brim & Extension
- On the flat side, start at the third stitch.
- Sl st, then ch 6.
- Turn, skip the first stitch, sl st in the second.
- Next: sc, then hdc in next two stitches.
- Finish with a dc.
- Sl st into the fifth stitch to close.
- Use black and yellow yarn to embroider hat band and decorations.

Assembly & Finished Size
Attach the Hat:
- Using black yarn, sew the witch hat securely onto the top of the pumpkin (above the stem).
Embroider the Face:
- Embroider face features with black yarn.
- Begin with outlining, sew the mouth with small vertical stitches, finish with two eyes.
- Add yellow detailing if desired.

Optional Backing:
- For a tidier result, crochet a second pumpkin base without the face, and sew it to the back of the main motif.
- Add stuffing between the two layers if extra thickness or dimension is preferred.

Conclusion and Ending Words
Each part of this pattern develops the Halloween pumpkin’s iconic appearance through careful stitch combinations and attentive assembly. The use of increases and stitch variation in the pumpkin base provides gentle shaping, while the addition of a stem and witch hat introduces playful character. Stitches are clearly delineated for ease of repetition and accurate progression across rounds. Embroidery completes the motif with expressive Halloween flair. Finishing steps tie together the elements for lasting structure and neat presentation, resulting in an item that works well for displays, accessories, or costumes. Personal color adjustments and optional backing give flexibility for individual style and function. This project combines seasonal charm with functional construction, supporting creative enjoyment for festive occasions.


Leave a Reply