
Crochet Ruffle Top Free Pattern For Summer Outfits
Upgrade your style with a free crochet ruffle top pattern that offers a fun and elegant design, perfect for adding charm and flair to your wardrobe.
I recently tried making a light and fun piece of clothing that instantly became one of my favorites to wear during warm days. This project is a beautiful Free Crochet Ruffle Top Pattern. It’s an airy and stylish top that feels great and looks lovely. What’s nice is that with a few small changes, you could also turn this pattern into a cute dress, a comfy tank top, or even a trendy beach cover-up. It’s a simple way to make different summer outfits using just one basic pattern.
Easy Free Crochet Ruffle Top Pattern with Step-by-Step Guide
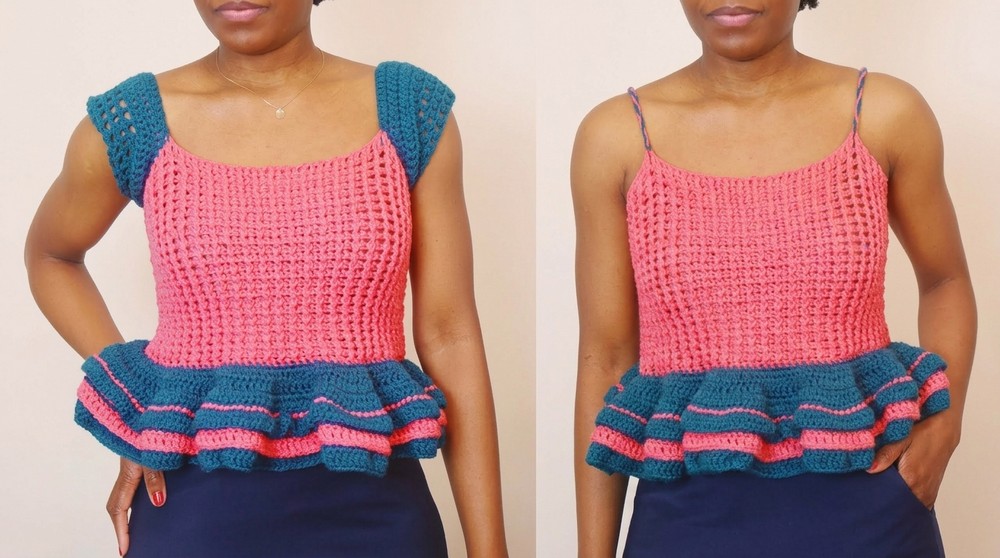
The ruffle top has a charming and feminine look. Its soft texture and flowing ruffles give it a playful and trendy style that stands out. The top fits gently around the body, with lovely ruffled edges adding movement and fun to how it looks. The openwork crochet design makes it light and breezy, perfect for summer days or layering over other clothes. The ruffles are the special feature here—they add a bit of volume and personality, making the top perfect for casual outings or even dressier occasions.

This top is made by creating rows of stitches that include the double crochet stitch, which gives it a soft yet sturdy feel. The ruffles are added by increasing stitches in certain areas to create extra flare and flow. This project is best for those who have some basic crochet skills and want to try working with texture and shaping. It’s a great step toward making wearable and stylish crochet items.

This ruffle top makes a wonderful handmade gift for friends or family who love unique clothes. It’s also great to add a fresh, charming piece to your own wardrobe that’s comfy and pretty. If you enjoy making wearable projects that combine style and comfort, this Free Crochet Ruffle Top Pattern could be the perfect choice.
Textured Ruffle Mesh Sleeve Top – Step-by-Step Pattern
Before You Start
- This top is customizable in both body and sleeve width and length.
- It combines ribbed texture (front and back post double crochet), ruffled bands for visual interest, and open mesh sleeves.
- You’ll work the body in one piece and add the sleeves last.
- Knowledge of crochet increases, post stitches, basic finishing, and sewing/weaving in ends is helpful.
- Select solid or gradient yarns for best ruffle definition.
Pattern Notes
- All instructions use US crochet terms.
- The body is worked flat or in rows, then ruffle bands and sleeves are added in the round.
- Textured ribbing uses alternating front post (fpdc) and back post double crochet (bpdc).
- Ruffle bands are worked directly onto the body in alternating rows of increases and plain stitches.
- Mesh sleeves are worked in the round from chains joined to the body.
- The project is easily adjustable for custom fit. Try on in progress for best results.
- Straps are made from chained lengths and reinforced with additional crochet rows.
How I Made the Crochet Pattern (Summary)
- Worked a ribbed rectangle (fpdc/bpdc), sized to bust minus 15 cm for stretch and snugness.
- Added ruffle bands by alternating rows of increases with plain double crochet, varying placement and height.
- Seamed the rectangle to form a tube, defined right and wrong sides.
- Picked up stitches to add mesh sleeves; worked mesh in the round after forming foundation chains.
- Created straps with chain and crochet for structure, placing them symmetrically.
Skill Level
Ambitious Beginner / Intermediate:
Requires comfort with post stitches, increases, working in the round, and garment shaping.
Finished Size
- Fully customizable.
- Example: Top width = bust circumference minus 15 cm (to account for stretch).
- Length = top-to-waist or desired coverage (e.g., 22 cm body, plus ruffles/bands as desired).
- Sleeves: mesh extends ~8–10 cm from armhole, adjust as desired.
Materials
- Main yarn: Worsted or DK weight cotton blend or other preferred fiber (approx. 200–400g depending on size/sleeve length)
- Accent/ruffle yarn (contrasting color, optional)
- 4.0–4.5 mm crochet hook (adjust as needed for gauge)
- Yarn needle
- Scissors
- Stitch markers
- Tape measure/ruler
Measurements / Sizing (Optional Schematic)
- Bust: Finished garment about 15 cm smaller than actual bust circumference for snug fit.
- Body Length: Measure from top to waist or desired length before ruffles (e.g., 22 cm).
- Ruffle Band Width: Varies; sample has two bands about 4–6 cm each.
- Strap/Armhole Position: Marked by dividing front/back in quarters for symmetry.
- Sleeve Chains: Typically 20 cm (measure around your upper arm).
Gauge
- Ribbed fabric: 14 dc x 8 rows ≈ 10 x 10 cm (4" x 4")
- Adjust hook or starting chain to achieve snug, stretchy fabric.
Stitch Abbreviations
- ch – chain
- sc – single crochet
- dc – double crochet
- fpdc – front post double crochet
- bpdc – back post double crochet
- sl st – slip stitch
- st(s) – stitch(es)
- inc – increase (2 dc in same st)
- rep – repeat
Special Stitches
- Front Post Double Crochet (fpdc): Yarn over, insert hook from front to back around post of next st, yarn over, pull up a loop, complete as dc.
- Back Post Double Crochet (bpdc): Yarn over, insert hook from back to front around post of next st, yarn over, pull up a loop, complete as dc.
- Ruffle Increase: Work (2 dc in one st) at intervals for width and fullness.
- Mesh Pattern: [dc, ch 1, sk 1] repeated in the round.
THE PATTERN
Body: Textured Rib Panel
Foundation Chain:
- Ch a length equal to your bust measurement minus 15 cm (for sample, ~82 cm bust, ch to 67 cm).
- Ch 2 more (for turning).
Row 1:
- Dc in 3rd ch from hook and each ch across.
- Ch 2, turn. (Do not work into very first st, ch-2 counts as first dc).
Row 2:
- For the second st, fpdc; for the next, bpdc.
- Alternate fpdc, bpdc across to end. Work a dc on top of the ch-2 from the previous row.
- Ch 2, turn.

Row 3 and beyond:
- Continue as established: work fpdc where the st looks like a front post, bpdc where the st looks like a back post.
- Repeat these textured rows until your panel is the desired top length from upper chest to waist (e.g., 22 cm).

Ruffle Bands
Switch to ruffle color:
- Row 1 (sc):
- Attach ruffle yarn. Sc in each st across. Ch 2, turn.
- Row 2 (Begin Ruffle):
- Dc in same st as ch-2.
- Dc in next st, 2 dc in following st; rep (dc in 1, 2 dc in next) across for a band of increases. Ch 2, turn.

- Row 3 (No Increase):
- Dc in each st across, one dc per st. Ch 2, turn.
- Row 4 (Increase Row):
- 2 dc in first st. Dc in next st, 2 dc in following st; rep across. Ch 2, turn.
- Row 5 (No Increase):
- Dc in each st across. Fasten off.

- Dc in each st across. Fasten off.
Repeat the principle of alternating increase and plain rows for dramatic ruffles. Add as many bands as desired, changing color if you wish. On each increase row: dc in one st, 2 dc in next, repeat.
Assembling Body / Side Seam
- Determine front and back: the neater color change side is "right side"; visible joins or Vs are "wrong side."
- With right side out, seam sides together using whipstitch or mattress stitch.
- Fasten off and weave in ends.

Second (or Third) Ruffle Band
- Attach yarn not to last row but to row before last increase row for a layered ruffle.
- Ch 2, then back post double crochet (bpdc) in each st across.
- Ch 2, dc in each st across (plain row).
- (Optional: another increase row as above.)
- End with one last plain row (dc across). Fasten off.
Each additional band follows the scheme: row of bpdc, row of dc, (optionally) row with increases, row of dc.
Straps
- Try on garment and mark positions for straps at front and back—typically at quarter points along edge.
- Attach two strands of yarn at each strap point at front.
- Ch a firm chain (e.g. 65 ch or ~20 cm, adjust to fit).
- Fasten off, leaving a tail to sew.
- Check length by trying on; sew other end to corresponding back marker with yarn needle.
- Repeat for second strap.
Mesh Sleeves
- With top still right side out, use stitch markers to mark four points spaced evenly for symmetry.
- Front: Mark halfway and quarter points.
- Back: Match markers.
- Attach yarn at marked points under arm/side seam.
- Ch to length (sample: 65 ch, adjust for ~20 cm or preferred sleeve width).
- Sl st into the opposite marker to form a loop.
- Sc into the next existing st along garment edge, then:
- Work double crochets into each chain, then continue double crochets into the existing stitches along armhole edge.
- At end of round, sl st to join.
- Work two more rounds of double crochet around.
- Begin mesh: ch 1, sk 1 st, dc in next; rep around. Join.
- Repeat mesh pattern in the round for 4 rows or until desired length.
- Sl st into next two sts, fasten off, weave ends.
- Repeat for second sleeve.
After the Main Pattern
If you do not use written patterns:
Make a ribbed rectangle, sew it up, add ruffles with rows of increases, join chains for sleeves and work mesh (dc, ch 1, sk 1). Straps are just chains sewn to body.
Assembly & Finishing
- Weave in all yarn tails.
- Block ruffles for definition, if desired.
- Adjust strap or sleeve length if needed.
- Steam or press gently for shape.
- Wear and enjoy!
Solution of problem
Problem: Top too loose/stretches out of shape.
Solution: Subtract enough cm (at least 15 cm) from the bust when making the foundation to use stretch/compression. Use a firmer stitch or a smaller hook for extra support.
What you can make by using these stitches
- Cropped ruffled tank tops
- Statement sleeve sweaters
- Textured headbands
- Ruffle scarves or wraps
- Baby or kids’ dress yokes
Congratulations! You’ve created a statement crochet ruffle top with mesh sleeves. Try different yarn color combinations, add or subtract ruffle bands, or lengthen for a unique look every time. Enjoy wearing your new garment or adapting these techniques to other funky projects!