
Easy & Free Crochet Roses Pattern For Gorgeous Décor
Sprinkle a playful twist on your projects with Crochet Roses Pattern that's perfect for sprucing up spaces, rocking accessories, and gifting like a pro.
Delicate loops of yarn intertwine to form breathtaking floral accents, bringing the timeless beauty of roses into the realm of handmade artistry. These intricate creations aren’t just decorative pieces; they carry boundless possibilities for use in everyday life. From sprucing up home décor with a touch of warmth to adding individuality to accessories, crochet roses offer versatility unmatched by many handmade treasures. Their delicate texture makes them ideal for adding charm to gift wrapping, enhancing the appeal of clothing, or even creating unique wedding bouquets that last forever.
How to Make Crochet Roses - Quick & Easy Pattern
See Also: Crochet Heart And Flower
The process of making them nurtures mindfulness, providing a relaxing and satisfying experience. They also hold the potential to foster community, as enthusiasts gather to share techniques, ideas, and creations. Whether used to brighten tabletops, adorn headbands, or serve as thoughtful keepsakes, these handmade roses combine beauty and function in ways that mass-produced items often cannot.
The resilience and timeless appeal of these blossoms ensure they’ll remain cherished additions to your collection or heartfelt gifts for loved ones. While seemingly small, each piece carries the care, creativity, and thoughtfulness woven into every stitch, proving that true elegance lies in the details.

Step-by-Step Guide Inspired by the Crochet Rose Tutorial
Introduction
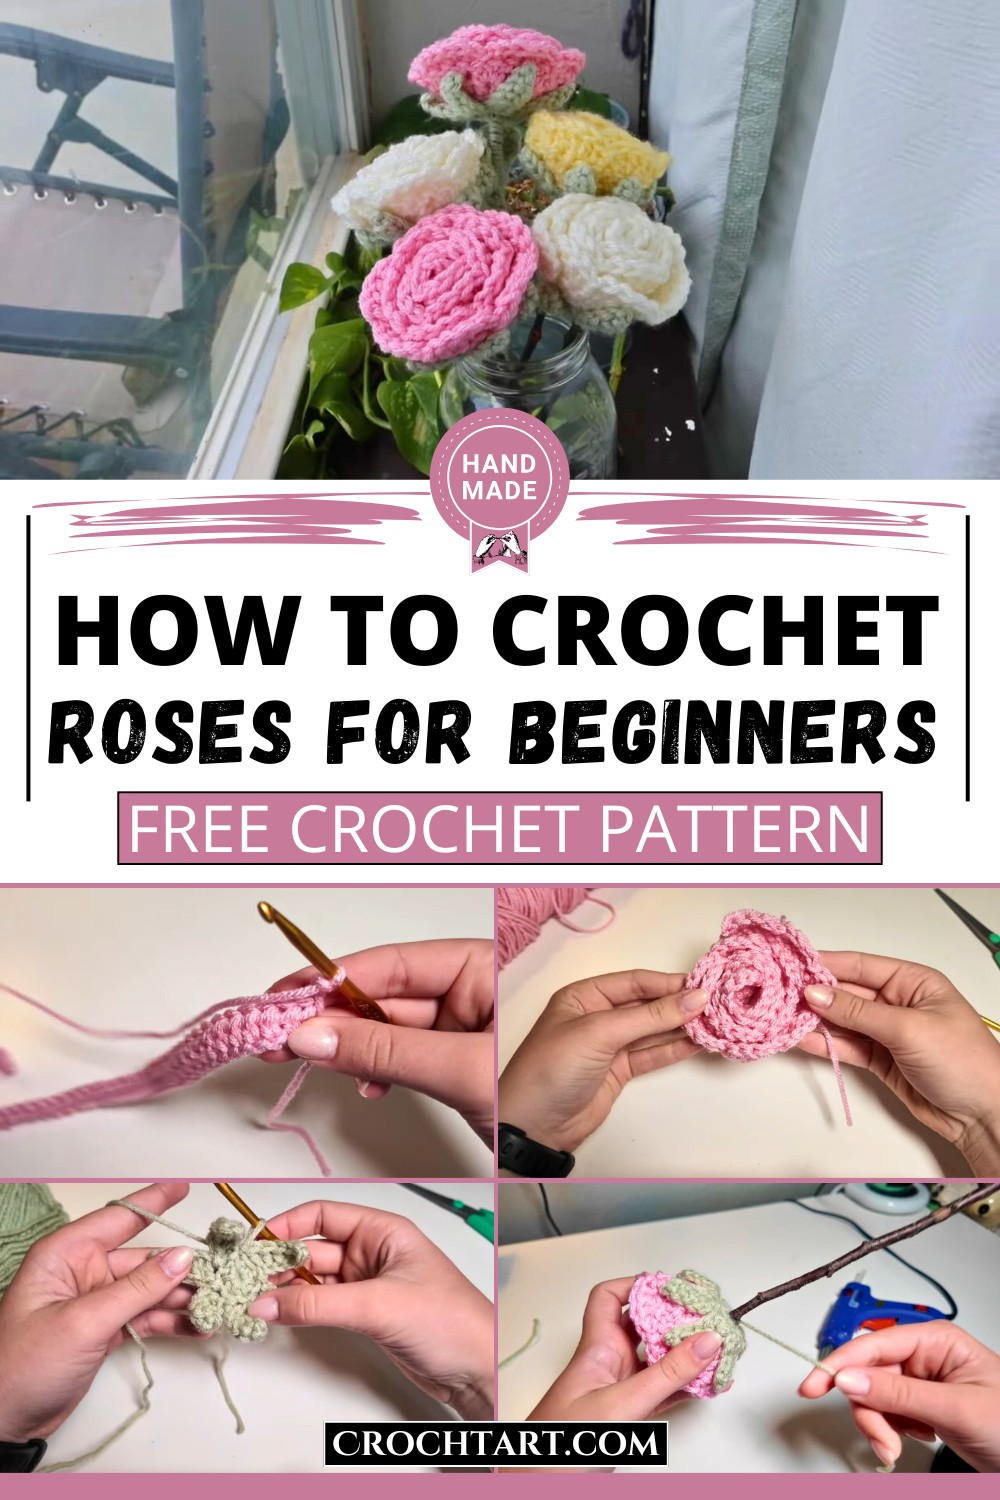
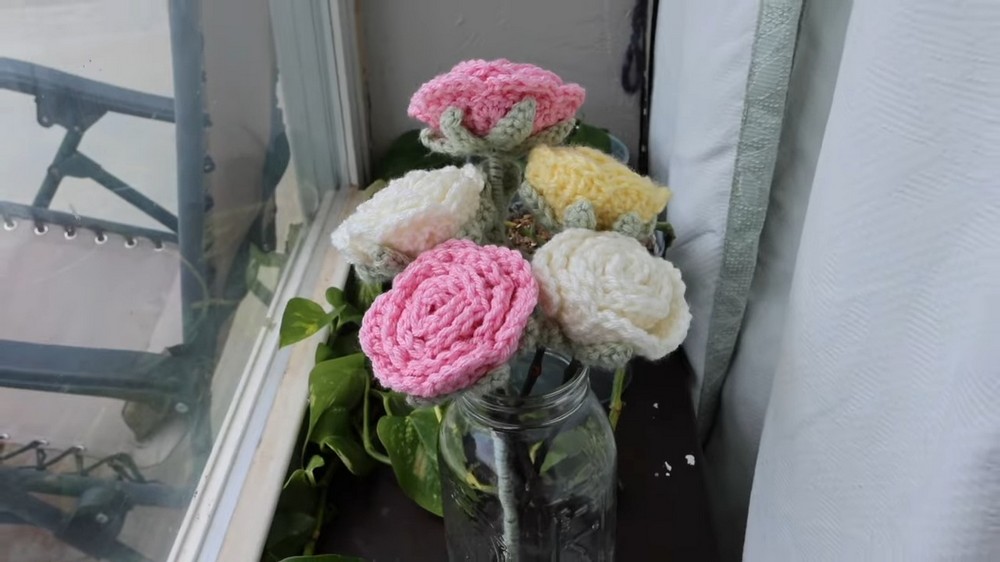
In this tutorial, Maddie takes us step by step through the process of creating a beautiful crochet rose bouquet. Perfect as a gift or home décor, these crochet roses are long-lasting, handmade blooms that never wilt. What makes this project especially unique is that no sewing is required, as the pieces are assembled and glued together with a hot glue gun. This project is beginner-friendly, customizable, and ideal for anyone looking to craft something beautiful and practical. Let’s dive into the steps, features, materials, and tips shared in this video!
Step-by-Step Guide to Crochet Roses
1. Materials You’ll Need
Maddie recommends the following materials:
- Yarn: Medium-weight acrylic yarn in your desired rose color (pink was used in the video) and green for the leaves.
- Crochet Hook: A 5mm crochet hook.
- Hot Glue Gun: To assemble the rose – no sewing required!
- Stick (for the Rose Stem): You can use a dowel stick or a sturdy stick from outside.
- Optional: Scissors for trimming loose ends.
2. Creating the Rose Petals
Step 1: Start with a Slip Knot and Chain Foundation
- Begin by making a slip knot, securing it onto your hook.
- Chain 48 stitches.
Step 2: First Row - Half Double Crochets
- Start at the second chain from the hook and create half double crochets (HDC) all the way to the end of the row. This will lay the foundation for your rose.
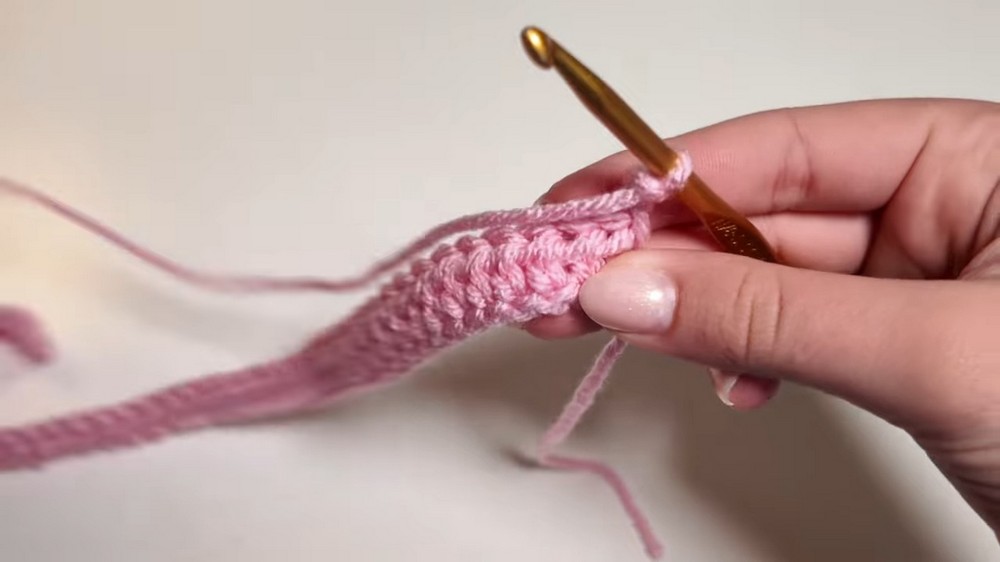
Step 3: Second Row - Double Crochet Clusters
- Chain 2, turn your work, and work clusters of three double crochets (DC) in one stitch, skipping the next. Repeat this pattern until the row is complete.
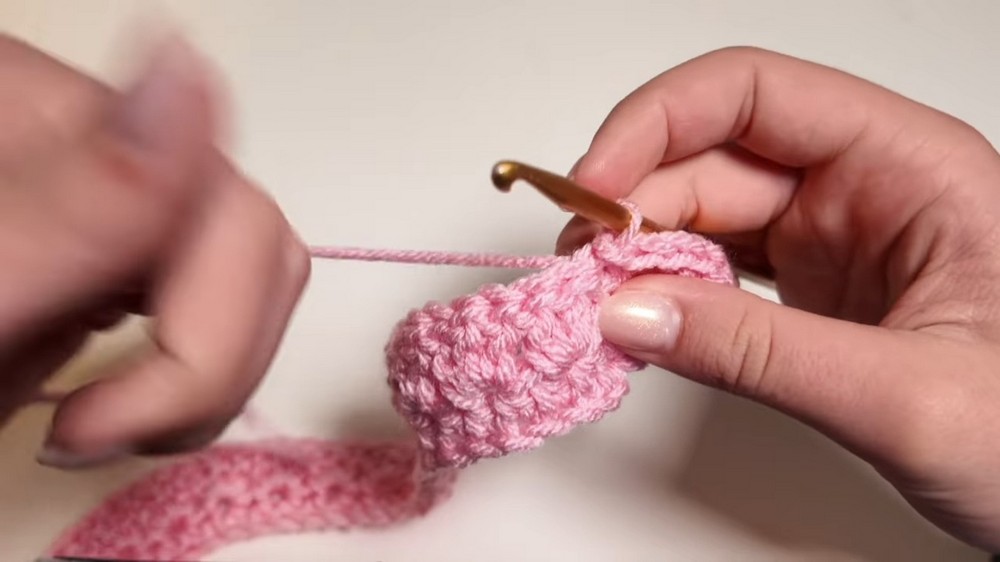
Step 4: Final Row - Petal Formation
- For the final row, chain 2 and flip the work. Alternate between 1 double crochet, 2 double crochets (in the same stitch), 1 double crochet, and a slip stitch to form the rounded shape of rose petals.
- As you crochet, the pattern will naturally start curling into a spiral shape.
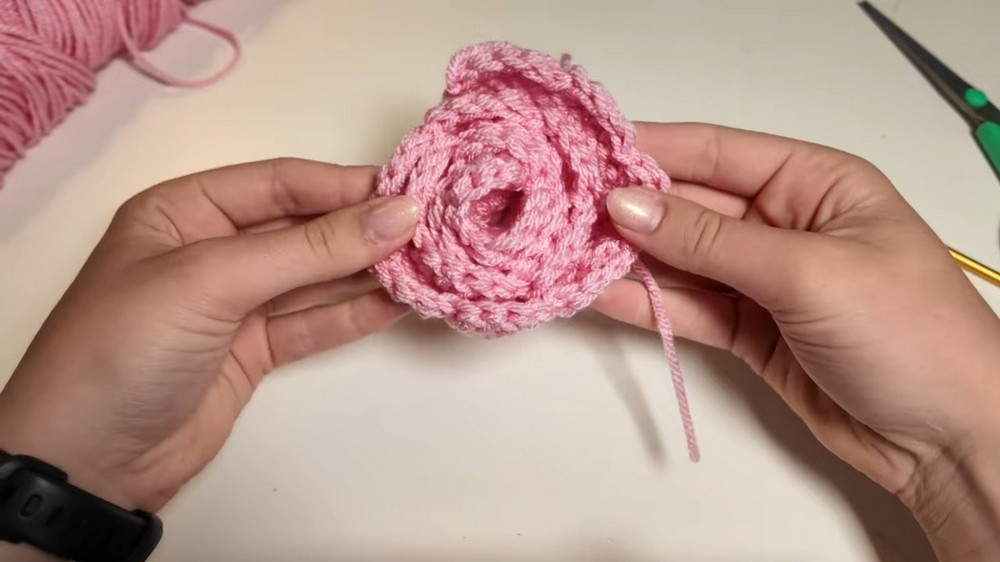
Finishing the Petals
- Once you reach the end, cut the yarn and pull the loop to secure. Your flat spiral will be rolled and glued later to resemble the rose.
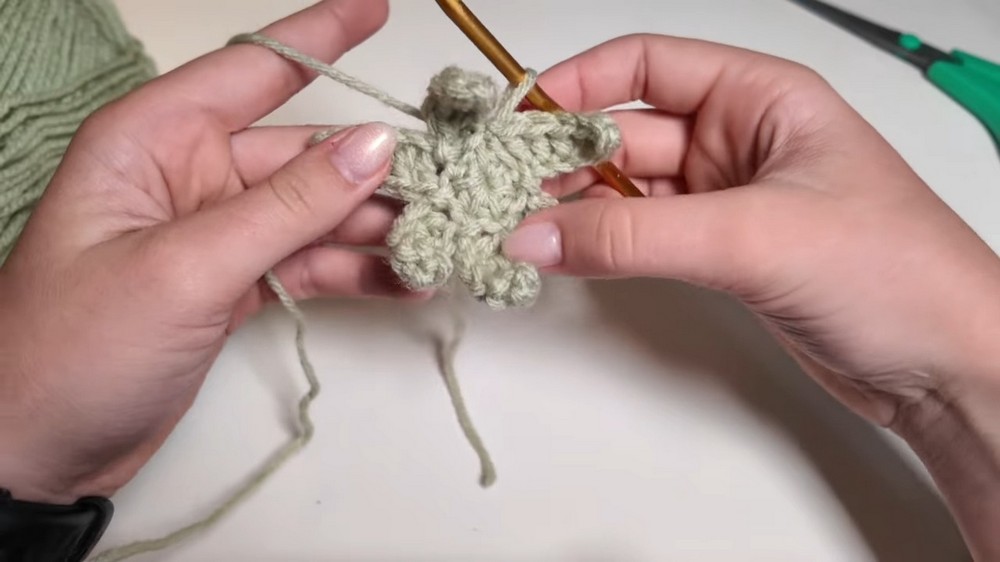
3. Creating the Leaves
Making a Magic Ring Base
- Use green yarn for the leaves. Start with a magic ring. This ring allows you to create the round base by looping the yarn and working into the center.
- If you struggle with a magic ring, Maddie suggests referring to her detailed tutorial on it (linked in her video description).
Adding Half Double Crochets
- Into the magic ring, crochet 6 half double crochets, leaving the hole slightly open to slide it over the stem later.
Building the Leaves
- Chain 6 stitches.
- Work down the chain:
- 1 Single Crochet in the second chain from the hook.
- 2 Half Double Crochets in the next two chains.
- 2 Double Crochets in the final two chains.
- Attach the leaf with a slip stitch into the next stitch on the base circle.
- Repeat this step 5 more times to create a total of 6 leaves.
Finishing the Leaves
- End the round with a slip stitch, cut your yarn, and secure it. The leaf piece should now have an open center, allowing it to slide onto the rose stem later.
4. Assembling the Crocheted Rose
Maddie’s unique approach emphasizes hot glue instead of sewing, making this project much easier!
Step 1: Rolling and Gluing the Rose
- Start at one end of the petal strip. Place a small blob of hot glue on the stick and begin wrapping the petal strip tightly around it.
- Continue gluing as you wrap, adjusting the tightness for your desired rose shape.
Step 2: Adding the Leaf Piece to the Stem
- Slide the green leaf ring onto the stick (stem) and tighten the magic ring loop around the base of the rose.
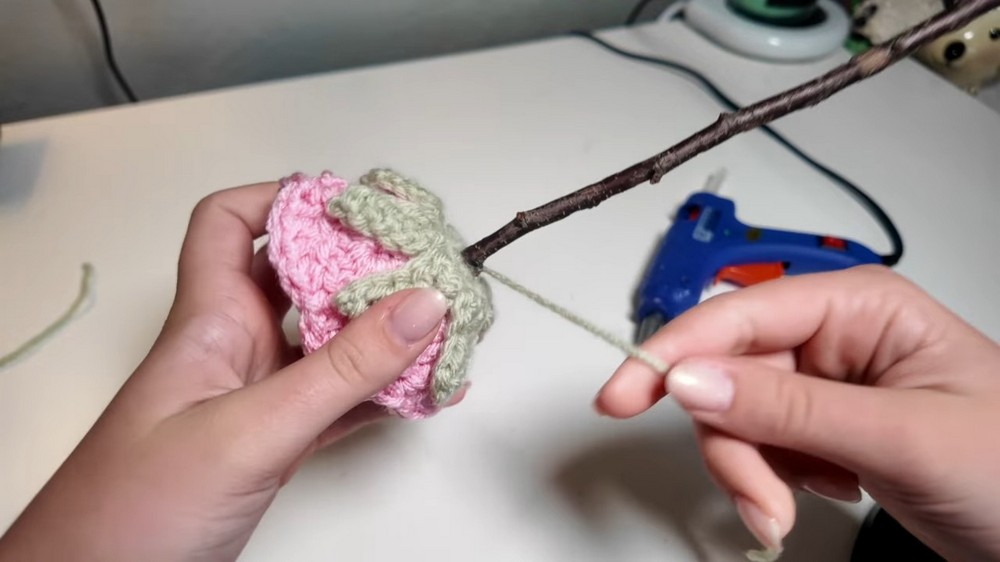
- Secure the leaves with more glue, attaching the petals to the foliage.
Step 3: Securing the Stem
- Wrap the leftover yarn tail around the base of the stick, adding a thin line of glue to hold it in place. Trim any excess yarn for a clean finish.
Special Features of This Project
- No Sewing: Hot glue replaces the need for tedious sewing between parts.
- Customization: Choose colors that match your personal style or the occasion.
- Great for Beginners: Techniques like half double crochet, double crochet, and slip stitches are easy to follow.
- Durable Décor: These roses can last forever as decorative pieces.
- Eco-Friendly: Maddie suggests using natural or recycled sticks as stems!
Tutor’s Suggestions
- Experiment With Colors: Maddie recommends trying other colors like white or red for variety.
- Keep It Loose: If you don’t like tight, compact roses, wrap the petals loosely for a fuller bloom.
- Natural Stems: Use sticks gathered outside for a free, eco-friendly option.
Difficulty Level
This project is beginner-friendly to intermediate, with clear explanations for each stitch and plenty of visual demonstrations. While the magic ring may seem challenging at first, Maddie reassures viewers that practice will make it easier.
Uses for Crochet Roses
- Home Décor: Place your finished roses in a vase as timeless decorations.
- Gifts: Handmade roses make thoughtful, sentimental presents.
- Events: Use them as centerpieces or bouquets for weddings, parties, or baby showers.
- DIY Projects: Incorporate these roses into wreaths, garlands, or gift wrapping.
Tip of the Day
To achieve neat, uniform leaves, ensure your magic ring is neither too loose nor too tight. Leave a small hole for the stick to pass through, but tighten it after assembly to secure it in place.
Conclusion
In this tutorial, Maddie teaches us how to create stunning crochet roses with minimal effort. By using simple stitches, a hot glue gun, and your creativity, you can craft everlasting roses that look beautiful in any setting. Whether you’re a beginner or an experienced crocheter, this project is a wonderful way to explore your craft.