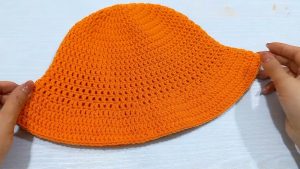
Cute Free Crochet Diamond Stitch Bucket Hat That Adds Style to Any Wardrobe
Add charm to your outfit with a Crochet Diamond Stitch Bucket Hat Pattern and enjoy a stylish hat perfect for sunny weather and fun outings.

Free Crochet Diamond Stitch Bucket Hat Great for Sun Protection
Bring a touch of creativity and style to your wardrobe with the Free Crochet Diamond Stitch Bucket Hat Pattern. This hat is not just fun to make but also looks beautiful with its unique diamond stitch design that adds an elegant texture. It is lightweight, soft, and perfect for sunny days or casual outings.

The pattern is easy to follow and great for beginners and experts alike. This bucket hat is not only useful for protecting your face from the sun but also works as a trendy accessory. It’s a lovely handmade project that you can gift to others or enjoy yourself.
Cute Free Crochet Diamond Stitch Bucket Hat
Materials
- Yarn: 100% Cotton yarn (any preferred brand). Note: Use colors of your choice for single or two tone hats.
- Crochet Hook: 4.0mm crochet hook.
- Other tools:
- Scissors
- Darning needles
- Stitch marker
Gauge
- Gauge Swatch: To ensure sizing accuracy, use a 4.0mm hook to make a 2×2 inch swatch in single crochet. Your gauge should match the yarn’s recommended tension.
- Tip: Crochet tightly or loosely depending on your tension to adjust the measurements.
Finished Sizes
- Adult Size:
- Crown Diameter: Approximately 6.5 – 7 inches.
- Height: 7 inches (before brim).
- Child Size:
- Adjust the diameter of the crown and rounds accordingly using the same formula below for smaller measurements.
Pattern Instructions
1. Magic Ring and Crown of the Hat
Round 1:
- Create a magic ring (fold the yarn tail, insert the hook, and pull up a loop).
- Chain 1. Work 6 single crochets into the ring.
- Pull the yarn tail tightly to close the magic ring.
(Total: 6 stitches)
Round 2:
- Work 2 single crochets in each stitch (increase on every stitch). Mark the first stitch.
(Total: 12 stitches)
Round 3:
- Alternate 1 single crochet in the first stitch and 2 single crochets (increase) in the next stitch. Repeat around.
(Total: 18 stitches)
Round 4:
- Work 1 single crochet in the first two stitches and increase on the third stitch. Repeat around.
(Total: 24 stitches)
Crown Growth (Continue Increasing):
- From here, the rounds follow a predictable pattern:
- Increase every fourth, fifth, sixth, seventh, etc. stitch in each subsequent round.
- For example:
- Round 5: Increase every 4th stitch. Total 30 stitches.
- Round 6: Increase every 5th stitch. Total 36 stitches.

Note:
- Continue until the crown diameter matches the head size. Use this formula:
Head Circumference ÷ 3.14 = Desired Crown Diameter. - Ensure the final number of stitches is a multiple of 4 for the diamond stitch pattern.
2. Side of the Hat
Once the crown diameter is achieved:
- Work 1 single crochet in each stitch for 3 rows without any increases. This begins shaping the sides of the bucket hat.
- Continue working additional repeat rows until the body height reaches 7 inches (or desired height for customization).
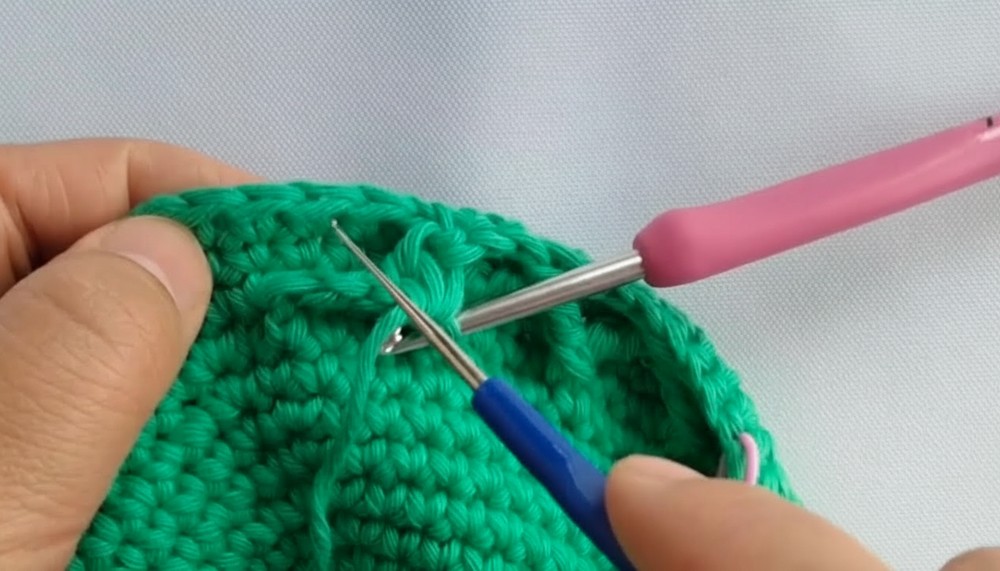
3. Diamond Stitch Pattern
The Diamond Stitch is the highlight of the hat. Follow these steps:
Round 1 (Diamond Stitch):
- Mark the first stitch.
- Work 3 single crochets in the first three stitches.
- Yarn over twice to work a treble crochet into the vertical post of the round 3 rows below (the post of the underlying row). Do not complete the treble crochet.
- Skip the stitch beside the post.
- Repeat the pattern above: 3 single crochets, a diamond stitch, and finish the treble.

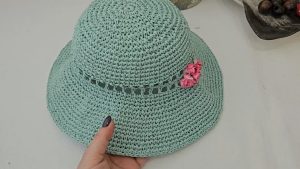
For Multi Color Diamond Stitch:
- Attach the second color when finishing the third single crochet of every repetition.
Alternate Rows:
- After completing the diamond stitch, work 3 rows of single crochet before repeating another round of the diamond stitch.

4. Brim
The brim gives the hat its functional and stylish flared design.
Create the Brim:
- Round 1 (Brim Increases): Work 3 single crochets, then increase by working two single crochets into the fourth stitch. Repeat around.
- Round 2 to 3 (No Increases): Work 1 single crochet in each stitch.
- Continue adding more rounds if you wish a wider brim.

Finishing:
- End the brim by making 2 slip stitches for a smooth edge.
- Cut the yarn, leaving a 6 inch tail.
Finishing Touches
- Use a darning needle to weave in all yarn tails neatly into the stitches.
- For a cleaner shape, steam block the hat for a polished look.

Customization Ideas
- Two Tone Design: Alternate two colors of yarn as shown in the diamond pattern.
- Add Beads: Sew or attach small beads onto the diamond stitches for a decorative touch.
- Make it Slouchy: Add more diamond stitch rows to elongate the hat before starting the brim.
- Change Yarn Weight: Use thicker yarn for a winter version or finer yarn for a lightweight summer hat.
Special Techniques
- Magic Ring: Essential for smooth starting rounds without gaps.
- Treble Crochet into Vertical Posts: Adds depth and creates the signature diamond look.
- Gauge Check: Ensures accurate sizing, especially when substituting yarns.
Conclusion and Remarks
The Diamond Stitch Bucket Hat is a versatile and eye catching crochet project suitable for any skill level. Its unique texture, easy customization, and practical design make it perfect for everyone. With clear guidance, this pattern helps you create something functional and fashionable. Whether you make it for yourself or gift it to a loved one, this hat is sure to impress.