
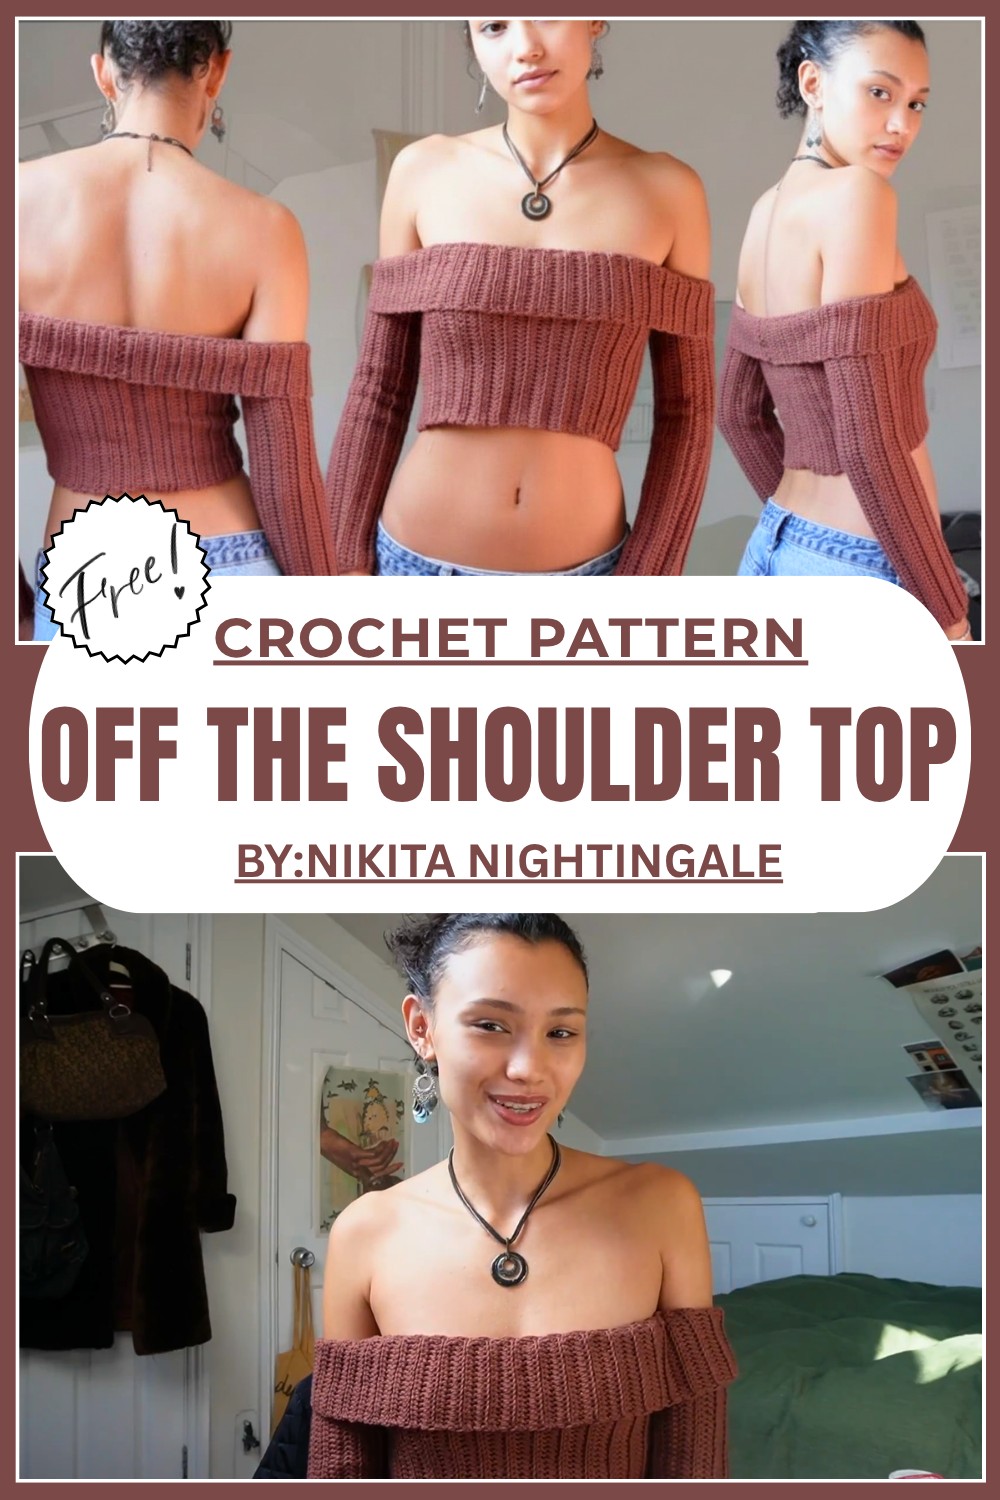
Free Crochet Off The Shoulder Top Pattern To Make Now
Upgrade your summer wardrobe with a free crochet off the shoulder top pattern, offering a breezy and stylish design that's for warm-weather days.
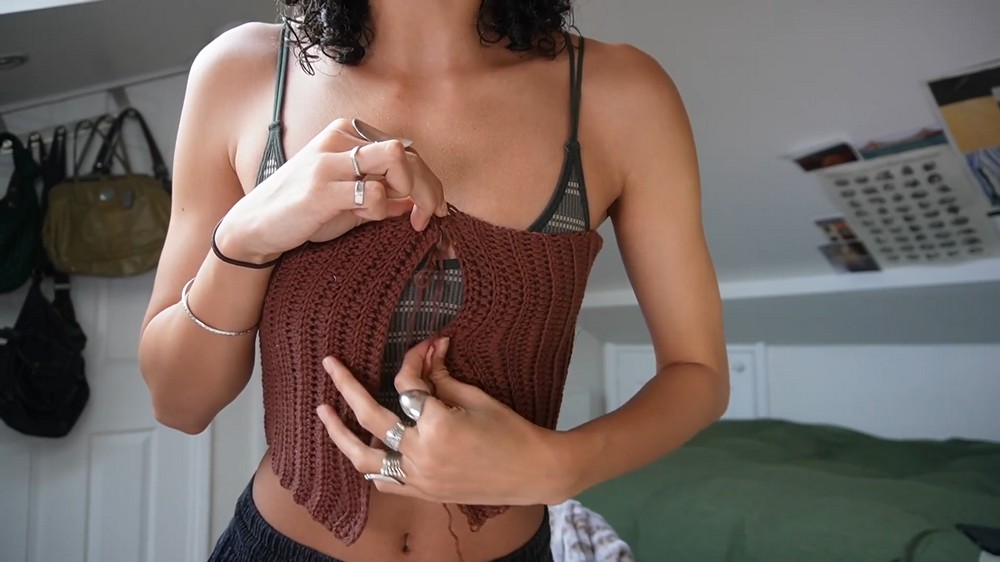
Making summer clothes by hand is always fun, especially when they are stylish and comfortable. The Free Crochet Off The Shoulder Top Pattern is a wonderful project that lets you create a beautiful top perfect for warm days and casual outings. This top shows off your shoulders in a charming way, giving a fresh and relaxed vibe that’s great for parties, beach trips, or everyday wear.
Quick Crochet Off The Shoulder Top Pattern for Summer
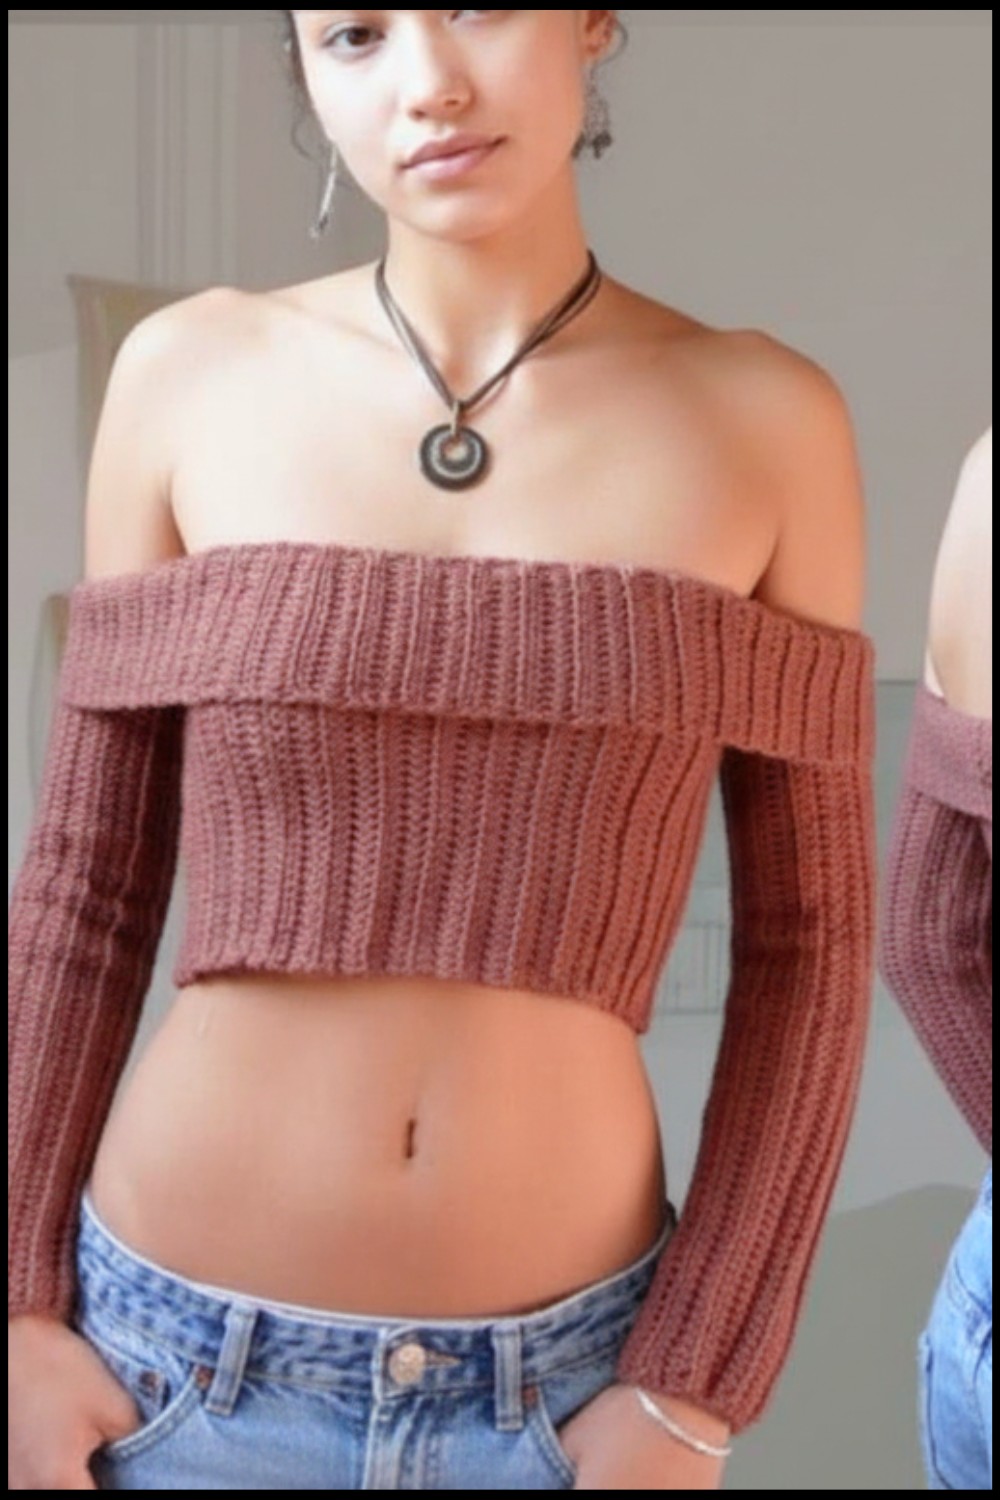
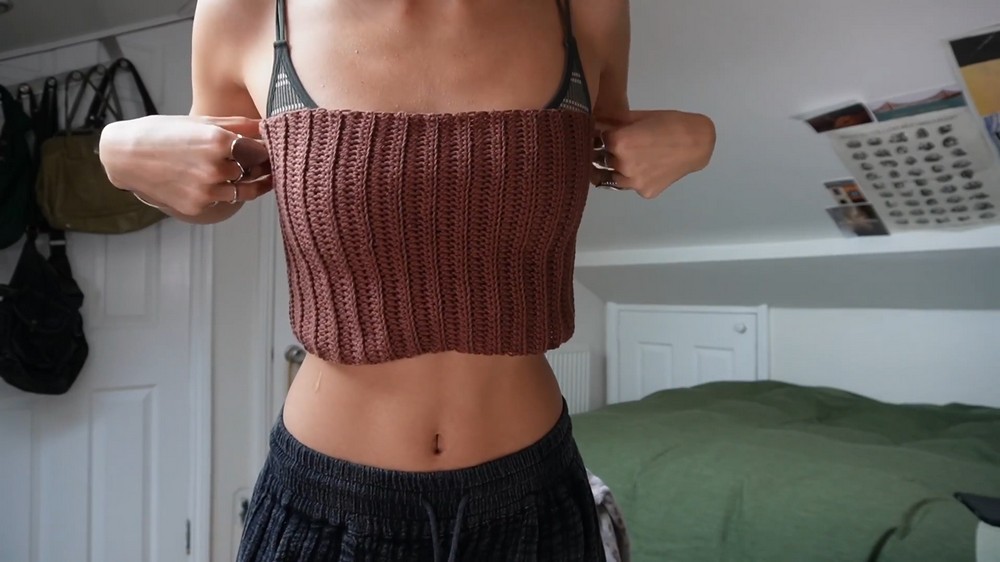
The most attractive part of this top is its OFF-SHOULDER design, which gently hugs the upper arms while leaving the shoulders bare. Its soft texture feels nice against the skin, made with breathable yarn for comfort in the heat. The shape is loose and flowy, making it easy to move around in without feeling tight. Overall, the top looks elegant but casual, and you can pair it with jeans, shorts, or skirts to create many different looks.
This pattern is excellent for people who like easy and enjoyable crochet projects. Whether you’re a beginner who knows just the basics or someone with more experience, you’ll find this pattern simple to follow. You can also choose your favorite colors and adjust the size, making it just right for you or as a special gift. The versatility of this off-the-shoulder top means you can style it your way.
If you want to make something pretty and wearable, the Free Crochet Off The Shoulder Top Pattern is a great pick. It’s comfortable, chic, and fun to make. This project can bring a handmade touch to your summer wardrobe and add a lovely, timeless piece you’ll enjoy wearing again and again.
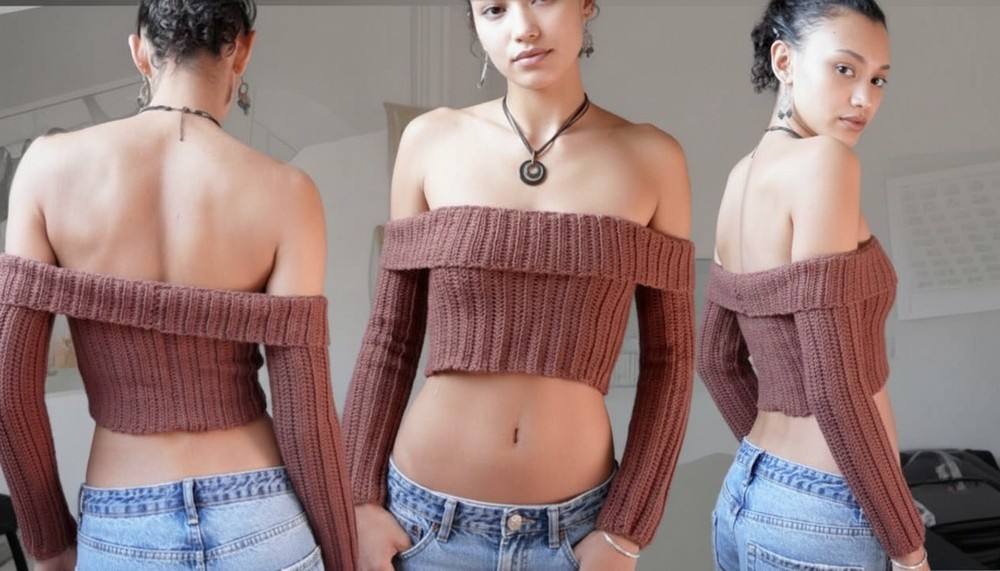
Off-the-Shoulder Ribbed Crochet Top
Before You Start
- This pattern is designed for customization to any size—try on the pieces as you go.
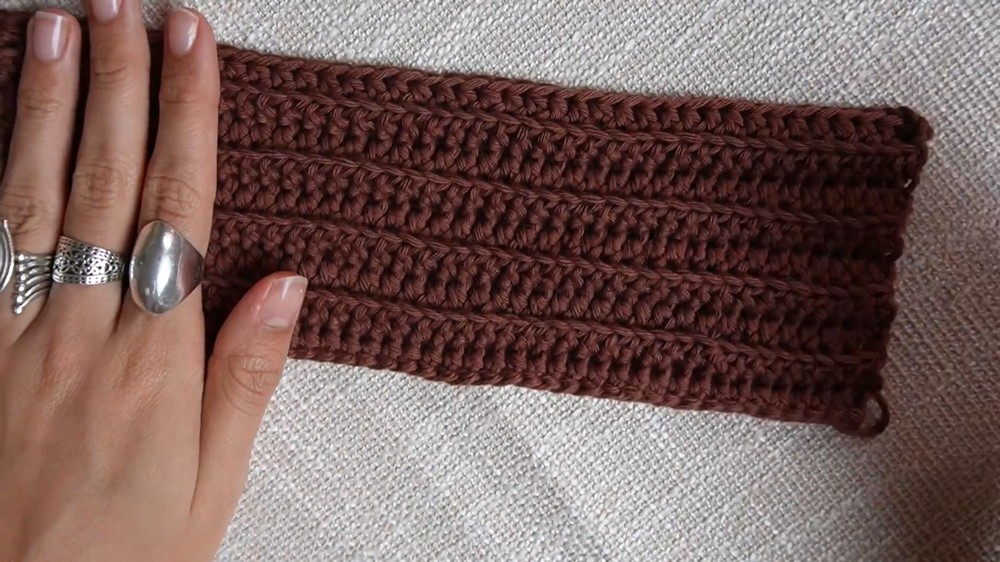
- The stitches used are half double crochet (hdc) and single crochet (sc).
- The main fabric is worked in a stretchy ribbed pattern (hdc BLO).
- All pieces are made flat, then slip stitched or sewn together.
- Perfect for adventurous beginners or intermediate crocheters.
Pattern Notes
- Worked in rows, flat, then seamed.
- Change hook, yarn weight, or add rows to adjust sizing.
- Try on the main panel before completing to avoid making it too loose.
- All ch-2 turning chains do NOT count as a stitch.
- Work all half double crochets in the BACK LOOP ONLY (BLO) unless stated otherwise.
- Sleeves are constructed in the same method and with the same stitch as the body.
- Make ribbing directly onto the top for a clean finish.
How I Made the Crochet Pattern? (Summary)
- Created a rectangular torso piece in ribbed (hdc BLO) fabric according to my measurements, then slip stitched ends together.
- Made two rectangles for sleeves, again in hdc BLO, sized to arm length and seamed.
- Attached sleeves to the top with hand-sewing (mattress stitch) at comfortable points.
- Added a ribbed band around the top working perpendicular, connecting as I crocheted for a seamless look.
Skill Level
Advanced Beginner / Easy Intermediate
Finished Size
Completely customizable—pattern is made-to-measure. A typical size (S/M) will finish approximately:
- Width: 34–36” around bust (or your exact bust or underbust measurement)
- Length: 6–8” from armpit to desired lower edge
- Sleeve: from top of arm to wrist, or as preferred
Materials
- Worsted weight (medium/4) cotton yarn (e.g. Paintbox Cotton in Coffee Bean, approx 400–500g, adjust for size)
- 5.0 mm crochet hook (or size to achieve desired stretch/drape)
- Tapestry needle (for seaming and weaving in ends)
- Scissors
- Stitch markers (or bobby pins as alternative)
Measurement / Sizing (Optional Schematic)
- Torso Panel: Bust/underbust circumference x desired height (armpit to hem)
- Sleeves: Arm length (“top of shoulder” to wrist) x arm circumference you desire (fitted is recommended; ribbing adds stretch)
- Ribbing: Depth as desired (try 2–3” or 17 chains as in video)
Gauge
- 16 sts x 12 rows = 4” x 4” (10 cm x 10 cm) in hdc BLO, lightly stretched
Stitch Pattern: All main panels: Half double crochet (hdc) back loop only (BLO)
Stitch Abbreviations
- ch – chain
- sc – single crochet
- sl st – slip stitch
- hdc – half double crochet
- BLO – back loop only
- st(s) – stitch(es)
Special Stitches
- Foundation Half Double Crochet (fhdc): Chainless foundation; see tutorials if unsure, or substitute ch + regular hdc.
- Back Loop Only (BLO): Instead of inserting hook under both top loops, insert only into the back loop of each stitch.
- Slip Stitch Seam: Join two fabric edges by working sl st through one loop of each edge.
- Mattress Stitch: Sew pieces together through the edges for a nearly invisible seam.
THE PATTERN
MAIN BODY PANEL
Foundation Row:
- Make a fhdc (or ch and hdc into ea ch) to the desired depth/length of your top, e.g. 42 hdc for a short crop (measuring from armpit to hem, or as you like).
- Turn.
If you don’t know fhdc, chain to desired number, hdc in second ch from hook and in each ch across.
Row 1:
- Ch 2 (does NOT count as st), hdc BLO in each st across. Turn.
Repeat Row 1 for a total number of rows to fit around your torso (e.g. 66 rows for a ~34” bust, but hold the work around your chest to check).
- The rectangle should have a nice stretch and overlap at the edges.
When done: Finish with a long tail for seaming.
For those who don’t read patterns:
Work a rectangle in half double crochet, always using the back loop only, until it wraps snugly (not tightly!) around your torso.
JOINING BODY PANEL
- With RS together, join the short ends using a slip stitch seam:
- Insert hook through the back loop only of one edge and front loop only of the other, sl st across the seam.
- Insert hook through the back loop only of one edge and front loop only of the other, sl st across the seam.
- Turn right side out.
SLEEVES (MAKE 2)
Foundation Row:
- Make a fhdc of the length you want from the top of your arm to your wrist (e.g. 72 fhdc for full length; adjust for shorter option).
- Turn.
Row 1:
- Ch 2, hdc BLO in each st across. Turn.
Repeat Row 1 for your desired sleeve width (e.g. 23 rows for a snug fit; try the first sleeve on your arm).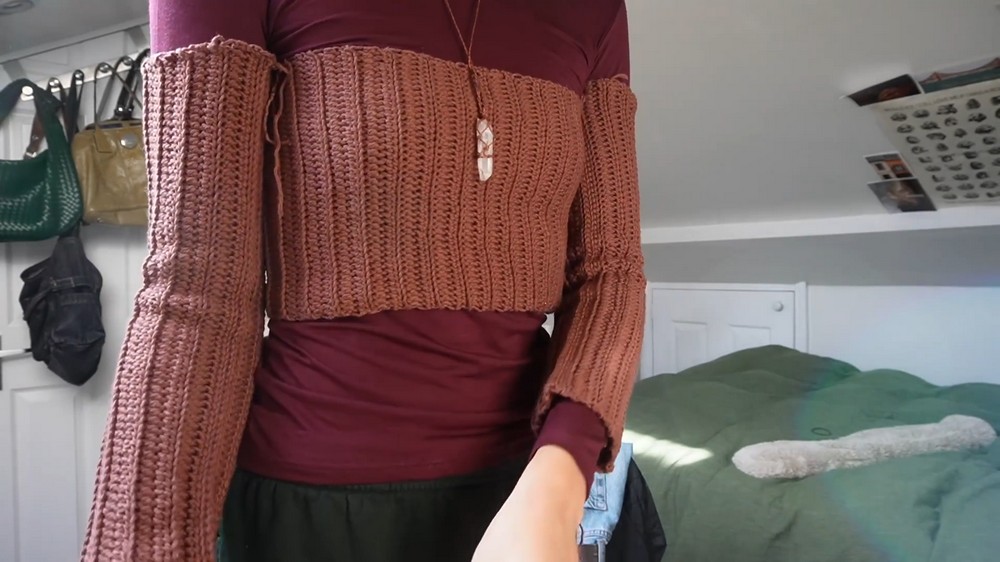
Finish: Leave a long tail and use slip stitch seam or mattress stitch to join the edges into a tube. Weave in ends.
Not sure?
Make a long, skinny rectangle the length of your arm, and seam the edge to form a tube. It should fit snugly so it stays up off-shoulder.
ATTACHING SLEEVES TO BODY
- With the top inside out, mark where you want the sleeves (use stitch markers).
- Seam sleeves to the armhole edge with mattress stitch or slip stitches, making sure the seam lays flat and the sleeve’s seam is hidden (toward underarm).

- Repeat for the other sleeve.
RIBBED BAND (BUST/SHOULDER)
- Attach yarn at body seam.
- Rnd 1: Sc evenly around entire top opening (front, back, and each sleeve opening) placing one sc in each row end or gap. Join with sl st to first sc.
- Rnd 2: With RS out, ch desired length for rib (e.g. ch 17 for a wide band).
- Hdc in 3rd ch from hook and across (16 hdc for this example).
- Sl st in next 3 sc along the body.
- Turn, hdc BLO back along the row, ch 2, turn, hdc BLO back down the row.
- Sl st in next 3 sc of body.
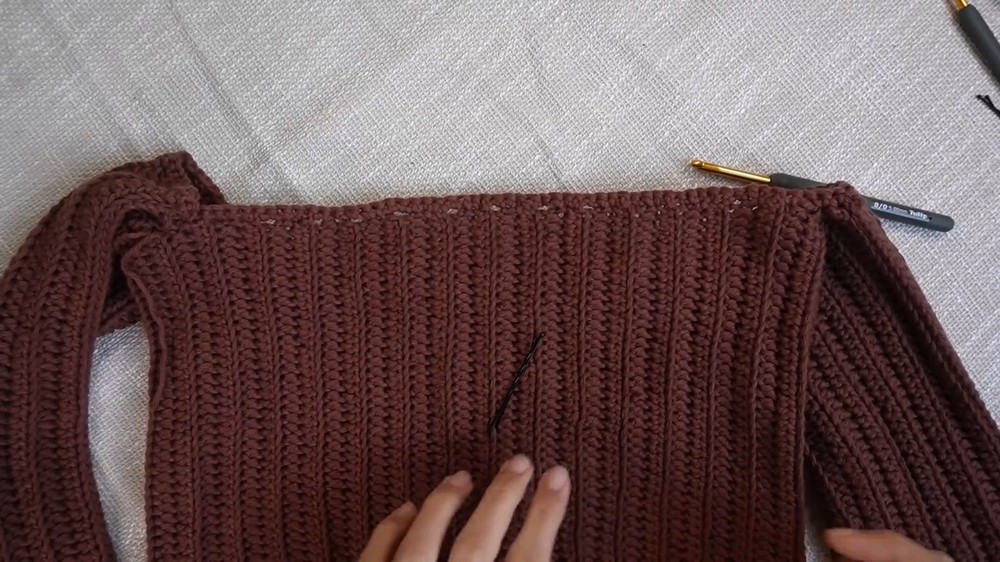
- Repeat this ribbing row, always sl stitching into next 3 sc of main body, all the way around the opening.
- Continue until you’ve worked into every body sc (when you return to the beginning).
- Join the ribbing edges with mattress stitch or sl st seam for a neat finish.
- FO, weave in all ends.
In plain English:
Work a single crochet foundation around the opening, then crochet perpendicular ribbing strips, joining as you go to the edge, all around the top for a clean, stretchy fit.
Assembly & Finishing
- Try on before final seaming and ribbing work.
- Mattress stitch saves time and looks tidy on the wrong side.
- Place seams at the back for the body, and underarm for sleeves, to keep them hidden.
- Seam ribbing edges invisibly; weave in all yarn tails.
- If top rolls, add a few rounds of sc around lower arms and body.
- For more sleeve movement, attach them only 75% of the way around the body opening.
Solution of Problem
Problem: If your top stretches or becomes too wide after assembling—
Solution: Make body 1–2” (2.5–5 cm) smaller than desired, as cotton naturally stretches out with wear and washing. Always try on and check fit before cutting your ends and seaming.
What You Can Make by Using These Stitches
- Crop or tank tops (add straps, remove sleeves!)
- Ribbed tube tops, bandeau, or bralettes
- Cardigans and sweaters (add longer body or open front)
- Cuffs, neckbands, and ribbed accessories
You now have a versatile, modern, off-the-shoulder ribbed crochet top! This style is excellent for layering and summer, or as a part of your festival wardrobe. If you have questions or need more visuals, reach out through the creator’s social media links. Enjoy crocheting and please share your completed makes!