FREE Crochet Maple Leaf Hair Clip Pattern To Show Off Your Style
Boost your look with this lovely crochet maple leaf hair clip, a soft and stylish accessory inspired by autumn’s vibrant colors and natural charm.
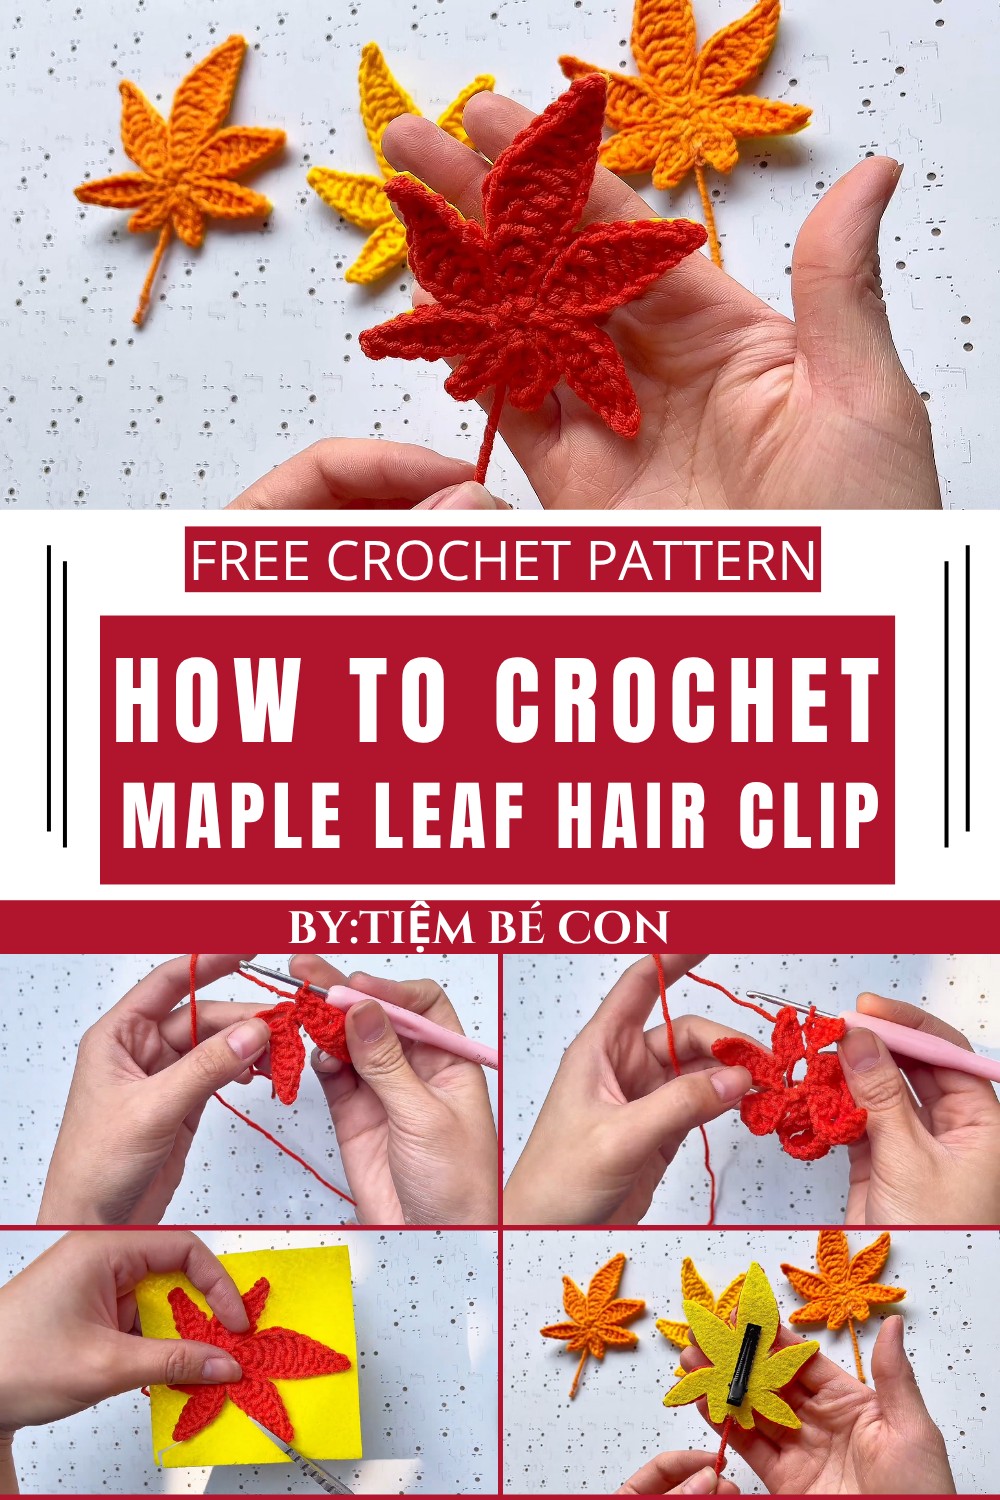
Free Crochet Maple Leaf Hair Clip Pattern Everyone Will Admire
A soft and delicate piece that feels like holding autumn in your hands, this crochet maple leaf hair clip is a stunning accessory inspired by the beauty of fall. The leaf captures the rich and warm shades of red, orange, and yellow, reflecting the charm of changing seasons. Its detailed design and natural look make it both eye-catching and elegant, perfect for styling your hair in a unique way.

Lightweight and practical, it keeps hair neatly in place while offering a touch of artistic beauty. Whether used for a casual day or a special event, this lovely hair clip carries a cozy fall vibe that’s hard to miss. It also makes a thoughtful handmade gift, filled with warmth and seasonal spirit. Perfect for anyone who loves autumn, this piece brings the essence of the season into everyday life effortlessly.
Materials Needed
Yarn:
- Any lightweight or medium-weight yarn (Category 3 or 4).
- Suggested Colors: Green for the leaf, or other colors for a stylized leaf.
Crochet Hook:
- Recommended hook size: 4 mm – 6 mm, depending on desired leaf size:
- For smaller, tighter leaves, use a 4 mm hook.
- For larger, open stitches, use a 5 mm or 6 mm hook.
Additional Supplies:
- Stitch markers: Optional, for marking important sections of the pattern.
- Scissors: For trimming yarn.
- Darning/Weaving Needle: For weaving in loose ends.
- Felt Fabric: A small piece for backing the leaf to add stiffness. Green or matching the yarn color is recommended.
- Hot Glue: For attaching the leaf to the backing and hair clip.
- Hair Clip (7 cm): Use a metal bar hair clip or alligator clip.
- Wire/Zinc: Optional, for enhancing the shape and support of the leaf edges.
Gauge
Gauge is not critical for this project. The size of your leaf will vary depending on yarn weight, hook size, and tension.
- With 4 mm hook and lightweight yarn: Approximately 6–7 cm long.
Finished Size
The final finished size is approximately 6–8 cm in length, but the size can be modified according to your preference and chosen materials.
Pattern Instructions
Below is the detailed pattern for crocheting a leaf design suitable for decorating hair clips:
Abbreviations (US Terminology)
| Abbreviation | Meaning |
|---|---|
| ch | Chain |
| sl st | Slip Stitch |
| sc | Single Crochet |
| hdc | Half Double Crochet |
| dc | Double Crochet |
| YO | Yarn Over |
Special Techniques
1. Magic Circle Creation:
- Wrap the yarn around your two fingers to form a loop.
- Insert the hook into the loop, YO, pull through, and chain 1 to secure. This forms the adjustable starting ring.
2. Crochet Wings (Symmetrical Edges):
- Increase and decrease strategically within stitches to form symmetrical, pointed ends for the leaf sections.
3. Wire Support (Optional):
- A thin wire can be crocheted into the edges or sewn after assembly to shape and support the leaf.
Step-by-Step Pattern
Part 1: Base Leaf Shape
- Start with the Magic Circle:
- Create a magic circle and start the base structure of the leaf.
- Round 1:
- Crochet 5 single crochet (sc) into the magic circle.
- Pull the tail to tighten and close the circle.
- Round 2 (Building the Leaf Shape):
- Slip stitch (sl st) into the first stitch to secure the circle.
- Then, crochet as follows:
- 1 single crochet (sc) in the first stitch.
- 1 half double crochet (hdc) in the second stitch.
- 1 double crochet (dc) in the third stitch.
- Work 2 dc in the fourth stitch (increase).
- End with 1 sc in the fifth stitch.

- This creates an elongated, pointed oval that resembles one-half of a leaf.
- Round 3 (Forming the Second Half of the Leaf):
- Rotate the project to work on the other side of the magic circle.
- Crochet the exact same pattern in reverse:
- 1 sc in the first stitch.
- 2 dc in the second stitch (increase).
- 1 dc in the next stitch.
- 1 hdc in the next stitch.
- 1 sc in the last stitch.
- Slip stitch into the starting stitch to complete the base shape of the leaf.

Part 2: Expanding and Detailing the Leaf
- Creating the First Wing/Edge of Leaf:
- Begin working additional edges or “wings” for your leaf.
- Chain 10 to lift the wing in height.
- Starting from the second chain from the hook, work as follows:
- 1 sl st, then 1 hdc in the second stitch.
- 1 dc, followed by 2 dc in the same stitch (increase).
- Mirror this pattern from dc back to sl st.

- Slip stitch into the base.
- Repeat for Other Wings:
- Rotate the project slightly and repeat this pattern to form additional overlapping wings or veins for the leaf.
- Each wing will start by chaining 10 (or another desired length).
- You will have 3–4 wings on each side of the leaf when completed.

Part 3: Stiffening and Decorating
- Finishing the Yarn:
- Cut the yarn, leaving a tail for securing.
- Use the darning/weaving needle to secure and hide the ends.
- Adding Felt Backing:
- Place the finished crochet leaf on top of a piece of felt. Trace the shape of the leaf and cut the felt slightly smaller than the crochet leaf.
- Use hot glue to adhere the felt backing to the reverse side of the leaf.

- Optional Wire Assembly:
- Cut thin wire long enough to fit around the edge of the leaf (extra length for overlap).
- Attach the wire by carefully sewing it along the edges or using glue. This will give the leaf additional structure.

Part 4: Adding the Hair Clip
- Apply hot glue to the top of the metal hair clip.
- (Use a 6–7 cm long clip for a secure fit.)
- Attach the glued portion of the hair clip to the felt side of the leaf.
- Press firmly and allow sufficient drying time for the glue to set before using.

Customization Ideas
- Size Variations:
- Adjust the size of your hooks and yarn to create smaller or larger leaves.
- Colors:
- Add multiple colors or layered stitching to form gradients for an autumn-themed look.
- Creative Uses:
- Create multiple leaves and string them together for a decoration or keychain.
- Decorative Embellishments:
- Add embroidery or beads along the veins for added elegance.
Tips for Success
- Even Tension: Maintain a uniform tension to ensure smooth and symmetrical wings.
- Secure Edges: Make sure to fasten off securely to prevent unraveling, especially if adding wire.
- Light Glue Application: Avoid overusing hot glue as it may create uneven textures beneath the felt.
Final Words
Congratulations on completing your crochet leaf hair clip! This graceful and intricate leaf design is perfect for creating versatile decorations or unique accessories. You’ve learned key techniques, such as the magic circle, symmetrical increases, and wire shaping, all of which you can use for future projects.