
Use This Trendy Free Crochet Puff Long Sleeve Top Pattern to Upgrade Wardrobe
Cozy up with a trendy crochet puff sleeve top made from this free pattern that is easy to follow and perfect for all skill levels and sizes.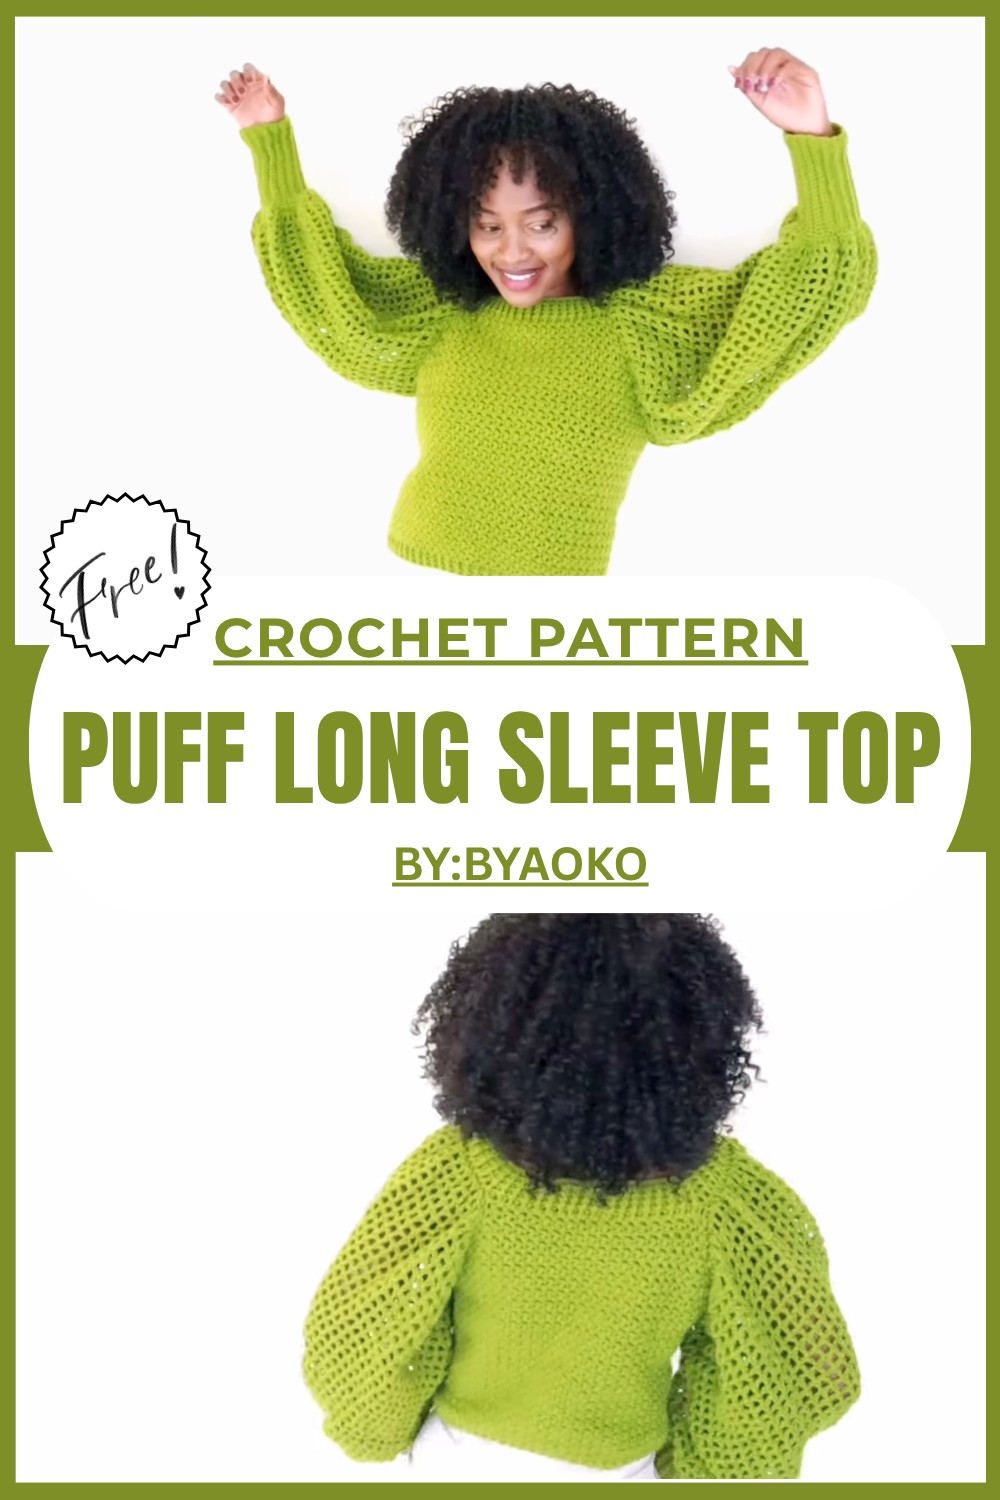
Free Crochet Puff Long Sleeve Top Pattern You’ll Love to Use
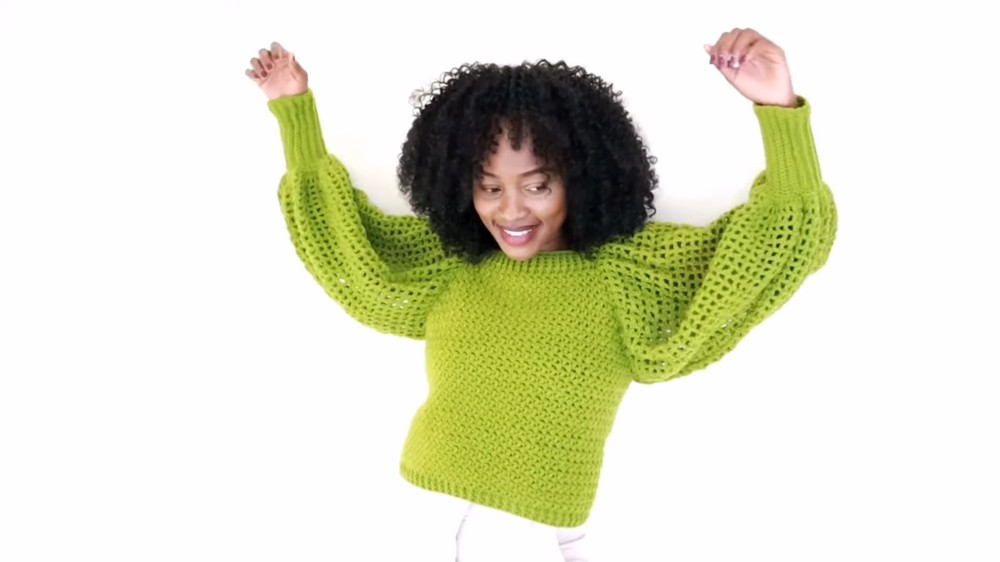
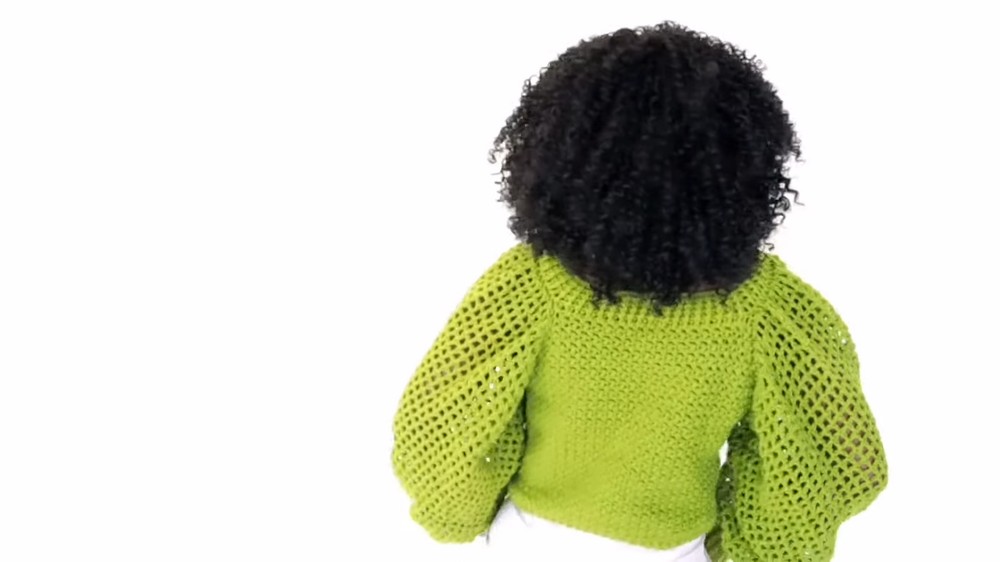
Hook a top that’s as fun to make as it is to wear, The Free Crochet Puff Long Sleeve Top Pattern combines style, comfort, and creativity into one stunning design. With its fluffy puff sleeves and soft, textured feel, this top will quickly become a favorite in your wardrobe.
The pattern is simple and beginner friendly, using easy stitches like the bean stitch to add unique details. Starting at the neckline, you’ll crochet your way down to create a beautiful fit that works for all sizes. The ribbed edges at the waist and cuffs make it even more elegant, while the puff sleeves add a trendy flair. 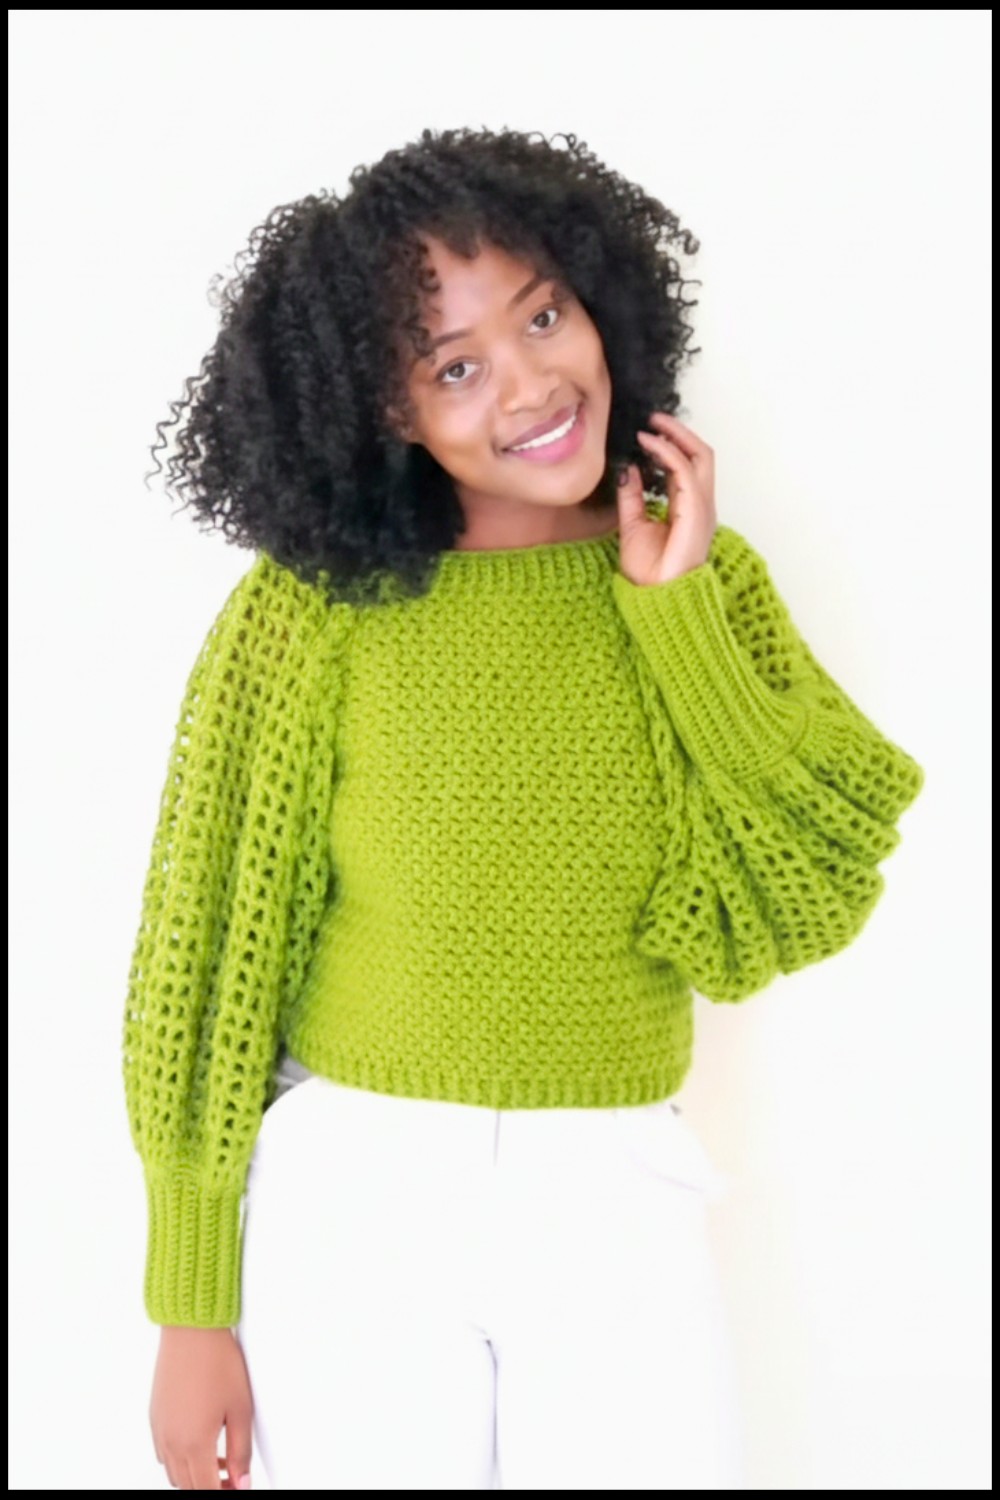 Whether you wear it casually or for a special occasion, this crochet top will turn heads and keep you cozy. Dive into the fun and create your very own stylish top.
Crochet Puff Long Sleeve Top Pattern
Skill Level
Advanced beginner to intermediate (you should be comfortable with basic stitches, working in rows, increasing, and basic seaming).
Materials
- Yarn:
- Thin acrylic yarn held double to achieve medium weight (category 4)
- Approx. 8 balls (amount may vary depending on yarn yardage and size).
- You may substitute any medium weight yarn (acrylic, cotton, blends).
- Hook:
- 5.0 mm crochet hook (or size needed to obtain gauge).
- Notions:
- Tapestry/yarn needle
- Scissors
- Stitch markers (highly recommended for measuring and balancing sleeves)
- Measuring tape
Size and Fit
The original top is demonstrated in a size M–L, but this pattern is easily adjustable.
Neckline width suggestions (measured along the starting chain):
- Size S–M: approx. 8 in / 20 cm
- Size L: approx. 9 in / 23 cm
- Size XL: approx. 10 in / 25.5 cm
You will work from the neckline downward for both front and back panels.
Abbreviations (US Terms)
- ch = chain
- sc = single crochet
- dc = double crochet
- st(s) = stitch(es)
- sp = space
- sl st = slip stitch
- RS = right side
- WS = wrong side
- rep = repeat
- yo = yarn over
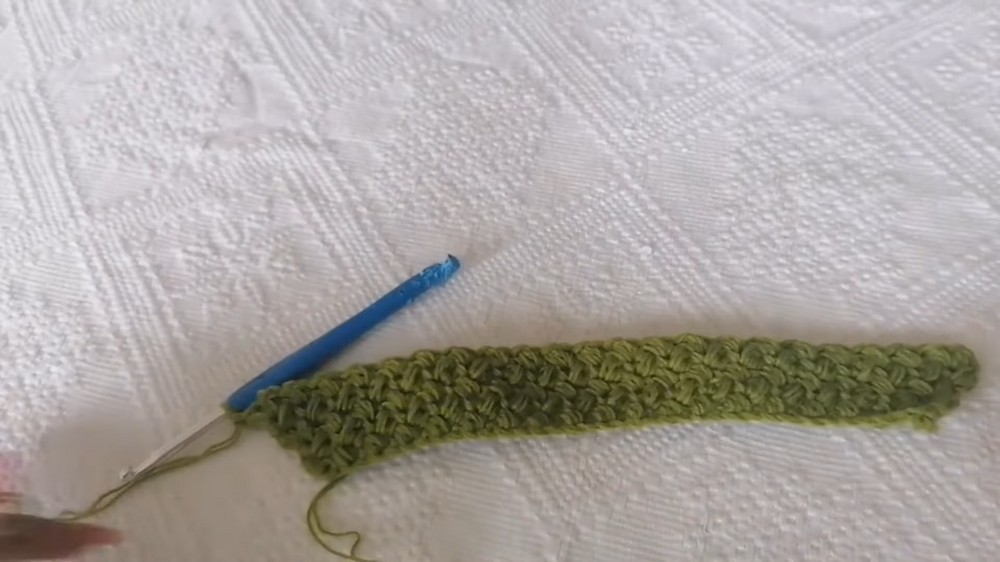
Special Stitch: Bean Stitch
Bean stitch is the main textured stitch used in the body of the top.
- Insert hook into designated stitch, yo, pull up a loop (2 loops on hook).
- Insert hook into the same stitch again, yo, pull up another loop (3 loops on hook).
- Yo and pull through all 3 loops on hook.
- Ch 1 to close/complete the bean stitch (this ch 1 counts as part of the stitch and creates the space for the next row).
Note: The video mentions “4 loops” at one point, but the structure described and the appearance are consistent with a standard bean/puff like stitch using 2 draws, then pull through all.
Overall Construction
- Front and back panels: worked from the neckline down in rows using bean stitch.
- You begin with a straight neckline.
- Then you increase at both edges to shape the shoulder/bust area.
- After reaching the desired height/width, you continue straight with no increases.
- Side seaming: front and back panels are joined at the sides using slip stitches.
- Neckline and straps:
- Straps and neckline ribbing are added in dc front post/back post ribbing.
- Sleeves:
- Start at wrist with sc ribbing.
- Work up, expanding into a puffy mesh sleeve (dc with chain spaces).
- Attach sleeves to armholes with single crochets, gathering the fullness at the shoulder.
- Waist ribbing: picked up around bottom edge and worked in front post/back post dc for a fitted hem.
Gauge (Approximate)
Because the pattern is highly adjustable and based on measurements, gauge is not strictly specified, but for reference:
- In bean stitch, for the sample:
- About 19 bean stitches ≈ 8.5–9 inches across neckline.
Adjust as needed using your measuring tape.
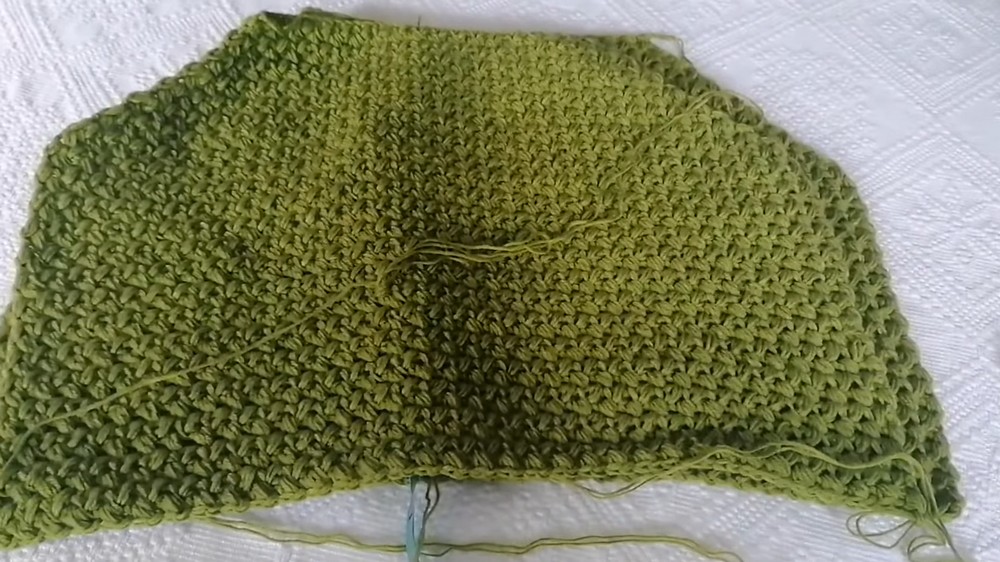
PART 1 – Front and Back Panels (Body)
You will make two identical panels (front and back).
Step 1: Foundation Chain for Neckline
- Make a slip knot.
- Ch a generous number of chains, more than you think you need. The pattern works best with an even number of beans, so chaining extra allows adjustment.
- Example (from transcript): the designer chained 45 and then adjusted.
- Lay your chain flat and measure the length:
- Aim for the neckline width based on your size (e.g., 8–10 inches as suggested).
- Aim for the neckline width based on your size (e.g., 8–10 inches as suggested).
Important:
You will only work the number of chains necessary to obtain your desired neckline width, and later you will undo extra chains at the end of Row 1 if needed.
Row 1: Bean Stitch Foundation Row (RS)
- Starting from the hook, skip first 2 ch.
- In the 3rd ch from hook, work 1 bean stitch (as defined above).
- Ch 1, skip next ch.
- In the following ch, work 1 bean stitch.
- Rep Steps 3–4 across the row.
At the end of the row:
- Ensure you start and end with a complete bean stitch (including the closing ch 1).
- Count your bean stitches. Example from transcript: 19 bean stitches ≈ 8.5–9 inches.
If you chained more than required:
- You will see unused chain stitches at the end. Carefully undo the excess chains (frog them) until the last chain is directly connected to your last bean stitch.
Row 2: Bean Stitch in Established Pattern (No Increase)
- After completing Row 1, you should have just chained 1 to close the last bean.
- Ch 1 more (or use the closing ch 1 as turning ch, depending on your tension) and turn your work.
- Identify the single crochet “core” of each bean stitch. In the video, she inserts into the “center” of the bean—the point where the stitch was created (not the chain space).
- Insert hook into the single crochet center of the first bean stitch, work 1 bean stitch, ch 1.
- In the next bean stitch center, work 1 bean stitch, ch 1, and continue across.
- At the end of the row, do not forget the last bean stitch in the final stitch/center.
- Close with ch 1.
You should still have the same number of bean stitches as Row 1 (e.g., 19).
Row 3: Increase Row
From this row, you begin to shape the shoulders/bust by increasing at both edges.
- Turn your work.
- In the first bean stitch center (or first single crochet of prior bean), work 2 bean stitches into the same spot:
- Bean stitch, ch 1,
- Bean stitch in the same stitch, ch 1.
This creates an increase at the beginning of the row.
- Continue working 1 bean stitch in each bean center across until you reach the last stitch.
- In the last bean stitch center, work 2 bean stitches into the same spot:
- Bean stitch, ch 1,
- Bean stitch in same stitch, ch 1.
- Turn.
Row 4: Straight Row (No Increase)
- Work bean stitches evenly across:
- 1 bean stitch in each bean center of the previous row, with ch 1 between each, no increases at either end.
Shaping Pattern for Upper Body
Repeat Rows 3 and 4, alternating:
- Increase Row: increase at first and last stitch (2 beans in same stitch at both ends).
- Straight Row: no increases.
Continue this alternating pattern until:
- The panel reaches the desired width across the bust/upper body and
- The upper shaping (slanted area) is complete and you are ready to work straight for the torso length.
The video suggests continuing until you reach the point shown in the sample, then working in a straight line.
Straight Body Section (Torso)
Once the increasing is complete and your panel is wide enough:
- Work bean stitch rows with no increases:
- 1 bean in each bean center, ch 1 between beans, as in Row 2.
- Continue until the panel length from neckline to hem reaches your desired measurement (e.g., down to waist or just below).
Make two identical panels: one for the front and one for the back.
PART 2 – Seaming the Sides
- Place front and back panels with WS facing out (RS together inside).
- Align the side edges carefully.
Side Seam with Slip Stitch
- Attach yarn at the bottom edge of one side seam through both layers.
- Sl st through both layers at the corresponding stitch/row:
- Insert hook in one panel’s edge stitch/row, then through the opposite panel’s corresponding edge stitch/row.
- Yo, pull through both and through loop on hook (sl st).
- Move to the next “row edge” or stitch on both panels and repeat.
- Continue up the side seam until desired armhole depth is left unseamed at the top (for arm opening).
- Fasten off and weave in ends.
Repeat on the other side seam.
You have now a body piece with two armhole openings and a neckline opening.
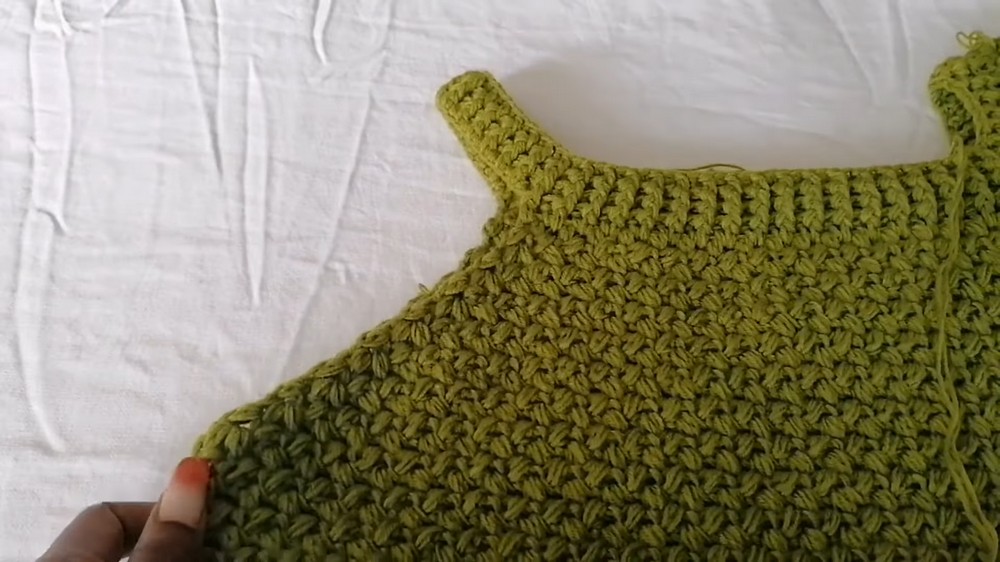
PART 3 – Neckline and Straps
The neckline is worked in double crochet ribbing with front post and back post stitches. The straps are formed from chain lengths that connect front and back.
Step 1: Setup Round (Dc Around Neckline and Strap Chains)
- With the top laid flat, decide where the back center is.
- Attach yarn at the back neckline (center) with a sc, then ch 1 or ch 2 to begin.

- Work around the neckline:
- In each chain 1 space from the bean stitch row, work 2 dc.
- Continue placing 2 dc in each ch 1 sp all the way from the back, around the front, and back to the backside where the straps will begin.
- When you reach one shoulder/front corner where you want the strap:
- Ch 28 (or enough chains to comfortably fit over your shoulder as a strap).
- This chain will be the armhole edge and strap.
- Turn to the opposite neckline side at the front:
- In the first chain 1 space after the chain, work 2 dc, then continue working 2 dc in each ch 1 sp around the front neckline to the other side.
- At the opposite corner/shoulder:
- Again, ch 28 (or same number as first strap to keep them equal).
- Join to the back center (starting point) with a sl st (if you are working in the round) or with a dc and the same logic as described in the video to close the round.
At this point, you have:
- A row of dc all around the neckline, and
- Two chain straps forming the armhole openings.
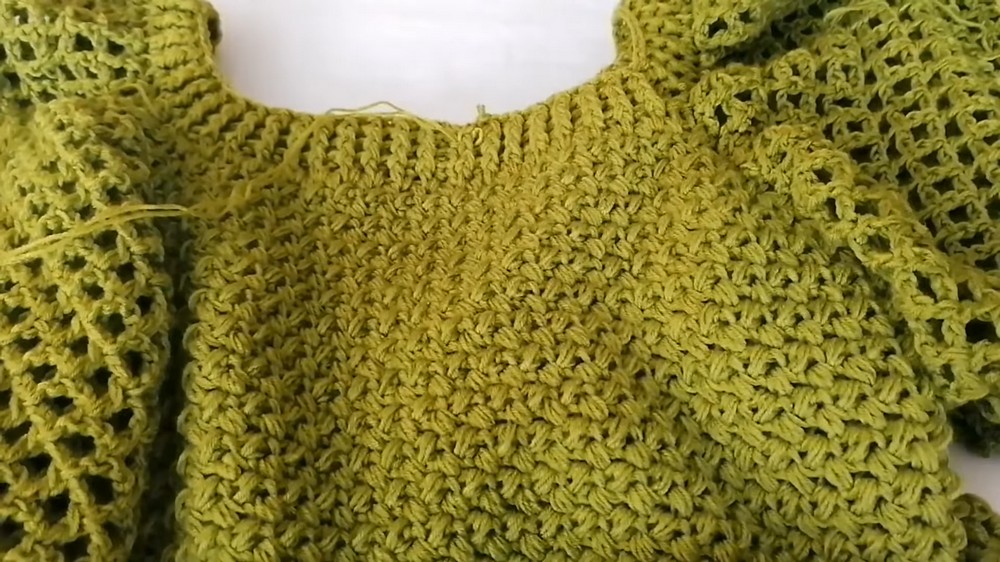
Step 2: Neckline Ribbing – Round 1 (Front Post / Back Post)
- Ch 2 (does not count as a stitch in most cases, or count as preferred).
- Around the neckline dc stitches only (not yet the strap chains):
- Work front post dc (FPdc) around the first dc,
- Then back post dc (BPdc) around the next dc,
- Alternate FPdc and BPdc around the neckline edge.
- When you reach the strap chain, work:
- 1 dc in each chain of the strap (no post stitches yet on this first pass).
- Continue alternating FPdc/BPdc around all dc stitches until you reach back to the starting point. Join with a sl st.
Step 3: Neckline Ribbing – Round 2 and Onward
- Ch 2.
- Around the neckline:
- Work FPdc into each FPdc of previous round,
- Work BPdc into each BPdc of previous round.
- When you reach the strap, you now have dc stitches (from previous round) instead of chains:
- Work FPdc and BPdc alternately across the strap dc stitches as well, continuing the ribbing pattern seamlessly.
- Continue in established ribbing pattern for 2–4 rounds (or as desired) to create a neat, elastic ribbed neckline and strap.
Fasten off and weave in ends.
PART 4 – Sleeves
The sleeves are worked from the wrist upward and then attached to the body.
A. Wrist Ribbing
- Ch 26 (for the sample; adjust for your wrist size).
- Row 1:
- Sc in 2nd ch from hook and in each ch across.
- Turn.
- Row 2:
- Ch 1, sc in first st through both loops.
- Sc in each remaining st through back loops only (BLO) until the last st.
- In the last st, sc through both loops.
- Turn.
- Row 3 and onward:
- Rep Row 2, always:
- First st: sc through both loops.
- Middle sts: sc in BLO.
- Last st: sc through both loops.
- Continue until the ribbing strip reaches the circumference of your wrist (wrap around comfortably but snugly).
- Rep Row 2, always:
- Join the two short ends of the ribbed strip:
- Fold the strip in half, RS facing each other.
- Sl st or sc across corresponding sts to form a cuff.
- Turn cuff RS out.
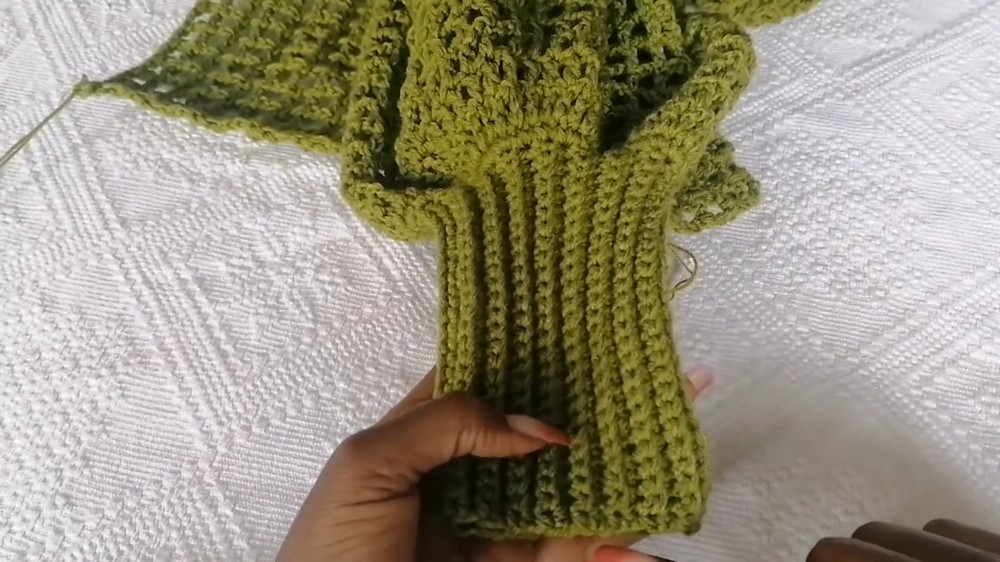
B. Building Puff Sleeve Above the Wrist
Now you will work upward from the edge of the ribbing, making the sleeve puffy.
- Attach yarn at cuff edge.
- Row 1 (Increase Single Crochet Row):
- Ch 1.
- For each rib row edge, work 2 sc along the top edge of the cuff.
- That is, 2 sc in the top of each “vertical rib” or row.
- This doubles the number of stitches and starts the puff/gather effect.
- Turn.
- Row 2: Dc Mesh (1-ch Space)
- Ch 4 (counts as dc + ch 1).
- Dc in next st, ch 1.
- Rep * to * across: dc in next st, ch 1.
- Turn.
- Row 3: Dc Mesh Repeat
- Ch 4 (dc + ch 1).
- Dc in next dc (skip chain spaces, always placing dc on dc), ch 1.
- Rep across.
- Turn.
- Row 4: Wider Mesh (2 ch Space)
- Ch 5 (counts as dc + ch 2).
- Dc in next dc, ch 2.
- Rep across.
- At the end: place the last dc into the 3rd ch of the beginning ch 4 of the previous row (as per the transcription).
- Turn.
This increases the width of the mesh by having ch 2 spaces between dcs.
- Check Circumference
- Using a measuring tape, measure around the top opening of the sleeve (do not stretch).
- The sample shows about 33 cm circumference and around 60 chain 2 spaces.
- If this circumference is sufficient to go around your upper arm and provide the desired puffiness, you can stop increasing.
- Rows 5+ (Straight Sleeve Section)
- Work in straight mesh pattern as in Row 4:
- Ch 5, dc in next dc, ch 2, rep across, dc in 3rd ch of turning ch.
- Continue until the sleeve length from cuff to top matches the distance from your wrist to the point on your shoulder/arm where you want the sleeve to attach.
- Work in straight mesh pattern as in Row 4:
Make a second identical sleeve.
PART 5 – Attaching Sleeves to Body
This is done with the body turned inside out so that the seam remains on the WS.
- Turn the body inside out (WS facing you).
- Turn sleeves inside out as needed so WS are facing each other where they meet.
Step 1: Positioning
- Identify the middle of the sleeve top (roughly half of the chain 2 spaces) and the top/shoulder area of the body’s armhole.
- Attach the sleeve at the middle point of the top of the sleeve to the top of armhole/shoulder with a sc. This helps center the sleeve.
Step 2: Attaching the Sleeve Around Armhole
You will only attach at the dc posts around the sleeve, ignoring the chain spaces.
- Starting from the center point:
- Insert hook through the body panel edge (armhole row edge) and through the dc at the top of sleeve mesh.
- Work 1 sc to join.
- Move to the next row edge on the body and next dc on sleeve:
- Sc through both layers.
- Continue in this way along one side of the armhole until you reach the underarm corner:
- Do not skip any body rows; attach each row to a dc on the sleeve where appropriate.
The sleeve is wider than the armhole edge, which is desired to create gathering/puffiness.
Step 3: Balancing the Fullness
From the transcript:
- After joining one side, the designer had 16 chain 2 spaces attached on one side of the sleeve.
- She then counted 16 spaces on the other side and marked them with a stitch marker so both sides are symmetrical.
- The remaining center section of spaces is gathered across the shoulder to create the puff.
Procedure:
- Count how many sleeve spaces (dc groups) you attached on the first side.
- On the opposite side of the sleeve, count the same number of spaces and mark where that section should end with a stitch marker.
- The middle portion (between these markers) will be distributed along the shoulder section of the body.
Step 4: Gathering at Shoulder
- Divide the remaining top sleeve section and the shoulder portion into halves (use markers if needed) to help distribute evenly.
- Continue attaching:
- Insert hook through one stitch/row in the shoulder strap area, then through the next dc in sleeve.
- Work 1 sc.
- In some areas, you may need to slightly “ease in” extra dc from sleeve into fewer body rows, which creates gentle gathers.
- Reach the stitch marker at the opposite side; this should correspond with your last sc attachment in that section.
Step 5: Complete the Underarm Side
- Continue attaching down the other side of the armhole in the same way as the first side.
- When done, fasten off and weave in ends.
Repeat this entire process with the second sleeve.
PART 6 – Closing the Sleeve Underarm Opening
The video also shows binding the sleeve’s opening and body underarm to close any remaining opening.
- With WS facing, align the underarm seam of the sleeve with the side seam/armhole bottom.
- Attach yarn where the first dc at the underarm gap appears.
- Work:
- Sl st into first pair of matching stitches, ch 1,
- Turn to the opposite side if needed, sl st into next pair, ch 1,
- Continue alternating sides and slip stitching together until the underarm opening is closed completely.
- Where you encounter the sc portion (not mesh), simply sl st through corresponding stitches to close.
At the end:
- Ch 1, cut the yarn, pull through, and tighten securely.
- Weave in all ends on WS.
PART 7 – Waist Ribbing (Bottom Hem)
The bottom of the top is finished similarly to the neckline.
- With the top RS facing you, attach yarn at any side seam along the bottom edge.
- Foundation round:
- Work 2 dc into each ch 1 space along the bottom bean stitch edge.
- Keep your stitch tension even; do not overcrowd or overly space.
- Join with sl st to the first dc.
- Ribbing rounds:
- Ch 2.
- Work FPdc around the first dc, BPdc around the next dc.
- Alternate FPdc and BPdc all the way around.
- Join with sl st.
- For the second and subsequent rounds:
- FPdc into FPdc, BPdc into BPdc of the previous round.
Continue for 2–4 rounds (or more if you desire a deeper rib). Fasten off and weave in ends.
Finishing
- Weave in all ends securely on the wrong side using a yarn needle.
- Check seams (side seams, sleeve attachments, underarm) for any gaps and close them with a few extra stitches if necessary.
- Lightly block the top if your yarn allows:
- For acrylic, gentle steaming at a distance (without touching the iron to the fabric) or light shaping on a flat surface works best.
- For wool or cotton, you may wet block, pin to measurements, and let dry.
Tips and Suggestions
- Customizing size:
- Adjust the initial neckline chain and number of bean stitches to match your shoulder width and preferred neckline.
- Adjust length of straight body section to your torso measurements.
- Adjusting sleeve fullness:
- To have less puff, add fewer stitches in the first sc row above the cuff (e.g., alternate 1 sc and 2 sc per rib instead of 2 sc each).
- To have more puff, maintain 2 sc per rib and possibly add more rows of increases or wider chain spaces.
- Strap length:
- The sample uses ch 28.
- Before proceeding to ribbing, try the top on and ensure that the strap chain length sits comfortably on your shoulder without slipping.
- Yarn choice:
- Acrylic gives a soft, light structure and is easier to maintain.
- Cotton will give more stitch definition and less stretch.
- For a more draped top, choose a slightly softer yarn (cotton/acrylic blend).

- Maintaining the top (Care):
- Hand wash or gentle machine wash on cool, especially for acrylic or blended yarns.
- Lay flat to dry to maintain shape.
- Avoid high heat; if ironing, use low heat and a pressing cloth or hover steam.
- Consistency in Bean Stitch:
- Always insert your hook in the same “center” of the bean stitch (the single crochet core) so your fabric stays even.
- Keep your ch 1 between beans consistent.
Final Words
This puff sleeve crochet top is constructed with simple elements—bean stitches, ribbing, and basic mesh—but the combination yields a sophisticated, puffy sleeve garment. The pattern is very adjustable: by changing the initial neckline width, number of increases, and sleeve fullness, you can customize the top to your body and style.
If you follow the measurements closely, use stitch markers to balance your sleeve gathers, and maintain consistent tension on the bean stitches and ribbing, you will achieve a neat and elegant finished piece.