Best Crochet Checkered Beanie Pattern For Bold Winter Looks
Style up your winter wardrobe with a cozy crochet checkered beanie that combines warmth, personality, and an unforgettable charm for all ages and occasions.

Easy Crochet Checkered Beanie Pattern for Ultimate Cozy Style
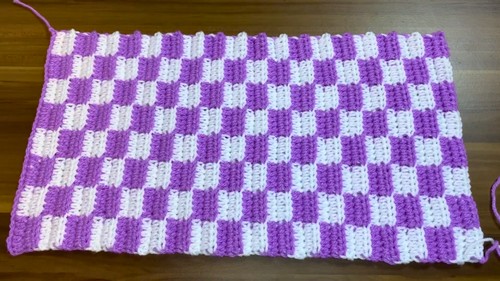
Wrapping your head in warmth while making a bold fashion statement, that’s the magic of this crochet checkered beanie! Unlike ordinary beanies, this one boasts a distinct, eye-catching checkerboard design that balances playful charm and modern style. The checkered pattern, featuring clean blocks of alternating colors, is not only visually stunning but gives your accessory a handmade, artistic vibe.

This beanie isn’t just about looks, its snug and stretchy fit ensures it keeps you warm on chilly days while still feeling lightweight and breathable. Whether you’re dressing up a plain outfit, heading out for a winter adventure, or gifting it to someone who loves handmade charm, the versatility of this pattern shines. It’s the perfect chance to mix and match your favorite colors, creating a unique piece for any season. Stylish, warm, and simple to make, this beanie is a crochet project that brings flair and function together.
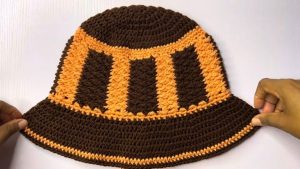
Crochet Checkerboard Beanie Pattern
This pattern guides you through crocheting a stylish checkerboard-patterned beanie. Perfect for beginners, this project requires simple techniques and can be completed in a day with ease.
Materials:
- Yarn:
- 2 balls of yarn in contrasting colors: White and Purple.
- Recommended yarn weight: Worsted weight (#4).
- Hook Size: Use a size 4 mm crochet hook.
- Other Tools:
- Tapestry needle for sewing and weaving in ends.
- Scissors.
Gauge:
The checkerboard pattern is worked in blocks of alternating colors using single crochet stitches. To match the gauge:
- 5 stitches x 5 rows = 1 checkerboard square.
Finished Size:
- Width (circumference): Approximately 18–22 inches (adjustable for size).
- Height: Approximately 9–10 inches (36 rows). Adjust as needed to achieve your desired size.
Special Techniques Used:
1. Changing Colors:
When switching colors, carry the unused yarn along the back of your stitches. This avoids cutting the yarn repeatedly and keeps the inside of the beanie neat.
2. Joining the Top:
To close the top of the beanie, you’ll gently gather the stitches using a tapestry needle and pull the yarn tightly to close any gaps.
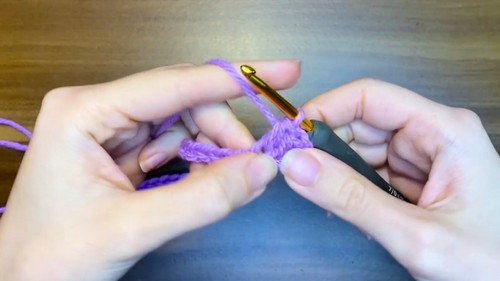
3. Single Crochet (sc):
- Insert the hook into the stitch.
- Yarn over and pull up a loop (2 loops on the hook).
- Yarn over again and pull through both loops on the hook.
Pattern Instructions:
Step 1: Start with Chain Stitches
- Create a slip knot and attach it to your crochet hook.
- Chain 52 stitches. This will determine the circumference of your beanie.

- (Tip: If you want a larger or smaller circumference, increase or decrease the number of chains in multiples of 5, keeping the checkerboard square pattern intact.)
- Once the chain is complete, begin the first row.
Step 2: Begin Row 1
- Skip the first 2 chains from the hook. In the third chain, make your first Single Crochet (sc).
- Continue with the purple yarn: Make 5 single crochet stitches in purple.
- Switch to white yarn and make the next 5 single crochet stitches.
- Alternate the colors every 5 stitches until the end of the row.
Step 3: Change Color and Move to Row 2
- At the end of the row, chain 2 stitches and turn your work around (to work in the opposite direction).
- Carry the unused yarn by running it along the back of the stitches and crochet over it to keep it hidden.

- Starting with the same color as the previous finish, crochet 5 single crochets into the middle/back loop of the stitches below.
- Alternate colors every 5 stitches, repeating the checkerboard pattern.

Step 4: Continue Rows 3–36
- Each row will follow the same pattern (5 sc in purple, 5 sc in white), alternating colors.
- After every four rows, you will complete a full “checkerboard square” of color on your pattern.
- Crochet 36 total rows (or more/less depending on your preferred height for the beanie).
(Tip: As the beanie progresses, you’ll notice it taking on a checkerboard pattern of alternating squares. If you accidentally make a mistake, unravel and redo the square—it will be worth it!)
Step 5: Finishing the Rectangle
- After finishing Row 36 or your desired length, tie off your yarn securely. Do this by cutting your working yarn, leaving about a 6-inch tail, and pulling it through the final loop to secure.
- You should now have a long crocheted rectangle with a checkerboard pattern.
Step 6: Assembling the Beanie
- Fold the rectangle in half lengthwise with the right side facing inwards. Ensure the checkerboard pattern aligns.
- Thread a 50 cm (about 20-inch) piece of yarn through your tapestry needle. Sew the two long edges together with a whipstitch or mattress stitch to form a tube shape. Tie off this yarn once you reach the end.

Step 7: Closing the Top
- Turn the tube shape inside out so the checkerboard design is now facing outward.
- Using a tapestry needle, thread through the top edge of the beanie in and out (gathering the fabric). Do this around the entire opening.
- Pull the thread tightly to close the top opening.
- Secure the closure by tying a firm knot with the remaining yarn.

Step 8: Weaving in Ends
- Weave in any loose yarn tails into the inside of the beanie. Use a crochet hook or needle to ensure the ends are well-hidden for a clean finish.
Finishing Touches & Customization Ideas
- Pom-Pom: Attach a matching or contrasting pom-pom to the top for added flair.
- Colors: Experiment with different color combinations for creative and unique checkerboard designs.
- Adjusting Size:
- For larger/smaller head sizes, add or subtract chains in your foundation row (in multiples of 5).
- To make the beanie taller or shorter, adjust the number of rows.
Conclusion
Your checkerboard-patterned beanie is now complete! This chic and cozy accessory is perfect for any occasion and makes a wonderful handmade gift. Its clean design, achieved with alternating colors, ensures it’s both stylish and versatile.
Important Notes:
- The checkerboard design requires consistent tension for even squares. Check your gauge periodically.
- Carrying the unused yarn across the back ensures a neat interior but avoid pulling too tightly as it may affect the shape.
- Blocking your finished beanie (if made with wool or similar fibers) will enhance its look, smooth stitches, and finalize its finish.