
Charming Crochet Bow Bag Free Pattern With Everyday Style
Its design exudes a balance of playful sophistication and practical wearability. The bag’s compact yet roomy structure is perfect for spring and summer, adding a fresh touch to your wardrobe. Whether paired with a breezy sundress for a garden party or with chic denim for a day of shopping, this bag complements a wide range of outfits effortlessly, revitalizing your look with its unique bow accent.
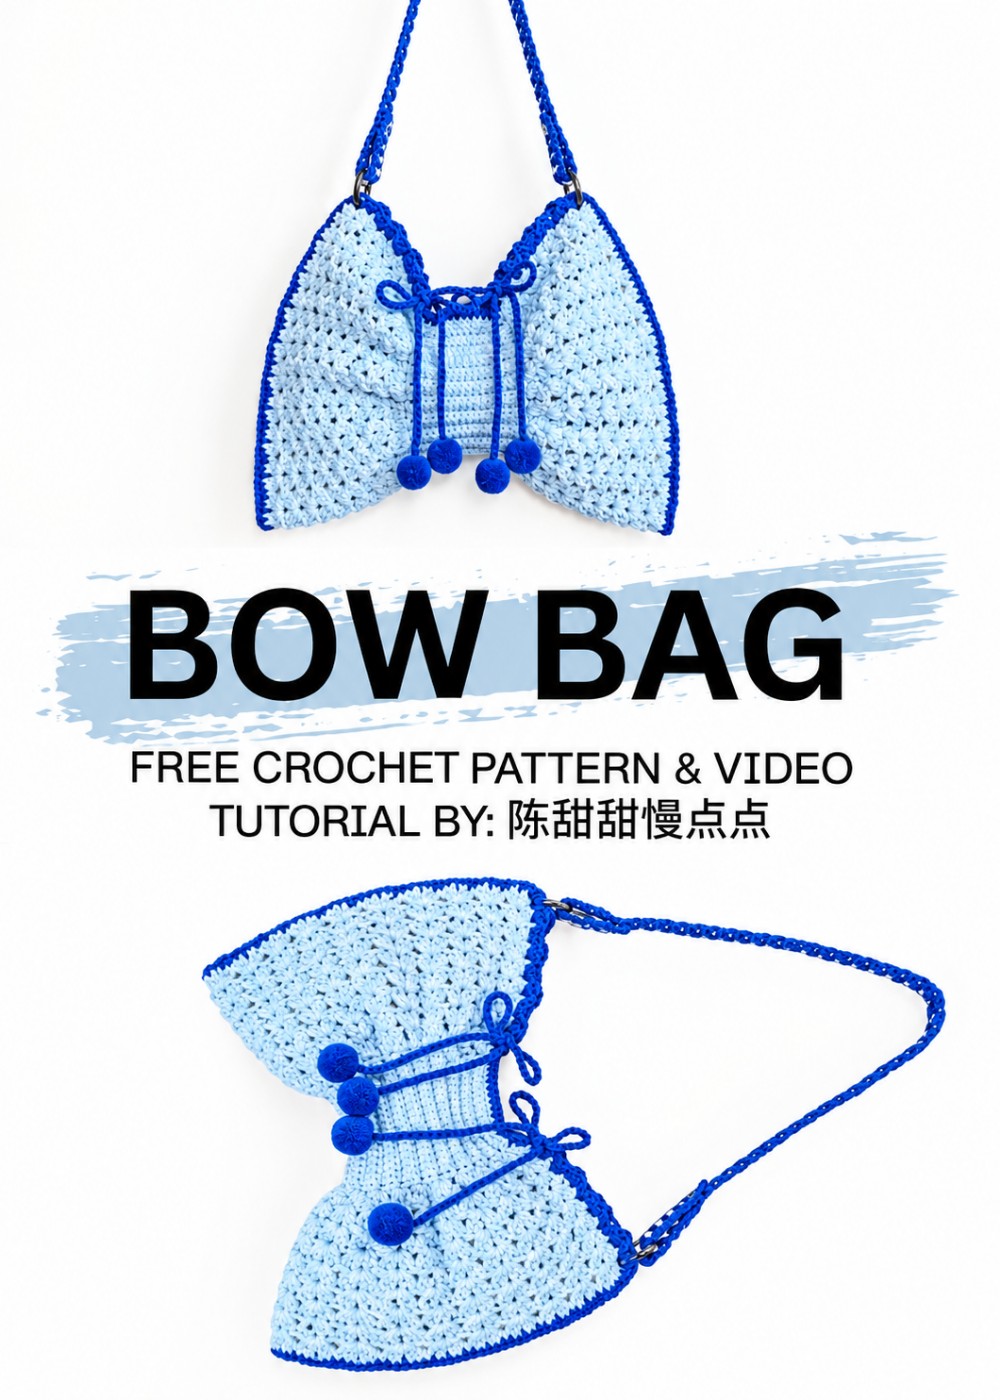
The texture of this bag is equally captivating. Made using 5-ply cotton yarn and a 3.0mm hook, it features a beautifully layered surface created by working single crochet stitches with a special focus on the back loops, lending a subtle ribbed effect that enhances durability and tactile interest. The standout bow at the front is not just decorative but also functional, blending seamlessly into the bag’s underarm silhouette, elevating the overall aesthetic.
Additional highlights include a magnetic snap closure for secure yet easy access, and a thoughtfully designed strap woven through the bag’s edges, finished with charming pom-poms that add a whimsical, lively flair. This unique construction balances softness with structure, making the bag both eye-catching and reliable. Dive into the complete Crochet Crochet Bow Bag Pattern to explore all the details, learn the step-by-step process, and create this exquisite accessory that merges style and utility like no other.
Crochet Ribbed & Shell Pattern Bag
This project provides clear, step-by-step instructions for a stylish cotton crochet bag distinguished by ribbed midsections, shell stitch sides, and thoughtful hardware elements. The directions do not assume advanced experience, yet incorporate techniques—such as back loop single crochet and shell stitches—that lend both structure and visual interest. Attention to detail, from border finishing to closure placement and strap assembly, ensures the bag is as functional as it is attractive. Each phase is carefully sequenced to support accuracy and confidence at every stage. The inclusion of contrasting yarn, magnetic clasps, and pom-pom drawstring embellishments enables individual customization. With practicality and durability at the core, this piece serves as both a useful everyday accessory and a special statement item. Comprehensive assembly advice guarantees a satisfying, long-lasting finished result, whether for personal use or gifting.
Quick Overview of Pattern
- Central Textured Panel: Ribbed base worked in back loop single crochet.
- Side Panels: Shell pattern crafted along each ribbed edge.
- Border & Assembly: Decorative trimming followed by seaming the bag body.
- Closures & Strap: Magnetic clasp installation, drawstring bow ties, and sturdy crochet strap with hardware.
- Embellishments: Pom-poms added to drawstring ends for a festive touch.
Notes
- Use high-quality, 5-ply cotton yarn in strongly contrasting colors for optimal stitch definition.
- The ribbed panel forms a flexible but firm midsection, supporting the shape.
- Ensure hardware and embellishments are securely attached for longevity.
- Gauge and measurements can be adjusted to suit individual preferences.
- Employ stitch markers for accuracy, especially on edges and pattern repeats.
- All steps are laid out in logical order; follow section by section for best results.

Skill Level
- Advanced Beginner to Intermediate
- Comfort with basic crochet stitches (single, double), working in rows and rounds, and simple pattern repeats. Some assembly required.
Materials
- Yarn: 5-ply combed cotton yarn, ~100g in two contrasting colors
- Crochet Hook: 3.0 mm
- Stitch Markers
- Magnetic Clasp / Snap Button
- Sewing Needle & Matching Thread
- Flathead Screw / Hardware Fastener
- Decorative Pom-Poms (for drawstring ends)
- Hardware Buckles (for strap attachment)
- Scissors
Measurements / Sizing
- Finished dimensions:
- Bag body: 25–30 cm wide x 17–20 cm tall
- Strap: Adjustable; standard length approx. 90–110 cm
- Drawstrings: Two cords, each ~40 cm
- Adjust dimensions for preferred size by adding/removing rows or stitch counts.
Gauge (and Stitch Pattern if applicable)
- Gauge: 18 single crochet stitches x 20 rows = 10 cm x 10 cm
(in BLO single crochet) - Stitch Pattern:
- Ribbing: Back Loop Single Crochet (BLSC)
- Side panels: Shell (2 dc, ch 1, 2 dc)
- Border: Alternating ⅔ sc in gaps, sc along panel edges
Stitch Abbreviations
- ch = chain
- sc = single crochet
- dc = double crochet
- BLO = back loop only
- sl st = slip stitch
Special Stitches
- Shell Pattern: [2 dc, ch 1, 2 dc] in same stitch or chain space
- Back Loop Single Crochet (BLSC): Work sc only in the back loop
- Pattern Loop: Chain and dc in strap foundation
The Crochet Pattern
Part 1: Middle Base Panel
Row 1: Foundation & First Single Crochet
- Start with a slip knot.
- Chain 18 for base.
- Turn, skip the first chain, and work into the back bump from the 2nd chain from hook.
- Work 17 sc across in total.
Rows 2–41: Back Loop Single Crochet (BLSC) Ribbed Panel
- Row 2: Ch 1, turn.
- Work 17 BLSC (sc in BLO) across.
- Row 3: Ch 1, turn; repeat BLO pattern for 17 BLSC.

- Rows 4–41: Continue Row 3. Maintain 17 BLSC per row, forming 20 ridged groups + 1 final single row (total 41 rows).
Part 2: Side Panels (Shell Pattern)
Side 1 Base Edge
- Ch 1.
- Work 41 sc along the side edge of the ribbed panel (1 sc per row end).
- Mark the first sc with a stitch marker.
Side 1 Shell Pattern Rows
- Row 2: Ch 3 (as first dc; mark if needed), turn.
- In the 2nd stitch, work shell: [2 dc, ch 1, 2 dc].
- Skip 1 stitch; shell in next stitch: [2 dc, ch 1, 2 dc].
- Repeat pattern across row.
- Work 1 dc in last stitch.
- Row 3: Ch 3, mark, turn.
- In each ch-1 space of previous row's shell, work [2 dc, ch 1, 2 dc].
- Finish with 1 dc in top of turning chain.
- Rows 4–10: Repeat Row 3 for a total of 10 shell rows. Fasten off and cut yarn.

Side 2 Base & Pattern Rows
- Turn work to opposite long edge of ribbed panel.
- Join yarn at last edge stitch.
- Row 1: Ch 1; work 1 sc in first stitch, continue with 1 sc per row across for 41 sc.
- Rows 2–10: Work shell pattern in same manner as Side 1. Fasten off and cut yarn.

Part 3: Border & Assembly
Border Trim Around Edges
- Attach contrasting yarn in side gap/space.
- Side Edge: Ch 1, work 2 sc in first gap, 3 sc in next, alternating for total of 23 sc (22 sc across 9 rows, plus 1 sc in first row single crochet).
- Middle Section: Work 17 sc across middle panel edge.
- Opposite Side Edge: Work 23 sc down using same alternating pattern.
- Repeat for other open edge; each side has 63 sc total.
Seaming the Body
- Fold bag in half.
- Line up 10 shell patterns on each side (each with 5 stitches = 50).
- Join yarn through first matching shell stitch on both sides.
- Ch 1, and sc across both thicknesses to seam:
- 50 sc across shell sections, 1 sc in middle gap, 1 sc on last edge = 52 sc total. Fasten off.
- Seam opposite side identically.
- Weave in all ends.

Part 4: Closures, Drawstring Bows & Straps
Magnetic Clasp Installation
- Mark top center of bag opening.
- Separate 2 strands from 5-ply yarn.
- Stitch both sides of magnetic clasp securely inside center with sewing needle.
Drawstring Bow Ties
- Crochet two chain cords (150 ch each).
- Weave drawstrings through first pattern gap at bag opening, skipping every second gap, using third gap for entry, repeating across 5 entry points.
- Attach pom-poms to ends.
- Tie a bow at each side.
Main Bag Strap Construction
- Round 1 (Foundation Loop): Start with slip knot (loose).
- Ch 2, work 1 dc into base knot, tighten to complete pattern unit.
- Pattern Loop: Ch 2, work 1 dc into gap of previous loop.
- Repeat until 60 pattern units formed.
- Round 2 (Edging): Turn, work into gap of 2nd loop.
- Ch 1, work 2 sc per gap along strap.
- In final pattern loop, work 5 sc to turn corner, then 2 sc per gap down opposite side.
- Work 5 sc in starting loop.
- Sl st into first stitch, fasten off, cut yarn.
Final Strap Attachment
- Attach buckles into first gap on each bag side.
- Thread finished strap through buckles.
- Adjust to preferred length.
- Use flathead screws/hardware fasteners to secure strap ends.

Conclusion
This bag offers a rewarding and useful project for those seeking to refine technique while producing something memorable. Combining straightforward construction with layered textures and smart closure systems, the process builds confidence and skill in several areas of crochet. Clear explanations guide the assembly of panels, the attachment of borders, and integration of adjustable straps and closures. Time invested in carefully seaming and adding ornamental touches will be reflected in the bag’s functionality and unique appeal. Whether chosen for daily use or as a personalized gift, the result balances beauty and resilience. The final product is not only visually engaging but will withstand repeated use thanks to meticulous assembly and sturdy materials. All instructions are arranged for logical progression, ensuring that completion is both satisfying and practical.


Leave a Reply