
Cute Crochet Baby Sun Hat Pattern For Warm Weather
Keep your little one cool and protected with this Crochet Baby Sun Hat, a breathable and stylish accessory perfect for sunny days outdoors.
As warm sunlight filters through the trees on a gentle summer afternoon, protecting a baby’s delicate skin becomes a top priority for caregivers. A lightweight Crochet Baby Sun Hat Pattern offers more than just shade, it becomes a sweet, practical accessory that ensures comfort and safety during outdoor adventures. Soft yet sturdy, this baby sun hat gently shields tiny faces from harsh rays while allowing breathability and freedom of movement.
Sweet Crochet Baby Sun Hat Pattern for Summer Joy
Made with gentle yarn, the hat provides a cozy fit that stays comfortably in place without irritating sensitive skin. Its wide brim offers ample protection against sun exposure, helping to guard against sunburn and overheating. The breathable crochet stitches allow airflow, keeping little heads cool even on the hottest days. Beyond its protective qualities, the hat’s charming texture and subtle detailing add a touch of style that complements any summer outfit.
Perfect for trips to the park, beach days, or everyday strolls, this Crochet Baby Sun Hat Pattern is as functional as it is adorable. Lightweight and easy to wash, it quickly becomes an essential item in every baby’s wardrobe. Offering gentle protection and sweet style, this sun hat encourages outdoor exploration with confidence and care.
1. Materials Needed
- Double Knit Weight Yarn (Weight 3)
- Crochet Hook (Choose based on the desired size):
- 3 mm hook = 0-6 months
- 3.5 mm hook = 6-12 months
- 4 mm hook = 1-3 years
- Blunt Needle or Regular Needle (for weaving ends)
- Scissors
- Optional: Multiple yarn colors for decorative bands.

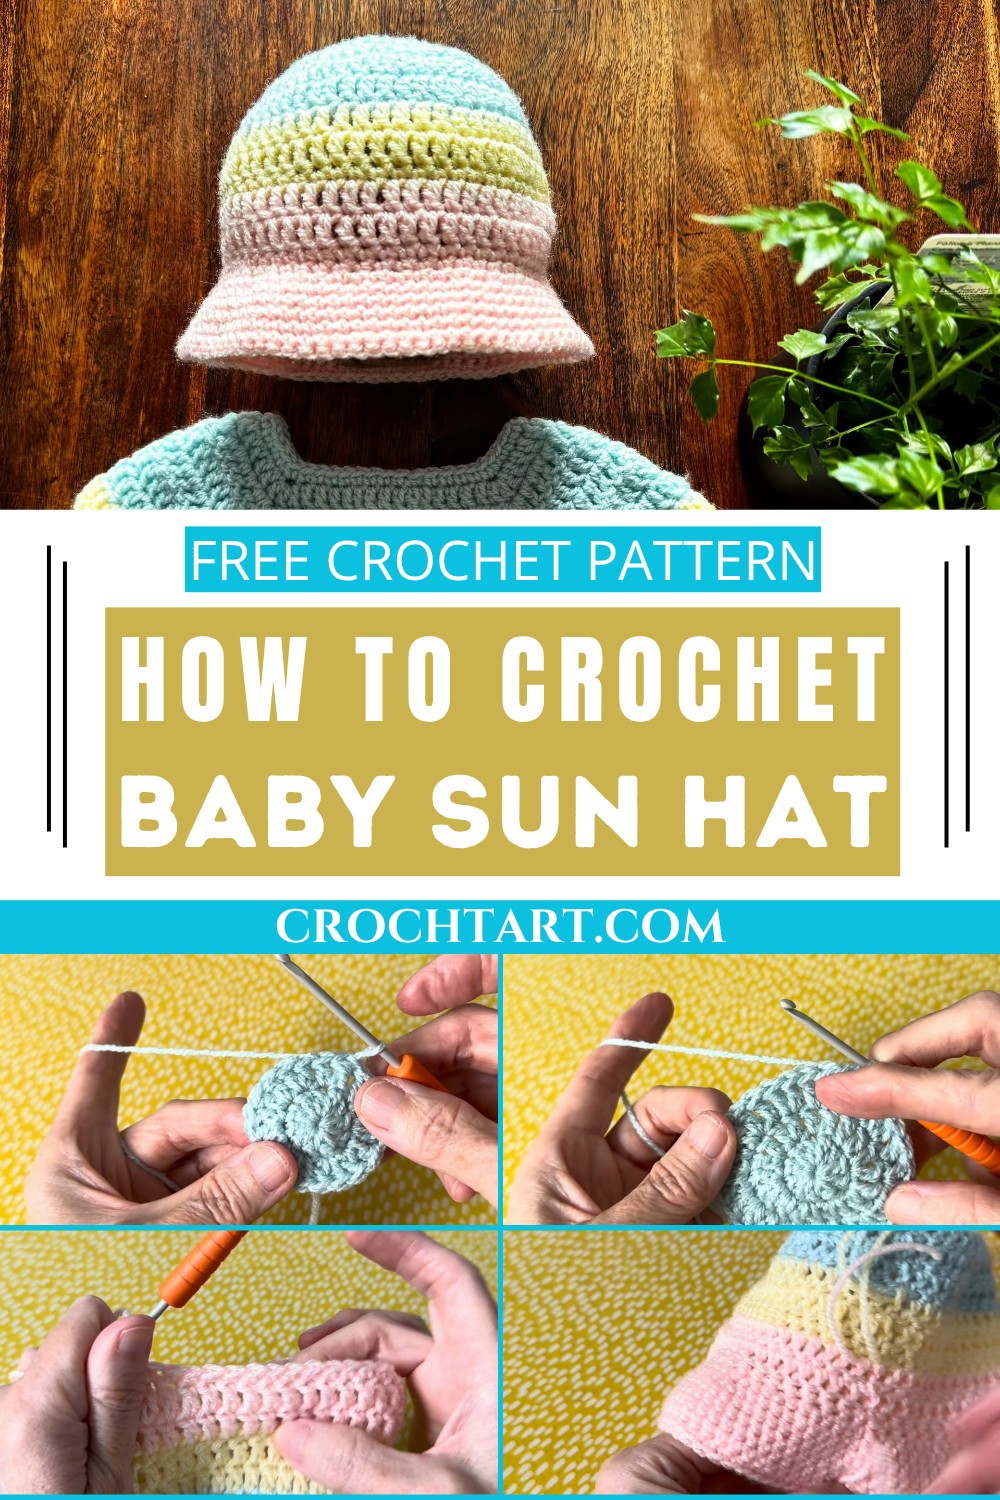
2. Making the Hat Base
Round 1: Slip Knot and Foundation
- Begin with a slip knot, ensuring the tail tightens and the working yarn loosens.
- Chain 3, then create 10 double crochets into the first chain.
- Pull the tail to tighten the center.
- Join the round with a slip stitch into the top of the first stitch.

Round 2: Start Increasing
- Use a chainless start or chain 2 as preferred.
- Work 2 double crochets into every stitch around, doubling the stitch count to 20.
Round 3: Increasing Pattern
- Alternate between adding 2 double crochets into one stitch and 1 double crochet into the next. This rounds off to 30 stitches.

Round 4: Creating the Crown
- Change the pattern to 2 double crochets into one stitch, followed by 1 double crochet in the next two stitches. The total stitch count increases proportionally.
Round 5: Final Increase for Crown
- Work the pattern 2 double crochets followed by 1 double crochet in the next three stitches until the stitch count reaches 50.
3. Adding Decorative Bands
Round 6: Base Color
- Work one double crochet into each stitch with no increases for this round (50 stitches).

Color Changing & Band Design
- Switch to a second yarn color.
- Create two rounds of double crochet, and then one round of single crochet in this new color.
- Change to a third color, repeating the same pattern (2 rounds of double crochet, 1 round of single crochet).

4. Creating the Brim
Increasing for the Brim
- For the first round of the brim, follow the pattern of 1 single crochet into one stitch followed by 2 single crochets in the next.

- Adjust the number of increases based on the desired hat width. Fewer increases will result in a firmer brim (bucket-style hat), while more increases will make the brim floppy.

Final Four Rounds
- Crochet four rounds of single crochet evenly with no further increases. This ensures that the brim maintains its shape and consistency.
5. Finishing Touches
- For the final row, turn your work and crochet in the opposite direction to create a textured edging. Alternatively, you can finish the edge as usual if preferred.
- Weave in the loose ends using a blunt or sharp needle, splitting the yarn to secure the ends better.

Special Features of the Hat
- Adjustable Sizing: Different hook sizes allow you to create hats for various age groups.
- Decorative Customization: Colored bands let you personalize the hat for a unique and playful look.
- Practical Design: Includes a sturdy brim that protects from the sun while maintaining the hat’s shape.
Level of Difficulty
This project is beginner-friendly but also enjoyable for intermediate crocheters. The techniques involve basic stitches (slip knot, chain, single crochet, double crochet) and simple increases.
Tutor's Suggestions
- Stitch Count Maintenance: Always count stitches at the end of each round to ensure accuracy.
- Customization: Adjust brim width by modifying the number of increases, but beware of making the brim too floppy.
- Finishing Touch: Use a needle to split the yarn when weaving in ends, providing extra hold to prevent unraveling.
Uses for the Hat
- For Babies: A sun hat is perfect for protecting babies’ sensitive skin.
- Gifting: Handmade hats make thoughtful and personalized gifts.
- Craft Sales: These hats are stylish and easy to customize, making them ideal for crochet fairs or online stores.
Tip for Success
When working with multiple yarn colors, make sure to weave in or secure the tail from color changes properly. This avoids snagging or unraveling after prolonged use.
Conclusion
By following this pattern, you’ll create a charming and practical baby sun hat that’s perfect for all occasions. With flexibility in size, color options, and design features, this project is both creative and functional. Whether for a gift, a sale, or your own child, this hat is sure to bring comfort and smiles.