
Dreamy Crochet Bow Bag That Pairs with Any Outfit
Charm your look with this Crochet Bow Bag featuring a graceful shape and stylish flair that’s perfect for daily wear or standout moments.
Often, a functional accessory becomes a statement piece when infused with art and detail, and this crochet bow bag is no exception. With its refined design, intricate texture, and delightful versatility, it balances practicality and elegance effortlessly. Whether as an everyday accessory or a thoughtful, handmade gift, this bow bag combines charm with simplicity, making it suitable for a variety of occasions. The process, though thorough, ensures anyone with intermediate crochet skills can achieve beautiful results, thanks to the clearly outlined guidance in this project.
Minimal Crochet Bow Bag That’s Light Sweet and Stylish
Soft, durable cotton thread is used throughout, ensuring sturdiness without compromising grace. The project concludes by assembling the bow to the bag, finishing off clean edges, and attaching the straps. The final product is not only functional but also a statement of fine craftsmanship.
This design benefits from its straightforward approach where simplicity meets elegance. It’s a project well-suited for those seeking to advance their skills while having fun creating a delightful accessory. A helpful tip? Stay mindful of your tension, as consistency matters greatly in maintaining the visual appeal of the textured stitches. In the end, this crochet bow bag becomes more than an accessory—it becomes a reflection of your artistry, suitable for both casual outings and more refined settings.
Materials Needed
- Cotton Thread: Approximately 400 grams.
- Crochet Hook: 3.5 mm.
- Optional Tools: Scissors and a yarn needle for finishing touches.

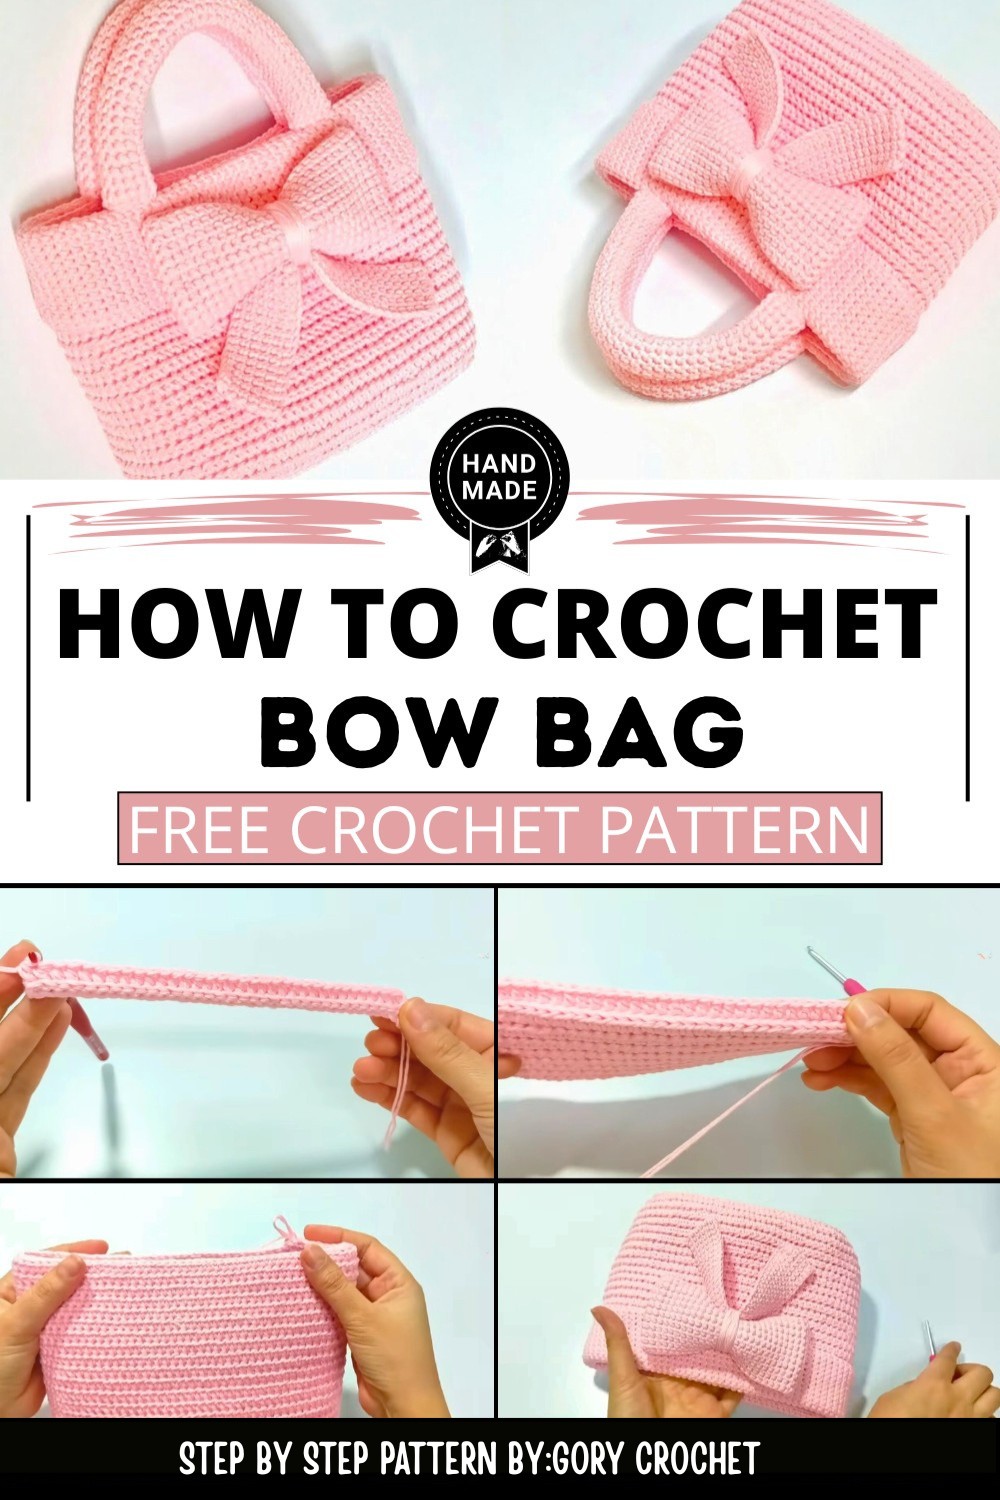
The process begins with a foundation of 34 chains, extending to a width of approximately 19 cm. This forms the base structure of the bag. The rows are worked in a combination of slip stitches and half double crochet (hdc) stitches, with careful attention to working in the back loops and on specific layers of yarn.

Such details add a graceful ridged texture. The tutor emphasizes consistency and advises crocheting 16 rows to ensure an ideal base height before commencing the body.


By the mid-stage, working in the round becomes the focus. The body is built row by row, following the same technique of back loop and half-column stitches, repeated up to 40 rows until the bag’s structure reaches its complete form, measuring 16 cm in height.


A standout feature of this project is the bow accent. The bow is crafted separately in two parts, consisting of 6 cm and 3.5 cm dimensions for the base and ribbon, respectively. This detail brings a bespoke aesthetic and adds a touch of whimsy to the finished bag.

Special Features of the Bag
- Textured Finish: The bag utilizes back loop stitches for a unique design and intricate texture.
- Structured Design: The body of the bag is worked seamlessly, resulting in a sleek and professional appearance.
- Bow Accent: Custom-made crochet bows add a distinctive charm to the final piece.
- Durability: Made with 400 grams of cotton thread, the bag has a sturdy and durable design.
Tutor’s Suggestions
- Use the back loop technique consistently to achieve a rich, textured look.
- Be mindful of stitch counts to maintain consistent dimensions in the base, body, and accessories.
- Add stitch markers for clarity while working on repetitive rows, especially in the body section.
Uses
- Everyday Bag: Lightweight yet durable, perfect for casual outings or errands.
- Gift Idea: A stylish and handmade gift for friends or family.
- Customizable Accessory: Personalize the size, color, or add extra elements like pockets.
Level of Difficulty
- Intermediate: While the techniques are straightforward (slip stitch, hdc, etc.), precision and consistency are needed for the structured appearance.
- Beginners with basic crochet skills can also attempt this, but it may require more patience.
Final Touches
- Once all stitches and elements are complete, weave in any loose threads using a yarn needle.
- The bag is ready to use with its seamless design and decorative finishes.
Tip
To avoid your edges becoming uneven, use a stitch marker to note the first stitch of each row. This will ensure that your rows align perfectly as you work the bag’s body.
Conclusion
This crochet bag tutorial is a wonderful project for anyone looking to crochet a practical yet decorative accessory. Incorporating basic and advanced techniques creates a well-structured and beautiful result. With clear guidance and a little time, you’ll create a personalized handmade bag you can proudly carry or gift.