

Adorable Free Bunny Amigurumi Pattern To Melt Your Heart
Hop into creativity with this adorable Free Crochet Bunny Amigurumi Pattern that’s for gifting, home decor, or making a cuddly companion everyone will adore.

Easy Free Bunny Amigurumi Crochet Pattern to Try
There is something special about holding a soft, handmade bunny that feels like it carries warmth and kindness. This crochet bunny amigurumi is a delightful piece, full of charm with its cute floppy ears, tiny paws, and gentle round nose. Its sweet and cuddly appearance makes it an instant favorite, perfect for decorating a cozy corner, being gifted to someone dear, or becoming a little one’s cherished companion.
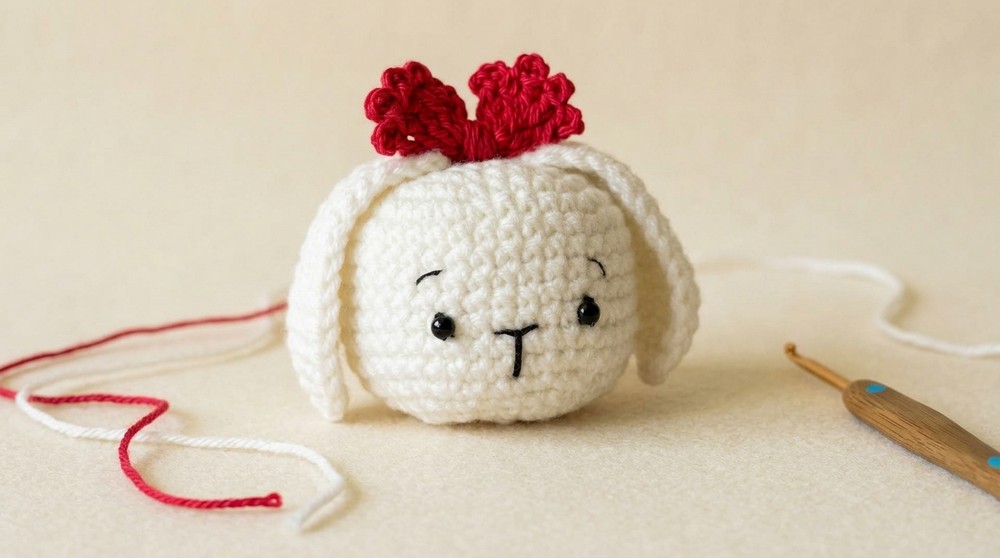
The lovely details in its design give it a heartwarming look, making it stand out wherever it is placed. This bunny amigurumi carries a comforting presence, serving as a unique keepsake or a playful toy that sparks happiness. Its inviting shape and adorable features radiate simplicity and beauty, effortlessly making it a treasured part of any home or memory. It’s no surprise that this little bunny inspires love and joy wherever it is.
Finished Size
The size of the bunny will vary depending on the yarn and hook you use. Using milk cotton yarn and a 3mm hook, the bunny will be small enough to serve as a keychain.
Materials
- Yarn:
- Milk cotton yarn or any medium-weight yarn (sport-weight or DK preferred).
Suggested Colors: White/cream for the bunny and optional colors for accessories.
- Milk cotton yarn or any medium-weight yarn (sport-weight or DK preferred).
- Hook:
- 3mm crochet hook or appropriate size for your yarn.
- Polyester Stuffing: For filling the bunny’s head.
- Tapestry Needle: For sewing pieces together and weaving in ends.
- Stitch Markers: To mark the start of each round.
- Scissors: For cutting yarn.
- Safety Eyes: Suitable size for the bunny (e.g., 6mm or 8mm).
- Embroidery Thread: For sewing the nose and adding facial features.
- Optional: Small bow or other decorations for added charm.
Key Abbreviations (US Terminology)
- MR = Magic Ring
- Ch = Chain
- Sl St = Slip Stitch
- SC = Single Crochet
- HDC = Half Double Crochet
- DC = Double Crochet
- Inc = Increase (2 SC in the same stitch)
- Dec = Decrease (Crochet 2 stitches together)
- St/Sts = Stitch/Stitches
Special Techniques
- Magic Ring (MR):
A tightened loop used as the foundation to start crocheting in the round. - Invisible Decrease (Dec):
Use the front loops only of two consecutive stitches to create a less noticeable decrease.
Pattern Instructions
Part 1: Bunny Head
Round 1: Magic Ring
- Start with a Magic Ring (MR).
- Work 6 SC into the ring.
- Pull the tail of the MR to close tightly.
- Join with a Sl St to the first SC.
- Total: 6 SC.

- Total: 6 SC.
Round 2
- Ch 1.
- Increase in every stitch: Work 2 SC in each stitch around.
- Total: 12 SC.
- Sl St to the first SC to join.
Round 3
- Ch 1.
- Pattern: Work 1 SC in the first stitch, Inc in the next.
- Repeat: [1 SC, Inc] around.
- Total: 18 SC.
- Sl St to join.

Round 4
- Ch 1.
- Pattern: Work 1 SC in each of the next 2 stitches, Inc in the following stitch.
- Repeat: [1 SC, 1 SC, Inc] around.
- Total: 24 SC.
- Sl St to join.
Round 5
- Ch 1.
- Pattern: Work 1 SC in each of the next 3 stitches, Inc in the next stitch.
- Repeat: [1 SC, 1 SC, 1 SC, Inc] around.
- Total: 30 SC.
- Sl St to join.
Round 6
- Ch 1.
- Pattern: Work 1 SC in each of the next 4 stitches, Inc in the next stitch.
- Repeat: [1 SC, 1 SC, 1 SC, 1 SC, Inc] around.
- Total: 36 SC.
- Sl St to join.
Rounds 7-10: No Increases
- Ch 1 at the beginning of each round.
- Work 1 SC in each stitch around.
- Total: 36 SC per round.
- Sl St to join after each round.

Round 11 (Decrease Begins)
- Ch 1.
- Pattern: Work 1 SC in each of the next 5 stitches, Dec (front loops only) in the next.
- Repeat: [1 SC, 1 SC, 1 SC, 1 SC, 1 SC, Dec] around.
- Total: 30 SC.
- Sl St to join.
Rounds 12-13
- Work 1 SC in each stitch around.
- Total: 30 SC per round.
- Sl St to join at the end of each round.

Round 14
- Ch 1.
- Pattern: Work 1 SC in each of the next 4 stitches, then Dec.
- Repeat: [1 SC, 1 SC, 1 SC, 1 SC, Dec] around.
- Total: 24 SC.
- Sl St to join.
Round 15
- Ch 1.
- Pattern: Work 1 SC in each of the next 3 stitches, then Dec.
- Repeat: [1 SC, 1 SC, 1 SC, Dec] around.
- Total: 18 SC.
- Sl St to join.
Round 16
- Ch 1.
- Pattern: Work 1 SC in each of the next 2 stitches, then Dec.
- Repeat: [1 SC, 1 SC, Dec] around.
- Total: 12 SC.
- Sl St to join.
Round 17 (Final Round)
- Work decreases all around: Dec in each pair of stitches.
- Total: 6 SC.
Stuff and Close
- Stuff the head firmly with polyester stuffing.
- Sew the opening closed: Insert the needle through the front loops of the remaining 6 stitches, pull tight, and weave in the end.

Part 2: Long Ears
- Chain 15.
- Skip the first chain, and work the following pattern:
- 4 SC
- 3 HDC
- 4 DC
- 3 HDC
- 1 SC
- Work along the opposite side of the foundation chain using the same pattern.
- Mirror the stitches for symmetry.

- Mirror the stitches for symmetry.
- Finish with 2 Sl St at the base.
- Fasten off with a tail for sewing.
- Repeat for the second ear.
Part 3: Assembly
- Attach Ears: Sew the ears securely to the sides of the bunny head.
- Facial Details: Add safety eyes after the 10th round, embroider a small triangle nose, and add optional whiskers.

- Stuffing: Ensure the head is fully stuffed for a rounded shape.
Part 4: Final Touch
- Add a small bow or accessory between the ears for a finishing touch.
- For keychain use, add a keyring loop through the top of the head.

Final Words and Finishing Tips
Congratulations on finishing your long ear bunny keychain! This project is a delightful way to use up yarn scraps and makes a wonderful gift or craft fair item.
Tips for Success:
- Maintain Tight Tension: This prevents gaps in the fabric through which stuffing might show.
- Use Stitch Markers: Mark the start of each round to avoid losing your place.
- Custom Eyes and Accessories: Experiment with different safety eyes or bows to personalize each bunny.


