Free Crochet Bear & Kitty Glasses Holder Pattern To Keep You Smiling
Snag this cute Free Crochet Bear & Kitty Glasses Holder Pattern and let these playful pals guard your glasses while adding a sprinkle of joy to your space.

Fun Free Crochet Glasses Holder Bear and Kitty Pattern for Every Table
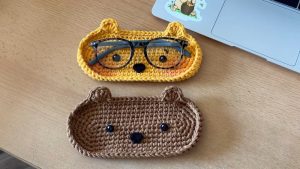
A cute and functional companion is all you need to keep your glasses safe and within reach. This Free Crochet Bear & Kitty Glasses Holder Pattern offers a charming way to organize your eyewear. The bear features an adorable, soft face with tiny ears, while the kitty stands out with playful whiskers and a sweet expression.

Its practical design ensures your glasses stay protected from scratches, making it a perfect addition to your bedside table, work desk, or any cozy corner of your home. Not only does it serve as a convenient holder, but it also doubles as a delightful décor piece that sparks joy every time you see it. Personalize it in your favorite colors to match any room or gift it to someone special. This project is ideal for turning an everyday essential into something fun, friendly, and functional.
Materials Needed
Yarn:
- Main yarn for coasters: Any medium-weight (size 4) yarn.
- Bear: Brown or your chosen color for the body.
- Hello Kitty: White for the body, pink for the bow.
- Additional yarn for details: Preferably black, pink, and yellow for details like eyes, nose, and whiskers. You can substitute felt for facial features if preferred.
Crochet Hooks:
- 6 mm hook: For crocheting the round coasters (two strands of yarn together).
- 4 mm hook: For crocheting smaller details (e.g. bear’s nose, bow, and single-strand projects).
Other Supplies:
- Scissors: For trimming yarn and felt.
- Stitch markers: To mark the start of rounds.
- Darning/Weaving Needle: For sewing in ends.
- Optional Eyes (10 mm): Flat-backed or safety eyes if you choose not to crochet facial details.
- Glue: For securing felt features or fastening ends if needed.
- Felt: For Hello Kitty’s eyes, nose, whiskers.
Special Techniques
- Magic Ring (Optional, for those comfortable):
- Use the magic ring to start perfectly circular coasters. Alternatively, begin with a chain loop.
- Increasing in Round Crochet:
- Increases are made when working two single crochet stitches into one stitch (noted as “increase stitch”). This ensures that your coaster lies flat and doesn’t curl.
- Triple Crochet Stitches:
- Triple crochets are longer stitches that add height, commonly used here for ears and bows.
- Surface Crocheting:
- To create smooth edges and precise details, single crochet evenly around edges.
Bear/Hello Kitty Coaster Pattern
Step 1: Base Circle for the Coaster
The base is the same for both the bear and Hello Kitty coasters.
- Round 1 (Foundation Chain):
- Start with a slip knot. Using the 6 mm crochet hook and two strands of yarn together, chain 17 (approximately 4.5 inches long).
- Round 1 (First Round):
- Skip the first chain and, in the second chain from hook, make 2 single crochets (sc) (increase stitch).
- Make 1 single crochet in each of the next 14 chains.
- In the last chain, make 3 single crochets (to curve around to the other side of the chain).
Rotate to the other side of the chain:

- Crochet along the opposite edge. Make 1 single crochet into the next 14 stitches.
- Finish with 1 single crochet in the final stitch.
Slip stitch into the first stitch of the round to close and start forming the base circle.
(Tip: Place a stitch marker at the beginning of the first stitch in each round.) - Round 2:
- Chain 1, mark it with your stitch marker.
- Make 2 increases (2 single crochets in the next two stitches).
- Make 14 single crochets (1 single crochet in each of the next 14 stitches).

- Then, make 3 increases (two single crochets in each of the next three stitches).
- Make 14 single crochets, and 1 increase (in the last stitch).
- Slip stitch to close.
- Round 3:
- Chain 1, and continue increasing:
- Alternate 1 single crochet and 1 increase for the first two sets of stitches.
- Make 14 single crochets, then alternate the increase pattern again for the next three stitches.
- Complete the round with 14 single crochets and an increase before finishing the round with a slip stitch.
- Round 4-6:
- Follow a pattern of adding regular increases as required (e.g., round 4 is [2 sc, 1 increase], round 5 is [3 sc, 1 increase]), to ensure the coaster grows into a flat circle. By Round 6, stop increasing.
- Round 7 (Final Round Before Ears):
- In this round, crochet evenly with 1 single crochet in each stitch. Slip stitch to finish the coaster base.

- In this round, crochet evenly with 1 single crochet in each stitch. Slip stitch to finish the coaster base.
Bear Ears
- Locate a position for the first ear (typically aligned with the top of the circle).
- Begin with a double crochet into the stitch.
- Make 3 triple crochets in the same stitch, followed by a final double crochet in the same space. This forms the curve of the ear.
- Skip 12 stitches and repeat the ear pattern on the opposite side for the second ear.
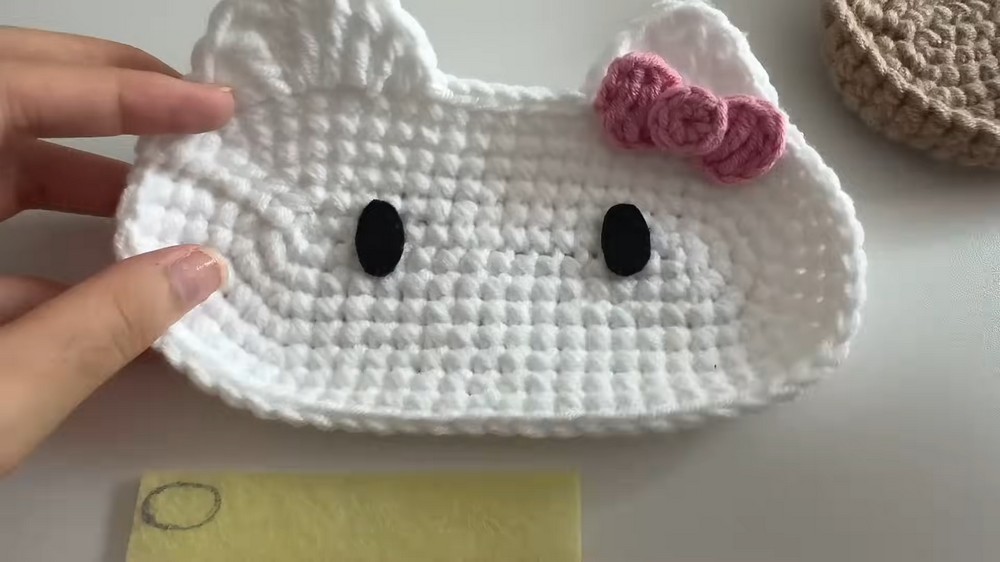
Hello Kitty Ears
- Start with a double crochet in the chosen ear position.
- Add 1 triple crochet, followed by 1 chain, and another triple crochet all in the same stitch.
- Chain 1 and finish with a final triple crochet and double crochet in the same space.
- Skip 12 stitches and repeat the ear pattern on the opposite side. Tip: Tug lightly on the middle triple crochet to create a pointed effect.

Facial Details Using Felt (Hello Kitty)
- Cut black felt ovals for eyes, yellow felt circle for the nose, and thin black felt strips for the whiskers.
- Secure the pieces using fabric glue or sew them into place for added durability.
- For the bear, use plastic safety eyes and a small crocheted oval for the nose.
Bow (Hello Kitty)
- Using pink yarn (4 mm hook), start with a slip knot. Chain 10.
- Skip the first three chains, and triple crochet into the next seven chains.
- Chain 3, slip stitch into the base.
- Wrap the excess yarn around the bow’s center for 5–6 wraps, shaping the bow.
- Secure by tying off and sewing or gluing it onto the ear.
Bear Nose
- Using brown yarn (4 mm hook), start with a slip knot. Chain 3.
- Make 12 double crochets in the last chain from the hook to form an oval nose. Slip stitch to join.
- Glue or sew it in position on the bear coaster.
Finishing
- Weave in all loose ends using a darning needle.
- Use fabric glue or sew small embellishments securely.
- Block the coasters (optional) to ensure they’re flat and shaped well.
Final Words:
Congratulations on completing your adorable bear and Hello Kitty coasters! These coasters are versatile, practical, and a delight to make. Maintain these pieces by hand-washing them gently in cold water and air-drying them flat to retain their shape.
Tips for Success
- Use even tension throughout to ensure coasters lie flat.
- Adjust the yarn weight and hook size for variations in size.
- Felt adds a clean look but can be swapped for crocheted features for added texture.